Build An Elasticsearch Query GUI Application Using Kivy and Python (Part 2)
Introduction
This tutorial will explain how to build an Elasticsearch GUI App with Kivy in Python. Kivy is a cross-platform, free, open-source Python library used to develop mobile GUI Apps and other software applications with Python programming language. Kivy is compatible with Apple, Android, Linux and Windows operating systems.
The application will demonstrate the potential of the Elasticsearch GUI application by making a simple "match" query request to a localhost cluster. Please visit part 1 of this Kivy application series to see how to create the function for the application’s Elasticsearch queries.
Prerequisites to build an Elasticsearch GUI App with Kivy in Python.
The Elasticsearch and Kivy application and packages for Python must be properly installed and configured. Refer to part one of this two-part series for instructions on installing the Elasticsearch and Kivy applications and packages for Python.
Knowing how to execute the query API call to Elasticsearch in the Python script.
The final Kivy App will query the following example Elasticsearch document:
1 2 3 4 5 6 7 8 9 10 11 12 | { "_index" : "some_index", "_type" : "_doc", "_id" : "1234", "_score" : 1.0, "_source" : { "str field" : "ObjectRocket Articles", "int field" : 4321, "bool field" : true, "time field" : "2019-08-13T09:32:46.369591" } } |
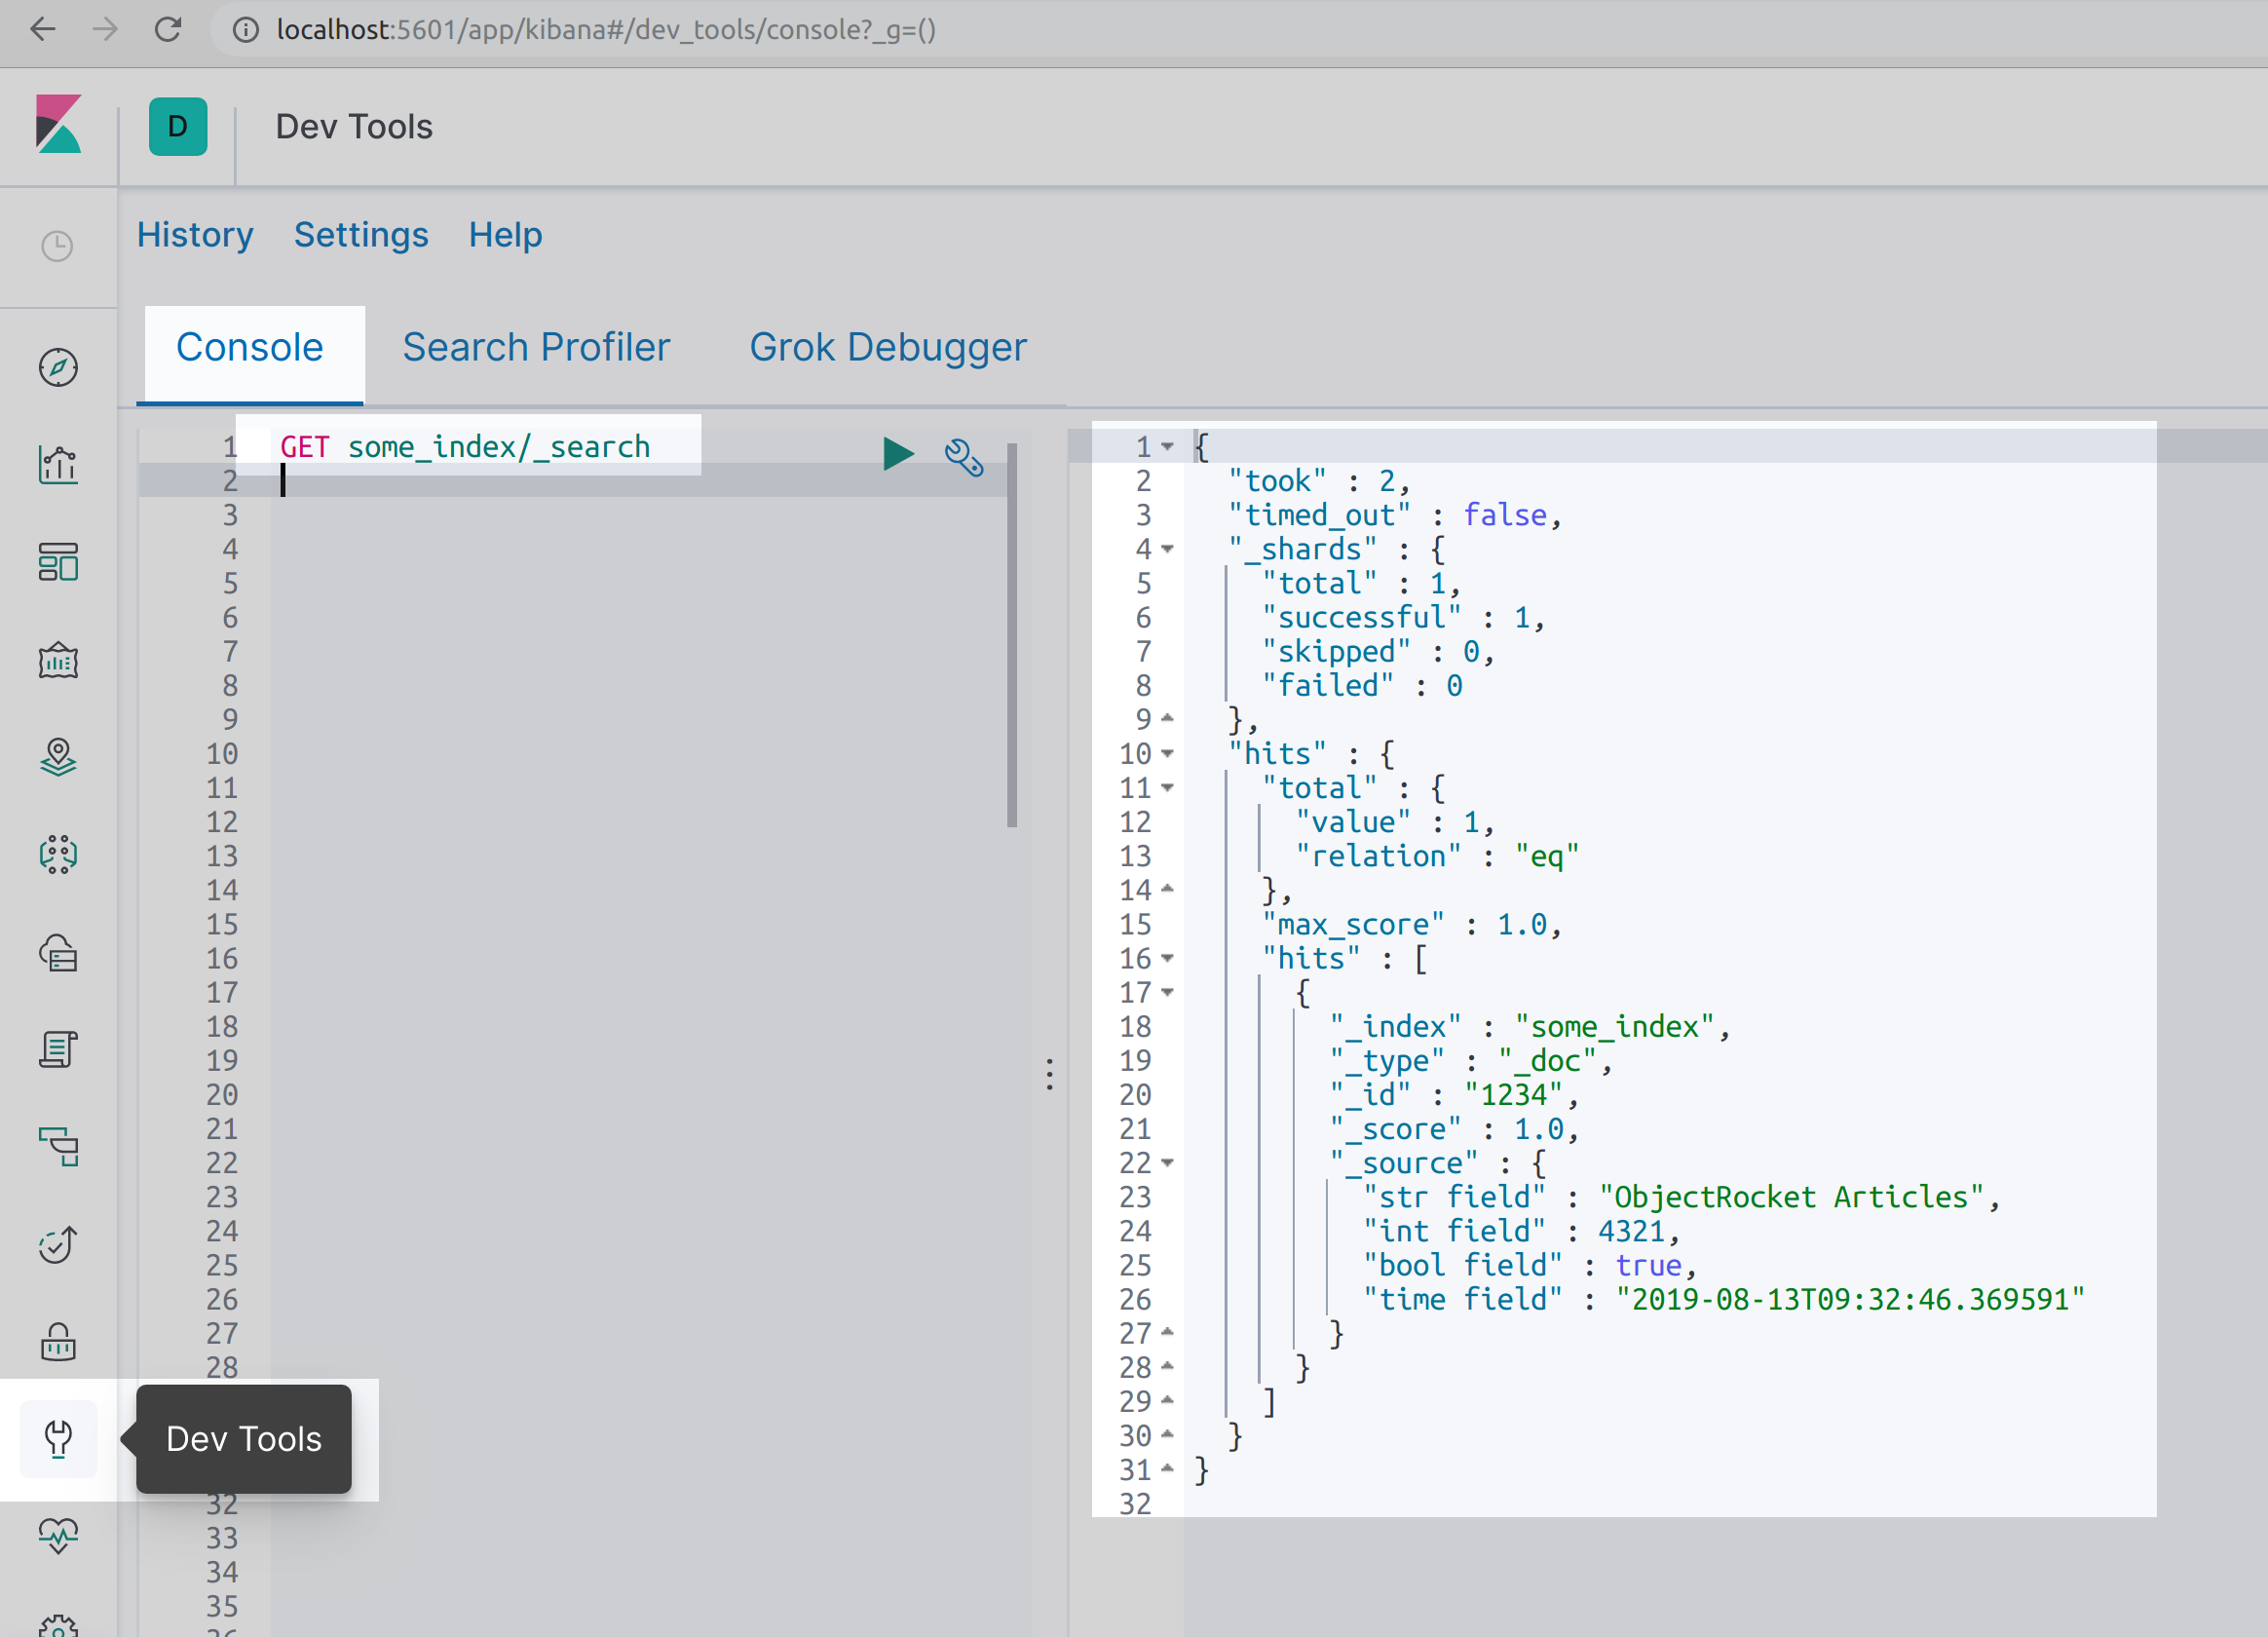
How to verify the Elasticsearch document using Kibana
Make the following GET request in Kibana, or with cURL, to verify there are documents in the Elasticsearch index that can be used to test the Kivy GUI application:
1 | GET some_index/_search |
The results should resemble the following.
How to execute a cURL request to obtain all the documents in an Elasticsearch index
To use the cURL library, instead Kibana, execute the following HTTP request in a command prompt or UNIX terminal window to retrive all of the documents in an index:
1 | curl -XGET "localhost:9200/some_index/_search?pretty=true" |
How to Declare a Class for the Kivy Application
This example application employs Kivy’s FloatLayout class to specify the relative location of each widget. Execute the following script to declare the inner application class for the Kivy App:
1 2 3 4 5 6 | # declare the class for the Kivy app class Elastic(FloatLayout): def __init__(self,**kwargs): # use Python's built-in super() function to get class attr super(Elastic, self).__init__(**kwargs) |
NOTE: There are several other layouts for Kivy, such as BoxLayout, RelativeLayout and PageLayout.
How to Create Kivy Widget Labels and Buttons for the Elasticsearch Query Functions
The float layout for the Kivy widgets uses the pos_hint dictionary attribute to specify a location for the widget relative to application window. The dictionary keys are y and y and take floats for their respective values.
How to use the Kivy widget’s ‘pos_hint’ attribute to set the element’s relative location
The following dictionary example will position the widget directly in the middle of the App:
1 | `{'x': 0.5, 'y': 0.5}` |
How to use the ‘size_hint’ attribute to set the relative size for the Kivy widget
Unlike the pos_hint attribute, the size_hint attribute must use a list [] or tuple () object for its value that must contain two floats that represent the relative size of app widget.
How to use Kivy’s add_widget( ) method to put the widget element into the app
The application class’s add_widget() method will insert widgets into the GUI application after the widgets have been instantiated.
How to create a Kivy label widget for the Elasticsearch app title
The following script creates a widget for the Label() object at the top of the application:
1 2 3 4 5 6 7 8 9 | # Button field to initiate the query to Elasticsearch label_pos = {'x': 0.05, 'y': 0.92} self.title_label = Label( text = "ObjectRocket Elasticsearch Query App", size_hint = (0.9, 0.07), pos_hint = label_pos, font_size ='36sp' ) self.add_widget(self.title_label) |
How to create a TextInput Kivy widget for the Elasticsearch index name
The followinhg script executes the TextInput() object instance containing the text value for the Elasticsearch index name that is input by the user:
1 2 3 4 5 6 7 8 9 | # TextInput field for the Elasticsearch index name input_pos = {'x': 0.05, 'y': 0.87} self.index_input = TextInput( text = "Index Name", size_hint = (0.9, 0.05), pos_hint = input_pos, font_size ='38sp' ) self.add_widget(self.index_input) |
How to declare a Kivy Button to initiate the search API query to Elasticsearch
The following script creates the button widget the user will press after the query parameters have been passed by the user:
1 2 3 4 5 6 7 8 9 10 | # Button field to initiate the query to Elasticsearch button_pos = {'x': 0.05, 'y': 0.75} self.query_button = Button( text = "Make Query Request", size_hint = (0.9, 0.1), pos_hint = button_pos, font_size ='36sp', on_press = self.update ) self.add_widget(self.query_button) |
How to create a TextInput widget for the Elasticsearch index field that can be queried
The user must input the index’s field that will be queried into the TextInput() widget. Note that this operation requires less than half of the application’s width, leaving room for the query field next to it.
Execute the following command:
1 2 3 4 5 6 7 8 9 | # TextInput field for the Elasticsearch query match input_pos = {'x': 0.05, 'y': 0.66} self.field_input = TextInput( text = "Field name here..", size_hint = (0.45, 0.07), pos_hint = input_pos, font_size ='38sp' ) self.add_widget(self.field_input) |
How to declare a TextInput widget for the query match
The query example used for this Kivy App uses a simple "query": "match" JSON query. This means the user text in this field will only return documents that perfectly match the field’s value.
Execute the following script to declare a TextInput widget for the query match:
1 2 3 4 5 6 7 8 | # Label field for the Elasticsearch query results self.query_results = Label( text = "", font_size ='32sp', # change the color of response font color = [105, 106, 188, 1], ) self.add_widget(self.query_results) |
How to create a label widget that will display the Elasticsearch query results
The following script will create a label used to display the JSON results of the Elasticsearch query, including errors, or state if the query did not return any documents:
1 2 3 4 5 6 7 8 | # Label field for the Elasticsearch query results self.query_results = Label( text = "", font_size ='32sp', # change the color of response font color = [105, 106, 188, 1], ) self.add_widget(self.query_results) |
How to define a method for the Kivy App class that will update the query results label
This nested method inside of the Kivy application class contains the filter-dictionary object for the query. Make sure to pass the text attributes from the field_input and query_input attributes to the filter’s "match" field.
Execute the following script:
1 2 3 4 5 6 7 8 9 10 | def update(self, val): # pass the field name and query args to filter dict filter = { 'query': { 'match': { self.field_input.text: self.query_input.text } } } |
How to check if the Elasticsearch index name exists on the cluster
Execute the following code to determine if the user has typed an index name into the application:
1 2 3 4 5 6 | # get the index name and put into a string variable index_name = self.index_input.text # make sure that the user has entered an index name if len(index_name) == 0 or index_name == "": json_resp = '{"error", "index name field cannot be empty"}' |
Note that the JSON response displayed by the application will produce an error warning if no indexed name is returned,
How to call the make_query() function if the user typed an Elasticsearch index name
Call the make_query() global function, declared in part one of this tutorial series, if there is an index name in the field. Execute the following command, making sure to pass the filter dictionary object and the index name to the function call:
1 2 3 4 5 6 7 8 9 10 | else: # pass the filter dict to the make_query() function resp = make_query(filter, index_name) json_resp = json.dumps(resp, indent=4) print ("Elasticsearch response:", resp) # change the label to match the Elasticsearch API response self.query_results.text = json_resp self.query_results.size_hint = (0.9, 0.4) self.query_results.pos_hint = {'x':0.01, 'y':0.10} |
Use Python’s built-in JSON library’s dumps() method to have it return an indented JSON string of the Elasticsearch cluster response to the API call.
How to Declare the Main Class for the Elasticsearch Kivy Application
Execute the following script to declare the Kivy class that will build and run the application:
1 2 3 4 5 6 7 8 | class ElasticApp(App): title = 'ObjectRocket Elasticsearch App' def build(self): return Elastic() if __name__ == "__main__": ElasticApp().run() |
How to save the Python script and run the Elasticsearch Kivy application
First, save the code
in the Python script using the .py file extension. Next, open a terminal window and run the Python script, or just double click on the script file in a folder in Windows, using the following python3 command:
1 | python3 main.py |
If there are no build errors, the App should immediately open and display the Kivy widgets, declared in the class above, as elements in the GUI application. A screenshot follows:

Now test the query API by typing an index and field name, as well as the query string, in their respective fields as shown here:
The JSON response returned by Elasticsearch, displayed in the Kivy App, will vary depending on the cluster’s index name, the document data in the index and the query call executed by the user.
Conclusion
This article is part two in the tutorial series explaining how to build an Elasticsearch GUI App with Kivy in Python. The tutorial specifically covered how to build a basic Kivy App that will make a simple "match" query request to an Elasticsearch cluster. The article explained how to declare the main class for the Elasticsearch Kivy class that will build and run the application, how to create Kivy widget labels and buttons, use the Kivy widget’s ‘pos_hint’ attribute to set the element’s relative location and how to use the ‘size_hint’ attribute to sets the relative size for the Kivy widget. Part two also covered how to use Kivy’s add_widget( ) method, how to create a Kivy label widget for the Elasticsearch app title and how to declare a Kivy button to initiate the search API query to Elasticsearch. Remember that if the app does not immediately open and display the Kivy widgets, there was an error somewhere in the build process.
Just the Code
Here is all of the Python code, from parts one and two, for the Elasticsearch query Kivy application:
1 2 3 4 5 6 7 8 9 10 11 12 13 14 15 16 17 18 19 20 21 22 23 24 25 26 27 28 29 30 31 32 33 34 35 36 37 38 39 40 41 42 43 44 45 46 47 48 49 50 51 52 53 54 55 56 57 58 59 60 61 62 63 64 65 66 67 68 69 70 71 72 73 74 75 76 77 78 79 80 81 82 83 84 85 86 87 88 89 90 91 92 93 94 95 96 97 98 99 100 101 102 103 104 105 106 107 108 109 110 111 112 113 114 115 116 117 118 119 120 121 122 123 124 125 126 127 128 129 130 131 132 133 134 135 136 137 138 139 140 141 142 143 144 145 146 147 148 149 150 151 152 153 154 155 156 157 158 159 160 161 162 163 164 165 166 | #!/usr/bin/env python3 #-*- coding: utf-8 -*- # import the JSON library to prettify the API response import json # import the Elasticsearch client library from elasticsearch import Elasticsearch # import the necessary UIX libraries for the Kivy app from kivy.app import App from kivy.uix.button import Button from kivy.uix.label import Label from kivy.uix.textinput import TextInput # import the FloatLayout library for UIX widget's location from kivy.uix.floatlayout import FloatLayout # import the Config library to set window size from kivy.config import Config # create a client instance of Elasticsearch client = Elasticsearch("http://localhost:9200") # set the app's window size with Config Config.set('graphics', 'width', '1024') Config.set('graphics', 'height', '1536') # define a function for the Elasticsearch query API call def make_query(filter, index_name): # make an API call to check if the index exists index_exists = client.indices.exists(index=index_name) # if it exists then make the API call if index_exists == True: print ("index_name:", index_name, "exists.") print ("FILTER:", filter, "\n") # catch any exceptions and return them to Kivy app try: # pass filter query to the client's search() method response = client.search(index=index_name, body=filter) # print the query response for debugging purposes print ('response["hits"]:', len(response["hits"])) print ('response TYPE:', type(response)) except Exception as err: print ("search() index ERROR", err) response = {"error": str(err)} # error text response if index doesn't exist else: # build a string for the index-does-not-exist response resp_text = "Elasticsearch index name '" + str(index_name) resp_text += "' does not exist." response = {"response": resp_text} # return the dict response to Kivy app return response # declare the class for the Kivy app class Elastic(FloatLayout): def __init__(self,**kwargs): #global es # use Python's built-in super() function to get class attr super(Elastic, self).__init__(**kwargs) # Button field to initiate the query to Elasticsearch label_pos = {'x': 0.05, 'y': 0.92} self.title_label = Label( text = "ObjectRocket Elasticsearch Query App", size_hint = (0.9, 0.07), pos_hint = label_pos, font_size ='36sp' ) self.add_widget(self.title_label) # TextInput field for the Elasticsearch index name input_pos = {'x': 0.05, 'y': 0.87} self.index_input = TextInput( text = "Index Name", size_hint = (0.9, 0.05), pos_hint = input_pos, font_size ='38sp' ) self.add_widget(self.index_input) # Button field to initiate the query to Elasticsearch button_pos = {'x': 0.05, 'y': 0.75} self.query_button = Button( text = "Make Query Request", size_hint = (0.9, 0.1), pos_hint = button_pos, font_size ='36sp', on_press = self.update ) self.add_widget(self.query_button) # TextInput field for the Elasticsearch query match input_pos = {'x': 0.05, 'y': 0.66} self.field_input = TextInput( text = "Field name here..", size_hint = (0.45, 0.07), pos_hint = input_pos, font_size ='38sp' ) self.add_widget(self.field_input) # TextInput field for the Elasticsearch query match input_pos = {'x': 0.50, 'y': 0.66} self.query_input = TextInput( text = "Query match here..", size_hint = (0.45, 0.07), pos_hint = input_pos, font_size ='38sp' ) self.add_widget(self.query_input) # Label field for the Elasticsearch query results self.query_results = Label( text = "", font_size ='32sp', # change the color of response font color = [105, 106, 188, 1], ) self.add_widget(self.query_results) def update(self, val): # pass the field name and query args to filter dict filter = { 'query': { 'match': { self.field_input.text: self.query_input.text } } } # get the index name and put into a string variable index_name = self.index_input.text # make sure that the user has entered an index name if len(index_name) == 0 or index_name == "": json_resp = '{"error", "index name field cannot be empty"}' else: # pass the filter dict to the make_query() function resp = make_query(filter, index_name) json_resp = json.dumps(resp, indent=4) print ("Elasticsearch response:", resp) # change the label to match the Elasticsearch API response self.query_results.text = json_resp self.query_results.size_hint = (0.9, 0.4) self.query_results.pos_hint = {'x':0.01, 'y':0.10} class ElasticApp(App): title = 'ObjectRocket Elasticsearch App' def build(self): return Elastic() if __name__ == "__main__": ElasticApp().run() |

Pilot the ObjectRocket Platform Free!
Try Fully-Managed CockroachDB, Elasticsearch, MongoDB, PostgreSQL (Beta) or Redis.
Get Started