Elasticsearch Dockerfile Example
Introduction
Docker containers offer a simple way to create and package your apps in their own environment. If you’re interested in starting a Docker container running Elasticsearch, the process is actually quite simple. In this article, we’ll show you how to create an image and spin up an Elasticsearch Docker container using Dockerfile.
Prerequisites
Before proceeding with the steps outlined in this tutorial, there’s one key prerequisite that you’ll need to have in place: You’ll need a stable and supported version of Docker in order to create an Elasticsearch image using Dockerfile.
Install Docker on your dev machine
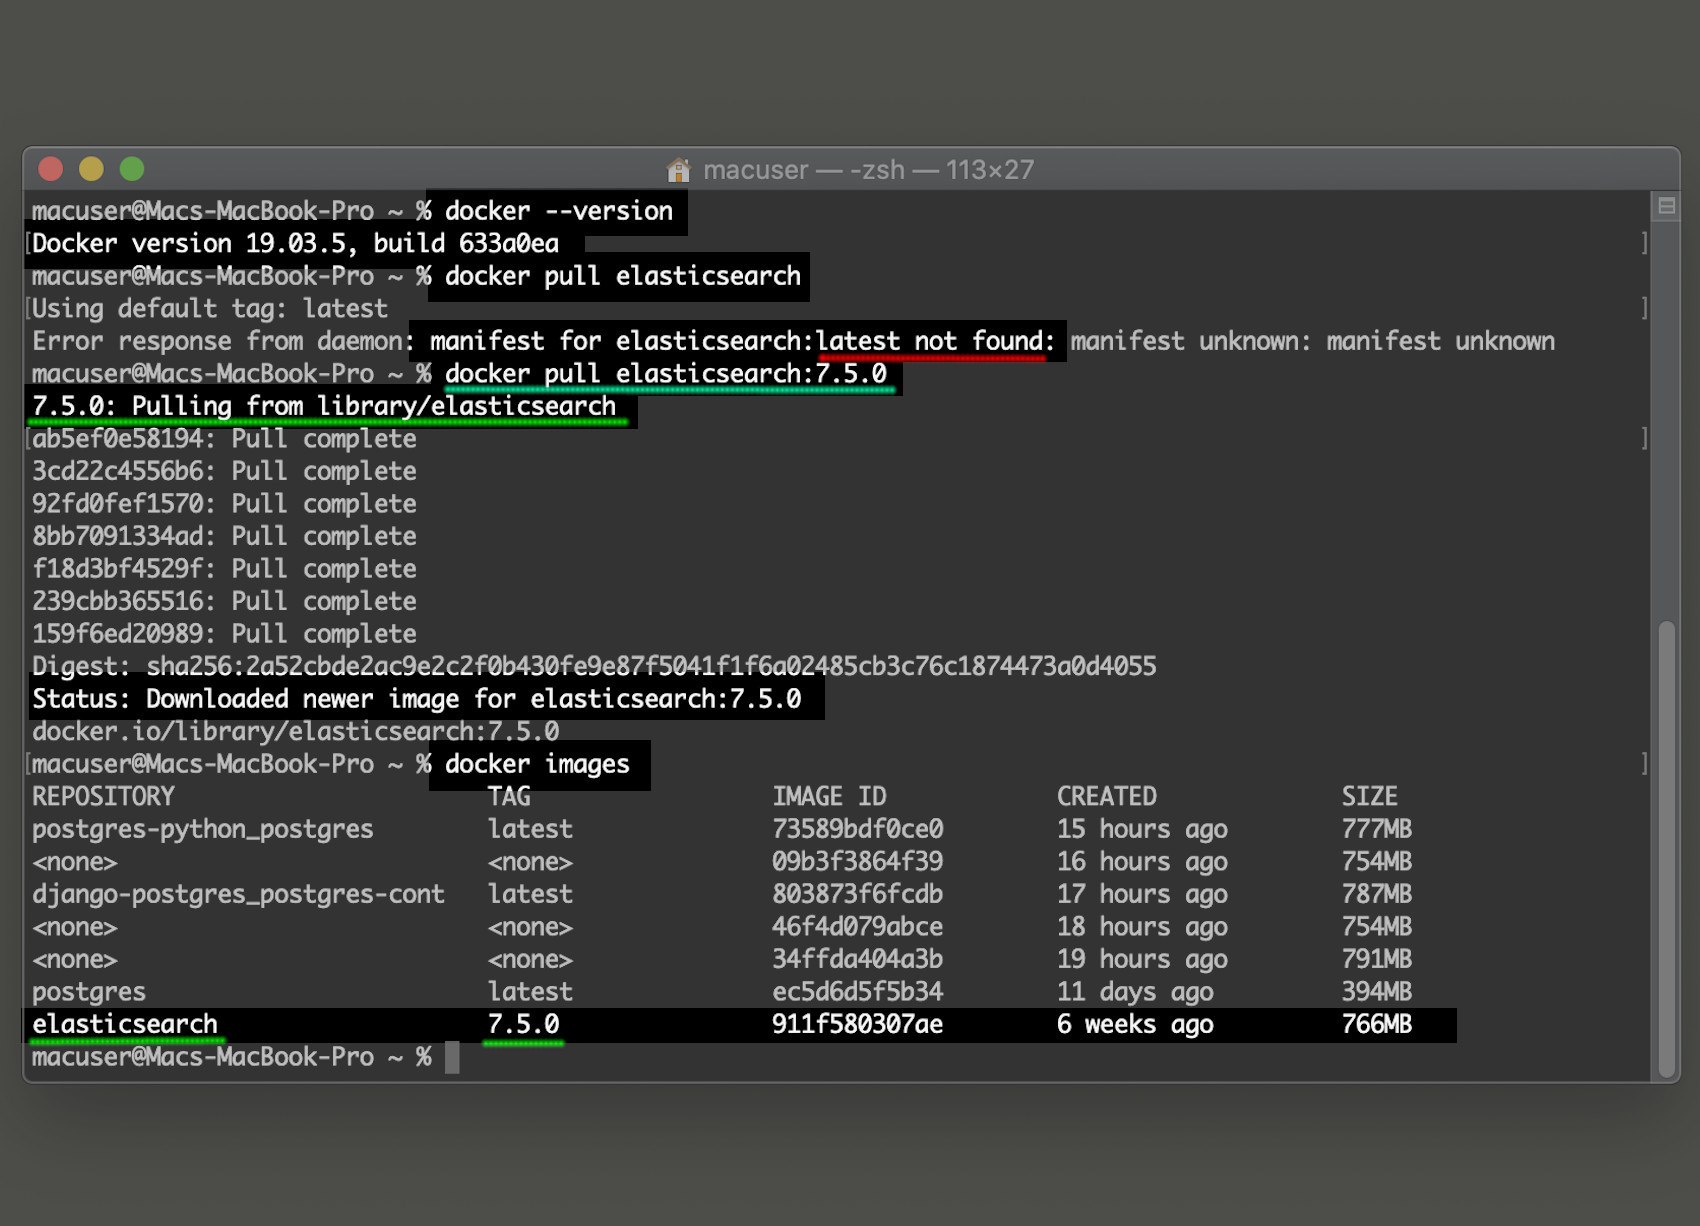
Let’s begin by making sure that the Docker Engine is installed. To check your Docker Engine version, use the following command in a terminal or command prompt: docker --version.
Elasticsearch Docker image
You’ll need to pull a stable version of the Elasticsearch Docker image if you’re planning to spin up a container from Elastic.
Docker Hub Elasticsearch
Use the command shown below to pull the Elastic Team’s official Elasticsearch image:
1 | docker pull elasticsearch |
Be patient– it can take a few minutes to download the image.
Latest Elasticsearch not found error
You may get an error stating manifest unknown or latest not found when you try to pull the latest Elasticsearch image from Docker Hub.
To get around this, you can specify an image version. In the example below, we specify that we’d like to get v7.5 of Elasticsearch:
1 | docker pull elasticsearch:7.5.0 |
It’s a good idea to specify a precise image version anyways since it helps to keep your containers less prone to error.
Set up a Docker project directory
Next, let’s create a new directory using the mkdir command. This directory should be created in the same place where you’ll store the files for your Docker and Elasticsearch project. You can then change into the directory using the cd command:
1 | mkdir elasticsearch-docker && cd elasticsearch-docker |
You can use an IDE like Sublime, Atom or Visual Studio Code to create a new Dockerfile for your custom Elasticsearch image. Use the subl command for Sublime or the code command for Visual Studio Code:
Elasticsearch YAML file
If you want to configure the Elasticsearch image, you’ll need to modify an elasticsearch.yml file on your host machine. After that, you’ll need to use Dockerfile’s COPY command to copy the content of the file into the container.
When you’re working with Elasticsearch and Dockerfile, you can make a number of different configuration changes using YAML. The following YAML commands are show just some of the things you can modify for your Elasticsearch cluster running in Docker:
1 2 3 4 5 6 7 8 9 10 11 12 13 14 15 16 17 18 19 20 21 22 23 24 25 26 | # ---------------------------------- Cluster ----------------------------------- # # Use a descriptive name for your cluster: # cluster.name: "docker-objectrocket" # # ------------------------------------ Node ------------------------------------ # # Use a descriptive name for the node: # #node.name: node-1 # # Add custom attributes to the node: # #node.attr.rack: r1 # # ---------------------------------- Network ----------------------------------- # # Set the bind address to a specific IP (IPv4 or IPv6): # network.host: 123.456.789 # # Set a custom port for HTTP: # http.port: 9200 |
Elasticsearch Dockerfile
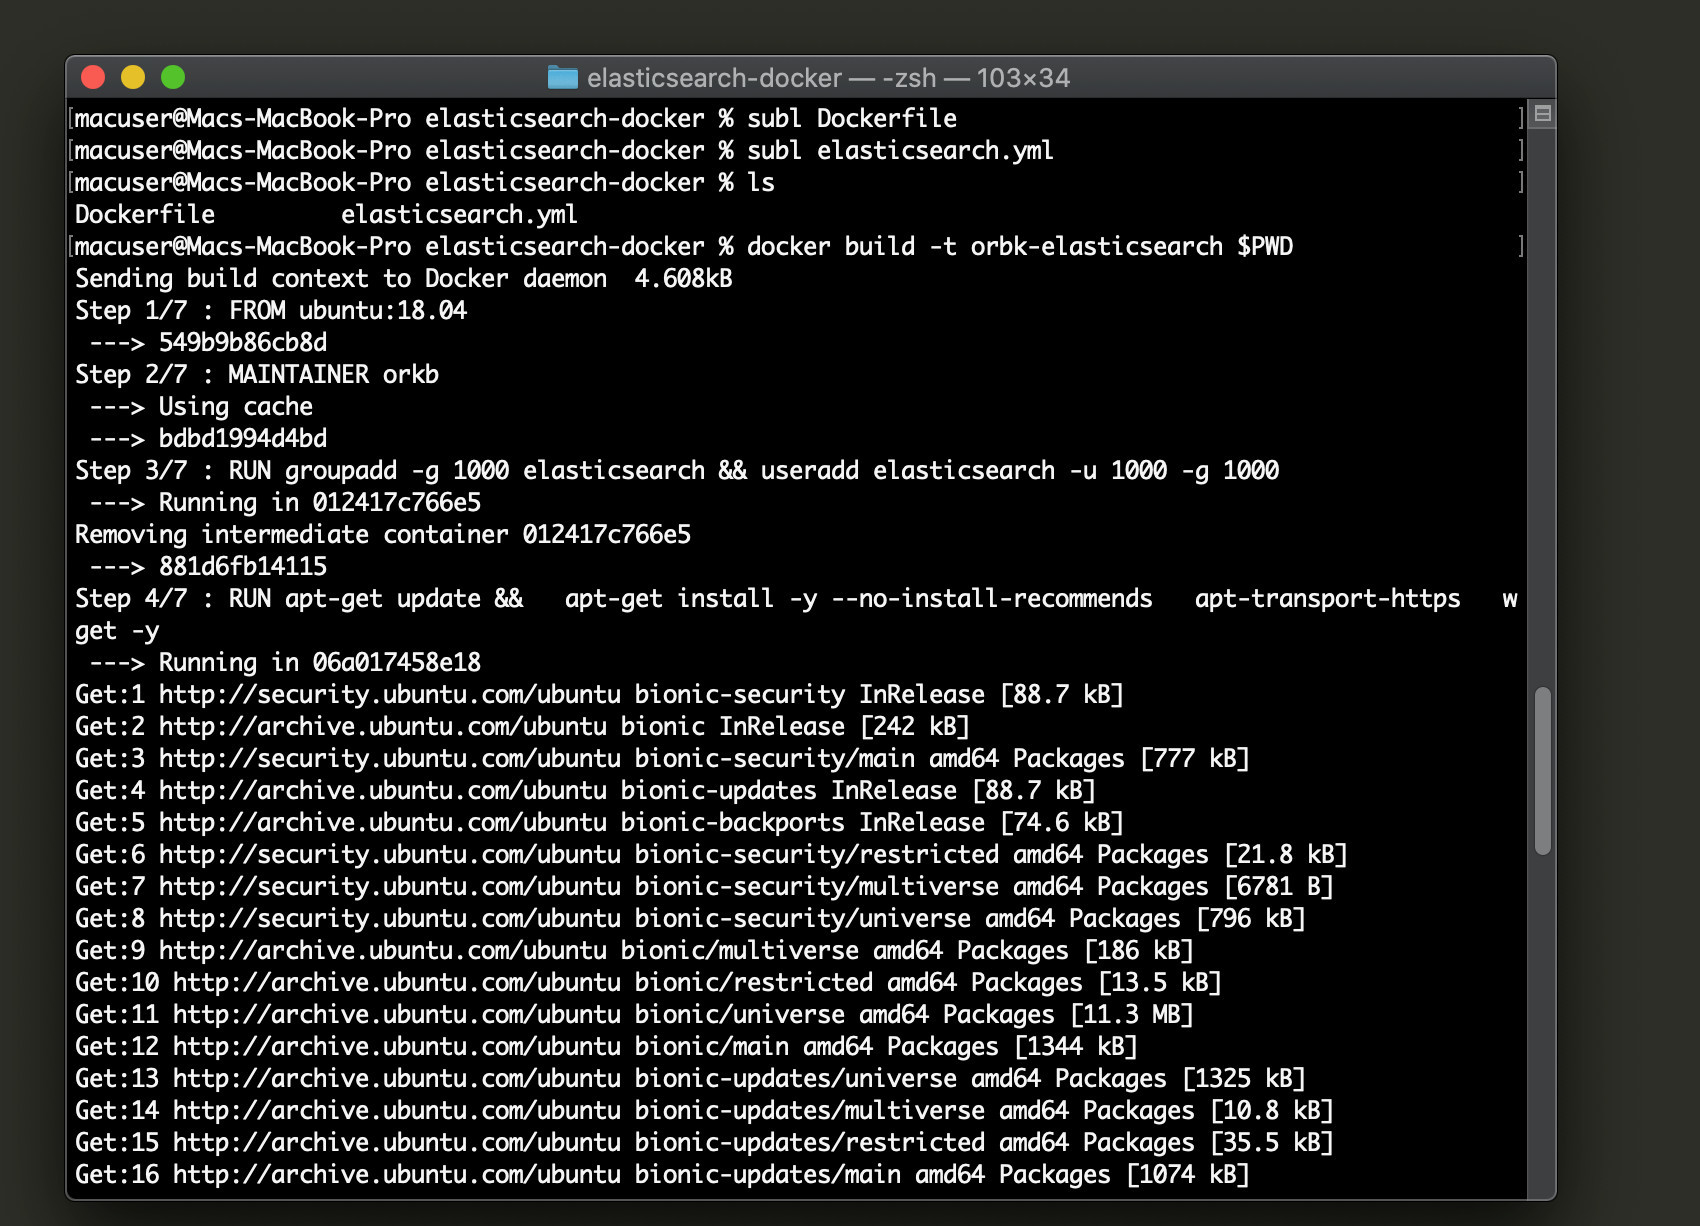
There are multiple ways you can build an Elasticsearch image in Dockerfile. In the following example, the Ubuntu image uses wget to download a DEB package of the Elasticsearch service:
1 2 3 4 5 6 7 8 9 10 11 12 13 14 15 16 17 | FROM ubuntu:18.04 # container creator MAINTAINER orkb # copy the configuration file into the container COPY elasticsearch.yml /usr/share/elasticsearch/config RUN groupadd -g 1000 elasticsearch && useradd elasticsearch -u 1000 -g 1000 # install APT transport and wget RUN apt-get update && \ apt-get install -y --no-install-recommends \ apt-transport-https \ wget -y RUN wget https://artifacts.elastic.co/downloads/elasticsearch/elasticsearch-7.5.1-amd64.deb --no-check-certificate |
NOTE: Be sure to run the apt-get update and apt-get install commands in the same line, as shown in the example above. If you don’t do this, it will get cached and won’t update every time.
To install the DEB package downloaded by the Dockerfile command shown above, use the following docker run command when you spin up a container from the image:
1 | docker run --rm -it orbk-elasticsearch sh -c 'dpkg -i elasticsearch-7.5.1-amd64.deb' |
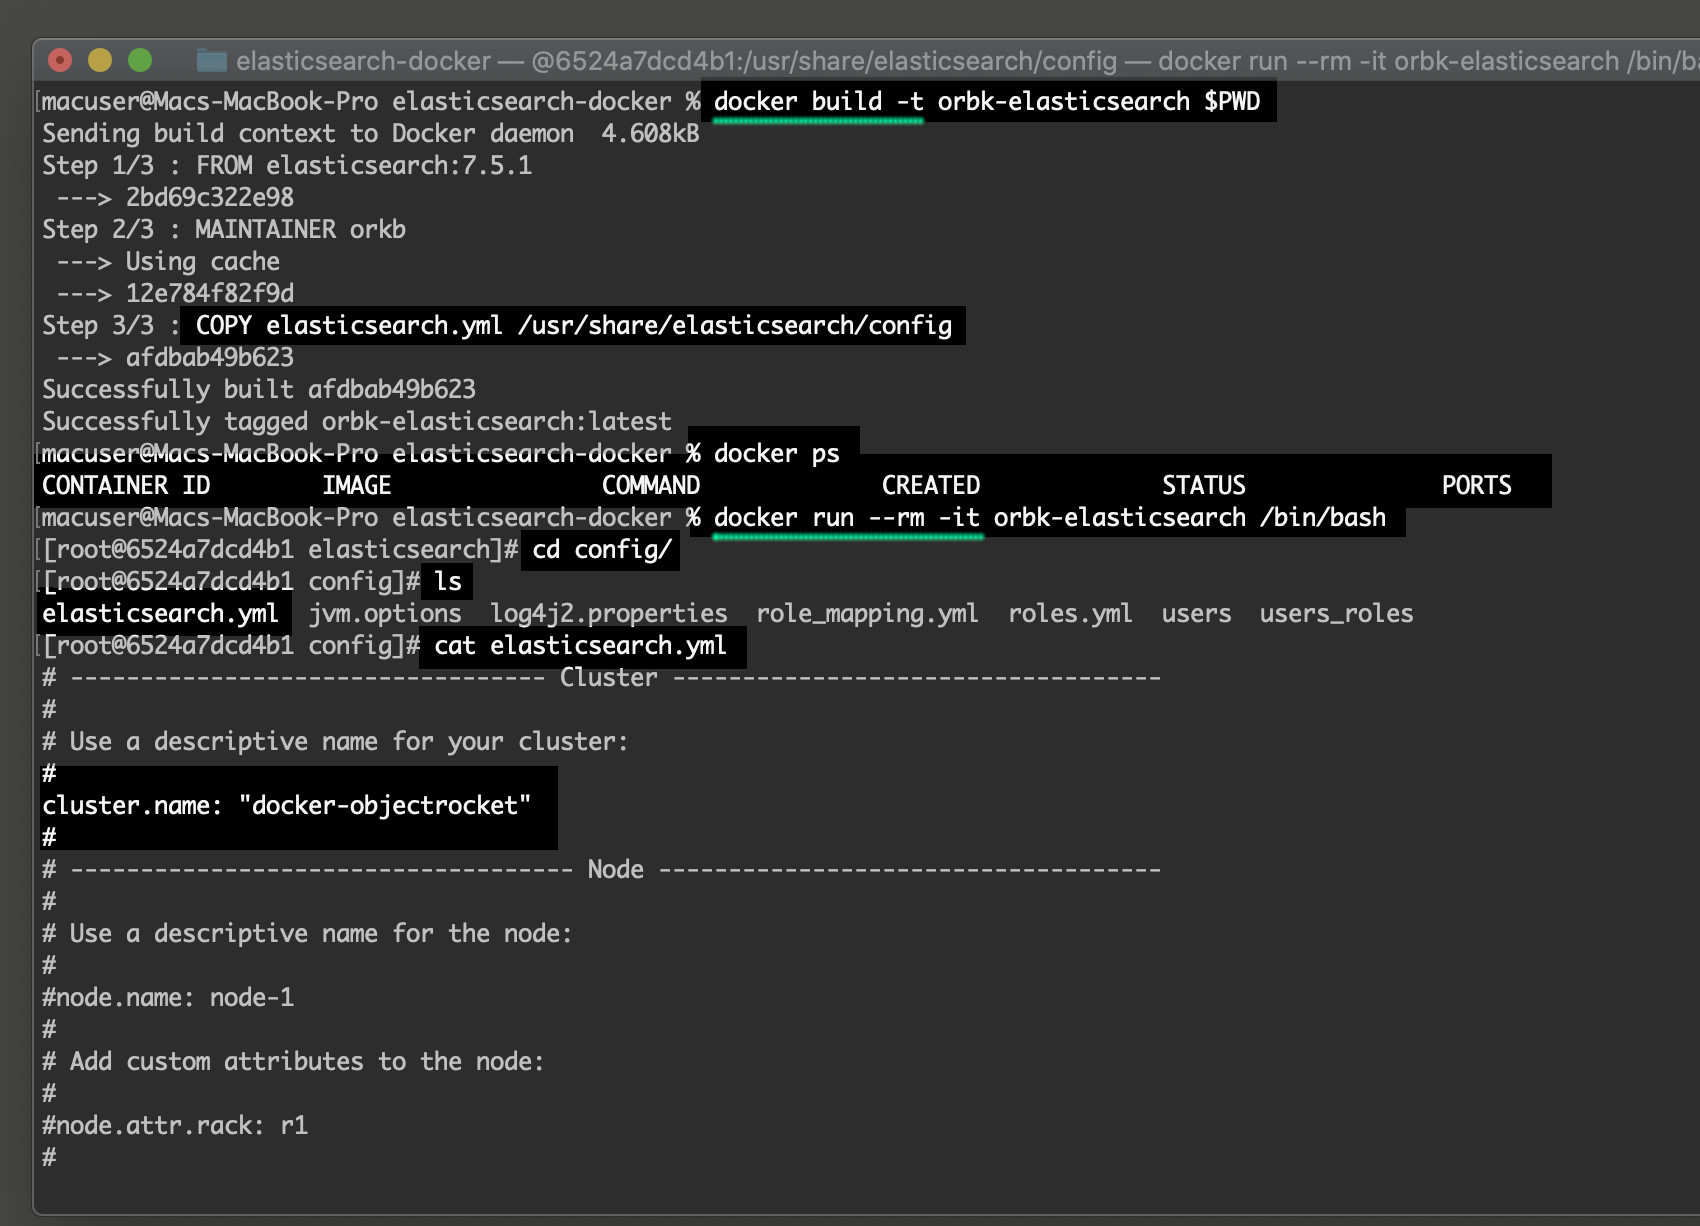
Alternatively, you can simply pull from the Elasticsearch image itself and then copy your configuration file into the container. The following example shows how to do this:
1 2 3 4 5 6 7 8 9 10 | FROM elasticsearch:7.5.1 # container creator MAINTAINER orkb # copy the configuration file into the container COPY elasticsearch.yml /usr/share/elasticsearch/config # expose the default Elasticsearch port EXPOSE 9200 |
NOTE: Docker only allows you to pull from one image per Dockerfile, so be sure not to use multiple FROM commands. If you do attempt to pull multiple images using FROM, it will just build an image using the last command and ignore any previous ones.
Build an Elasticsearch image from Dockerfile
Once you’ve created and edited your Dockerfile, you can use the docker build command to build your custom Docker image from the Dockerfile:
1 | docker build -t orbk-elasticsearch $PWD |
NOTE: Make sure to use the -t option in order to give the image a name. The $PWD command tells Docker to find the Dockerfile instructions in the present working directory.
Once the building process is complete, you can use the docker ps -a command– you’ll notice that no containers are running yet. This is because only the image has been created so far. You’ll need to use the docker run command to create a container from the image.
Spin up an Elasticsearch container
You can use the following command to run the orbk-elasticsearch Docker image that was created earlier:
1 | docker run --rm -it orbk-elasticsearch /bin/bash |
You can also use the -p option to expose the default Elasticsearch port of 9200. Here’s an example of how to use this option:
1 | docker run -p 9200:9200 -e "discovery.type=single-node" orbk-elasticsearch |
Conclusion
If you’re interested in running Elasticsearch in a Docker container, it’s important to know how to set up your container correctly. In this article, we showed how to create an image and then spin up an Elasticsearch Docker container using Dockerfile. With our step-by-step instructions, you’ll have no trouble working with Elasticsearch and Dockerfile on your own local machine.


Pilot the ObjectRocket Platform Free!
Try Fully-Managed CockroachDB, Elasticsearch, MongoDB, PostgreSQL (Beta) or Redis.
Get Started