How to Use The Websocket Output Plugin For Elasticsearch
Introduction
If you’re working with both Logstash and Elasticsearch, you may want to use a websocket in order to secure an uninterrupted connection between Logstash and your Elasticsearch cluster. The Websocket output plugin can allow for real-time communication between the server and client– in this case, between Elasticsearch and Logstash, through a websocket. In this article, we’ll explain how to use the Websocket output plugin for Elasticsearch.
Prerequisites for the Websocket Plugin
Before we can set up the Websocket plugin, we need to make sure we’ve covered all of the system requirements for this task. There are some important prerequisites to keep in mind:
- You must have Java and JDK 8 installed. You can confirm that Java is installed and determine the version with this command:
1 | java -version |
Elasticsearch must be installed or running from a source directory. You can make an HTTP request using cURL to see if the service is running:
curl -XGET "localhost:9200".The Logstash service for Elasticsearch must also be installed and running in order for the plugin to work. Visit Elastic’s downloads page for Logstash to get started.
Install Logstash for the Elasticsearch cluster
The next step will be to install Logstash for the Elasticsearch cluster. If you already have Logstash installed, you can skip this section.
Homebrew installation for macOS
If you’re planning to use Homebrew to install Logstash, it’s best to update the package manager first. You can do this and then install Logstash for Elasticsearch with the following commands in a macOS terminal:
1 2 | brew update brew install logstash |
Next, start the service using Homebrew:
1 | brew services start logstash |
You’ll see that the Logstash directory path for the Homebrew installation is in the Cellar directory:
1 | /usr/local/Cellar/logstash/ |
Installing Logstash from source
Another way to install Logstash is by downloading it straight from the source. Use the wget command to download the package, or you can simply download it from Elastic’s site. To download Logstash 7.1 with wget, use the following command in a Linux terminal:
1 | wget https://artifacts.elastic.co/downloads/logstash/logstash-7.1.0.zip |
NOTE: It’s also possible to install Wget on macOS using Homebrew (brew update; brew install wget). If you get a response stating Cannot write to .., try using the command with sudo to avoid permissions-related issues.
Once you’ve downloaded Logstash, use the unzip command to extract the Logstash directory from the archive:
1 | sudo unzip logstash-7.1.0.zip |
Installing Logstash on Linux
Next, we’ll install Logstash. For Debian-based Linux distributions, use the APT repository to install Logstash. To do this, first update the repository packages using the apt-get command:
1 | sudo apt-get update |
Then install the Logstash package with apt-get:
1 | sudo apt-get install logstash |
For RPM-based distributions, use the yum command:
1 2 | rpm --import https://artifacts.elastic.co/GPG-KEY-elasticsearch sudo yum install logstash |
If you do a YUM installation, the configuration file should be found in the /etc/yum.repos.d/ directory.
Running Logstash on a systemd Linux distribution
Once everything is installed correctly, it’s time to run Logstash. On a systemd distribution of Linux, you can use the systemctl command:
1 | sudo systemctl start logstash.service |
Running Logstash on a SysV distro of Linux
For SysV distributions, the following command is used instead:
1 | sudo /etc/init.d/logstash start |
Verify that the Logstash service is running
The default port for the Logstash service is 9600, so you can verify that Logstash is running by simply navigating to http://localhost:9600 in a browser. Another option is to use the following cURL request to get a JSON response from the Elasticsearch cluster, which will also verify that Logstash is working:
1 | curl -XGET localhost:9600?pretty=true |
You should see the "version" field returned as part of the JSON response– this is the version of Logstash running on the cluster. Be sure that the macro version of Logstash matches the one for Elasticsearch (i.e. you need to use version 7.x of Logstash with Elasticsearch 7.x) to avoid compatibility issues.
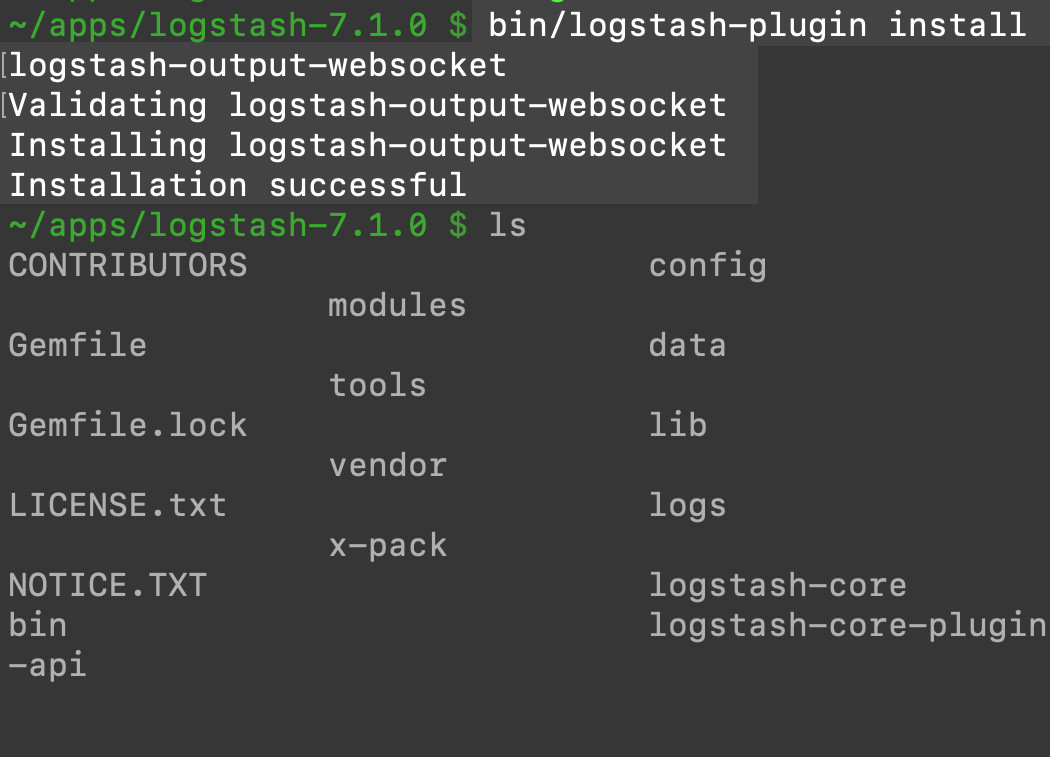
Install the Websocket Plugin using Logstash
If you’ve confirmed that Logstash is successfully installed, you can use this command to have the Logstash service install the Websocket plugin:
1 | bin/elasticsearch-plugin install logstash-output-websocket |
Note: The Logstash service doesn’t need to be running in order for the logstash-plugin install command to work.
Configure Logstash to use the Websocket plugin
If Logstash is currently running, you’ll need to stop the service at this time. This will allow you to restart the service using a new configuration file for the plugin. The command or action you need to execute to stop the service will vary depending on the OS you’re using and how Logstash was installed.
If you’re running Logstash in the foreground from a terminal window, simply press CTRL+C to stop the service.
Create a configuration file for the Websocket pipeline
The next step in the process is to create or edit a configuration file for the Websocket plugin. You can edit the file using nano:
1 | sudo nano websocket-example.conf |
NOTE: If you’re running Logstash from an unzipped source directory, you’ll need to create or move the .conf file to the logstash/config directory.
Edit the Websocket configuration file settings
Once you’re in the configuration file, change the settings for the websocket. The basic structure of the JSON object in the configuration file looks like this:
1 2 3 4 5 | input {} output { websocket {} } |
Configure the Websocket options in the Logstash configuration file
There are several options to pass within the nested websocket JSON field in the configuration file. Let’s look at some commonly-used options:
Codec option
The codec option allows you to use different encoding schemas for the websocket. The default value is plain.
ID option
The id option allows you to pass in a string to be used as the websocket’s plugin ID. If you omit this option, Elasticsearch will automatically generate an ID for the plugin.
Host and Port options
The host option is a string representation of the host domain name or IP address for the websocket, while the port option is an integer expressed without quotation marks ("). The default values for these options are:
1 2 | host => "0.0.0.0" port => 3232 |
Restart the Logstash service
Now that you’ve created the Logstash configuration file and made the necessary changes, it’s time to restart the Logstash service. Use the -f option with the logstash command followed by the path to the configuration file to start the websocket:
1 | bin/logstash -f config/websocket-example.conf |
If you get an error stating Logstash could not be started because there is already another instance, or if the port is in use by a running process, try using lsof to locate the process. Then, you can use sudo kill -9 to kill the process using its PID, as shown in the following example:
1 2 | lsof -n -i4TCP:9600 sudo kill -9 12345 |
Be sure the path to the configuration file, as specified in the bin/logstash command, is correct.
Conclusion
Using a websocket can help you maintain a persistent communication between Logstash and Elasticsearch. Data can flow into Elasticsearch from Logstash through a websocket– all you need is the Websocket output plugin for Elasticsearch to make it happen. With the instructions provided in this tutorial, you’ll be ready to install the plugin, make the configuration changes, and get started with an output websocket.


Pilot the ObjectRocket Platform Free!
Try Fully-Managed CockroachDB, Elasticsearch, MongoDB, PostgreSQL (Beta) or Redis.
Get Started