How to Upload Images to an Elasticsearch Index
Introduction
Although Elasticsearch is known for its fast and powerful text search, it’s possible to index more than just text. For example, it’s easy to upload images to Elasticsearch. You can use Python’s PIL library to extract an image’s EXIF data, and then index the image’s data to an Elasticsearch index. In this article, we’ll provide step-by-step instructions for storing images with Python in Elasticsearch.
Prerequisites for indexing photos to Elasticsearch
Before we look at how to upload photos to Elasticsearch, let’s go over the key system requirements for the task:
- Elasticsearch must be installed and running, along with Java and its JVM. You can check if Elasticsearch is running by making a
GETrequest to the server on the default port of9200. It should return a JSON response with cluster information:
1 | curl -XGET "localhost:9200" |
- When you index photos with Python in Elasticsearch, you may want to use the Kibana Console UI to verify that the photos or images uploaded correctly. If so, you need to make sure that the Kibana service is running as well. Simply load the interface in a browser by navigating to:
1 | https://{YOUR_DOMAIN}:5601 |
- You’ll need to create an Elasticsearch index for the image data. If you haven’t created one yet, we’ll go over how to do it in this article. We’ll be indexing EXIF data in Elasticsearch for this tutorial, so it’s best not to have an index with a rigid
_mappingschema– not all images have the same EXIF data fields, and some images don’t have any at all.
Install all the Python libraries and dependencies using pip3
The Python code used in this article is tested and written with Python 3 in mind, since Python 2.7 is now deprecated. Therefore, we’ll be using the pip3 command for the PIP package manager for Python 3 to install the necessary libraries and modules.
Install Pillow (PIL) for Python 3
Throughout this tutorial, we’ll be using the Python Imaging Library, also known as PIL or Pillow. We’ll be using Pillow with Python and Elasticsearch to index images. Let’s begin by installing PIL using the following command:
1 | pip3 install Pillow |
If you’d like to upgrade PIL to the latest version, use this command:
1 | pip3 install -U Pillow |
>NOTE: Older versions of PIP allowed for the entire Pillow library to be imported (e.g. import PIL); however, since version 2.0 of PIL, only its classes can be imported (e.g. from PIL import Image)
Install pybase64 for the Base64 Python encoding library
Next, we’ll install and upgrade the base64 encoding and decoding wrapper for the libbase64 Python library:
1 | pip3 install -U pybase64 |
This library is necessary for converting documents to base64 in order to index them to an Elasticsearch index.
Select a personal photo or public domain image to index to Elasticsearch
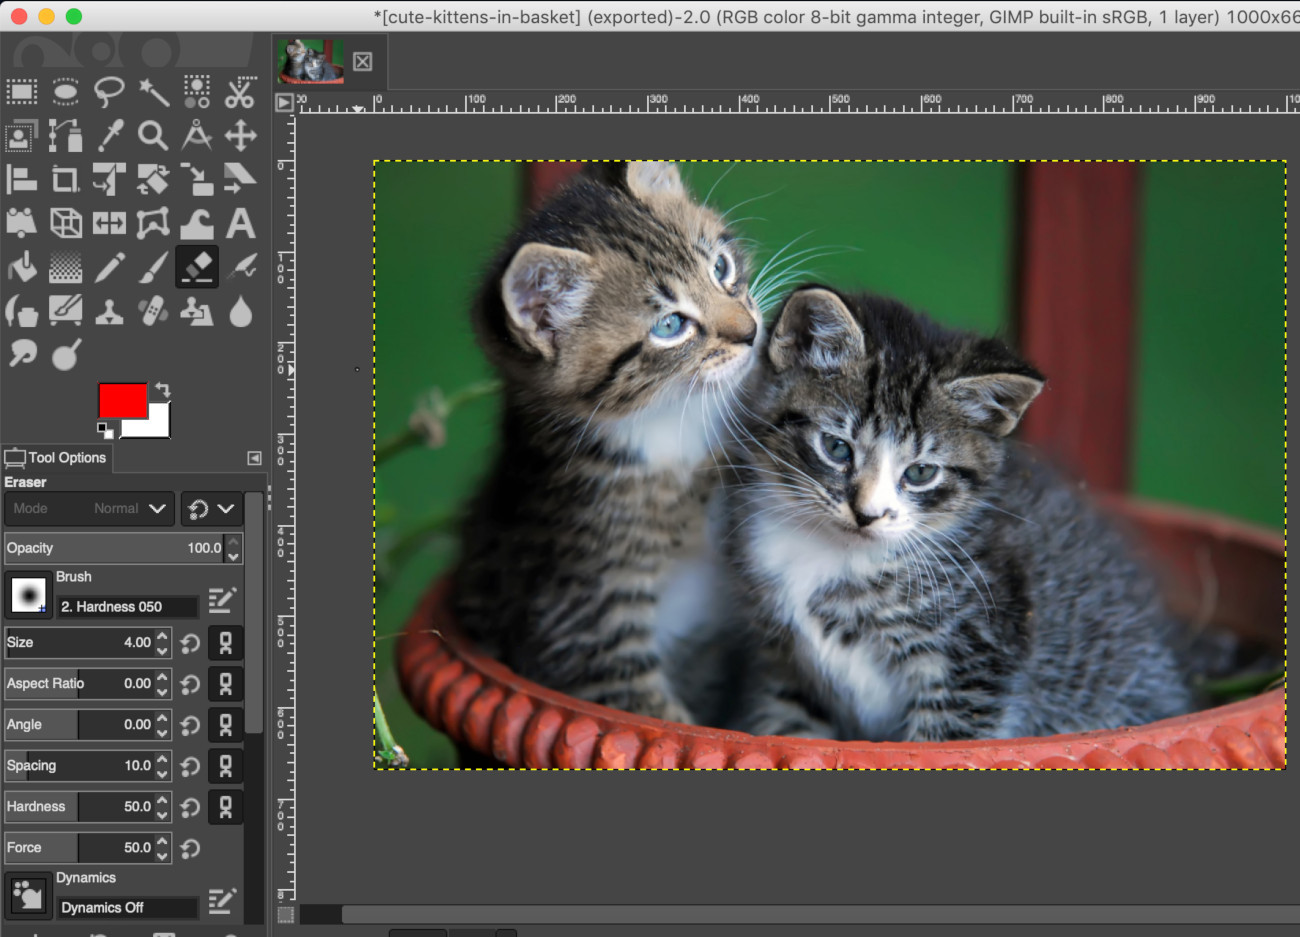
The image we’ll be using in this article is cute-kittens-in-basket.jpg from publicdomainpictures.net.
The actual image we’re using is a scaled down (1000×669) version of the original “cute-kittens” image:
If you’d like to follow along with the instructions in this tutorial, use a public domain image like this one, or take a photo with your phone and put it into the same directory as your Python script.
Create a new project directory and Python script
Once you’ve confirmed all the system requirements and selected an image, you can get started on the code. The first step will be to create a directory and a Python script for the code. Then, move the image you’d like to index into the project directory. You can create a directory using the mkdir command in a terminal window:
1 | mkdir index-image-project |
After you create your directory, use the touch command to create a new Python script, or use nano to edit a new file and save it as a Python script:
1 | touch index_image.py |
>NOTE: Keep in mind that the names of Python scripts use underscores (_) instead of hyphens (-) (e.g. my_script.py).
Open a new Finder window (or whatever GUI-based folder application available on the OS where the Elasticsearch cluster is running), and move the image to the new project folder.
If you’re in a terminal window, this can be done using the mv command by specifying the target directory in the second parameter:
1 | mv my-image.jpg /Users/username/Desktop/index-image-project/my-image.jpg |
Import the necessary Python libraries and modules to index an image to Elasticsearch
Next, we’ll need to import libraries and modules such as Elasticsearch and PIL into Python. Let’s edit the project’s Python script, making sure to import all of the following modules, classes, and libraries at the top:
1 2 3 4 5 6 7 8 9 10 | # import the Elasticsearch low-level client from elasticsearch import Elasticsearch # import the Image and TAGS classes from Pillow (PIL) from PIL import Image from PIL.ExifTags import TAGS import uuid # for image meta data ID import base64 # convert image to b64 for indexing import datetime # for image EXIF data timestamp |
After making these edits, save your script and run it in a terminal or command prompt window (using the python3 command) to make sure that all modules were properly installed using pip3.
If you get an ImportError, then return to the Prerequisites section of this article and make sure all of the libraries are installed and updated. Pillow (commonly known as PIL), elasticsearch, and pybase64 (or base64 for Python) are the only libraries we’ll be using in this article that don’t come packaged with a Python installation by default.
Create a new client instance of the Elasticsearch low-level client
Before we proceed, let’s make sure that the Elasticsearch cluster is up and running. Once you’ve confirmed this, we’ll add the following code to create a new client instance of Elasticsearch in the Python script:
1 2 | # create a client instance of Elasticsearch elastic_client = Elasticsearch([{'host': 'localhost', 'port': 9200}]) |
Start the Kibana service
You may want to use the Kibana Console UI to make HTTP requests and verify that an image has been indexed. If so, then you’ll need to make sure that Kibana is running.
Use Python’s PIL library to grab the image’s EXIF meta data
The PIL library (Python Imaging Library) is instrumental in making it possible to index photos in Elasticsearch with Python. The PIL library has a TAGS class that allows one to read an image’s EXIF meta data. You can use this data to create custom fields for the Elasticsearch document’s _source data. This allows the document to be indexed, organized and searched using the image’s EXIF tags.
Set up the image document’s index data for Elasticsearch
If you have a specific _id or _index in mind for your selected image document, it’s best to declare that information before doing anything else. Let’s also declare a string containing the file name (and its path if the image is not in the same directory as the script):
1 2 3 4 | # create an Image instance of photo _file = "cute-kittens-in-basket.jpg" _index = "images" _id = 1 |
Create a PIL Image instance of the image in the directory
Next, we’ll pass that _file string to PIL’s Image.open method as 'rb'. We’ll have it return a PIL Image object of the target image:
1 | img = Image.open(open(_file, 'rb')) |
Use’s PIL’s PIL.ExifTags Python library to read an image’s EXIF meta data
Make sure to import the TAGS class at the beginning of your script. This makes it possible to index an image EXIF with PIL:
1 | from PIL.ExifTags import TAGS |
Create a Python function to get the PIL Image’s EXIF data
We’ll need to create a function that first verifies the PIL Image object and then uses the _getexif() method to return all of the image’s EXIF data:
1 2 3 4 5 6 7 8 9 10 11 12 13 14 15 16 17 18 19 20 | def get_image_exif(img): # use PIL to verify image is not corrupted img.verify() try: # call the img's getexif() method and return EXIF data exif = img._getexif() exif_data = {} # iterate over the exif items for (meta, value) in exif.items(): try: # put the exif data into the dict obj exif_data[TAGS.get(meta)] = value except AttributeError as error: print ('get_image_meta AttributeError for:', file_name, '--', error) except AttributeError: # if img file doesn't have _getexif, then give empty dict exif_data = {} return exif_data |
Now we can use the exif_data dictionary object for the Elasticsearch document’s _source data. Here’s the code we need to do it:
1 2 3 4 5 | # get the _source dict for Elasticsearch doc _source = create_exif_data(img) # store the file name in the Elasticsearch index _source['name'] = _file |
The function will place all of the EXIF data into a Python dict object and return that object to be indexed later on. For our sample image, the object’s key-value pairs would look like the following:
1 2 3 4 5 6 7 8 | _source: { 'mime_type': 'image/jpeg', 'name': 'cute-kittens-in-basket.jpg', 'datetime': '2019:06:14 21:18:04', 'make': 'Camera Unknown', 'model': 'Camera Unknown', 'uuid': '1a994cbe-8d03-4c07-9f26-6d13930dcbcd' } |
Create another function to generate missing EXIF data if needed
At this point, we’ll need to declare another function that will parse the EXIF dict data returned by the get_image_exif() function. This function will ensure that all of the documents in our Elasticsearch index have the same fields by generating EXIF data for them, even if some images don’t have any.
This function will parse through the EXIF keys using if and elif conditional statements to check if the EXIF data is present:
1 2 3 4 5 6 7 8 9 10 11 12 13 14 15 16 17 18 19 20 21 22 23 24 25 26 27 28 29 30 31 32 33 34 35 36 37 38 39 40 41 42 43 44 45 46 47 48 49 50 51 52 53 54 55 56 57 58 59 60 61 62 63 64 65 66 67 68 69 70 | def create_exif_data(img): # create a new dict obj for the Elasticsearch doc es_doc = {} es_doc["size"] = img.size # put PIL Image conversion in a try-except indent block try: # create PIL Image from path and file name img = Image.open(_file) except Exception as error: print ('create_exif_data PIL ERROR:', error, '-- for file:', _file) # call the method to have PIL return exif data exif_data = get_image_exif(img) # get the PIL img's format and MIME es_doc["image_format"] = img.format es_doc["image_mime"] = Image.MIME[img.format] # get datetime meta data from one of these keys if possible if 'DateTimeOriginal' in exif_data: es_doc['datetime'] = exif_data['DateTimeOriginal'] elif 'DateTime' in exif_data: es_doc['datetime'] = exif_data['DateTime'] elif 'DateTimeDigitized' in exif_data: es_doc['datetime'] = exif_data['DateTimeDigitized'] # if none of these exist, then use current timestamp else: es_doc['datetime'] = str( datetime.datetime.now() ) # create a UUID for the image if none exists if 'ImageUniqueID' in exif_data: es_doc['uuid'] = exif_data['ImageUniqueID'] else: # create a UUID converted to string es_doc['uuid'] = str( uuid.uuid4() ) # make and model of the camera that took the image if 'Make' in exif_data: es_doc['make'] = exif_data['Make'] else: es_doc['make'] = "Camera Unknown" # camera unknown if none exists if 'Model' in exif_data: es_doc['model'] = exif_data['Model'] else: es_doc['model'] = "Camera Unknown" if 'Software' in exif_data: es_doc['software'] = exif_data['Software'] else: es_doc['software'] = 'Unknown Software' # get the X and Y res of image if 'XResolution' in exif_data: es_doc['x_res'] = exif_data['XResolution'] else: es_doc['x_res'] = None if 'YResolution' in exif_data: es_doc['y_res'] = exif_data['YResolution'] else: es_doc['y_res'] = None # return the dict return es_doc |
Create a NumPy array
In our next step, we’ll be using the file string (_file) declared earlier. We’ll open the image using PIL’s Image class, and pass that Image object instance to NumPy’s asarray() method. Be sure to cast the NumPy array as a normal Python list object using the tolist() method; this ensures that the image’s pixel data can be put in lists and then stored in Elasticsearch:
1 2 | # covert NumPy of PIL image to simple Python list obj img_array = np.asarray( Image.open( _file ) ).tolist() |
Convert the Python list object to a str
Keep in mind that Elasticsearch only allows strings or encoded strings to be passed– not objects such as lists. We’ll need to convert the list to a string using the str() function:
1 2 | # convert the nested Python array to a str img_str = str( img_array ) |
Use Python’s Base64 library to encode images
You can also encode an image using Python’s Base64 library:
1 | img_base64 = base64.b64encode( bytes(img_str, "utf-8") ) |
Put the raw image data into the _source object
At this point, we’re ready to put the raw image data into a field key of the _source object:
1 2 | # put the encoded string into the _source dict _source["raw_data"] = img_base64 |
Create an Elasticsearch index and put the image data into it
The final step is to create an index in Elasticsearch if you have not done so already. Then, we can index the _source dictionary object with all of the EXIF and raw image data.
Create an Elasticsearch index and ignore any 400 HTTP errors
If the _index specified earlier already exists, be sure to use the ignore=400 option. This will instruct Elasticsearch to attempt to create an index, but also to ignore any HTTP 400 error codes so that the script will continue on without interruption:
1 2 3 4 5 6 7 8 | # create the "images" index for Elasticsearch if necessary resp = elastic_client.indices.create( index = _index, body = "{}", ignore = 400 # ignore 400 already exists code ) print ("\nElasticsearch create() index response:", resp) |
Index the image dict object to the Elasticsearch index
In the previous step, we passed all the document data declared earlier to the Elasticsearch client’s index() method. Here, we have it return a response to confirm that the API call was successful and that there were no errors:
1 2 3 4 5 6 7 8 9 | # call the Elasticsearch client's index() method resp = elastic_client.index( index = _index, doc_type = '_doc', id = _id, body = _source ) print ("\nElasticsearch index() response:", resp) |
Getting the raise ConnectionTimeout(“TIMEOUT”, str(e), e) error while calling the Elasticsearch index() method
If you encounter a ConnectionTimeout error while indexing the image to Elasticsearch, simply use the request_timeout option while calling the index method:
1 2 3 4 5 6 7 8 | # call the Elasticsearch client's index() method resp = elastic_client.index( index = _index, doc_type = 'img', id = _id, body = _source, request_timeout=60 ) |
The example shown above attempts to index the image data but will wait 60 seconds before it raises a timeout error. This can be useful for larger images that may take longer than expected to index.
Conclusion
While Elasticsearch is known for its powerful text search capabilities, it’s also possible to upload photos to Elasticsearch with Python. Although the example we reviewed in this tutorial shows the indexing of a single photo, you can use the same basic process to bulk index in Elasticsearch in Python. If you needed to bulk index documents in Elasticsearch, you would still read and generate EXIF data for each image in Python and then index that data to an Elasticsearch index. Using the step-by-step instructions provided in this tutorial, you’ll have no trouble uploading photos to Elasticsearch.
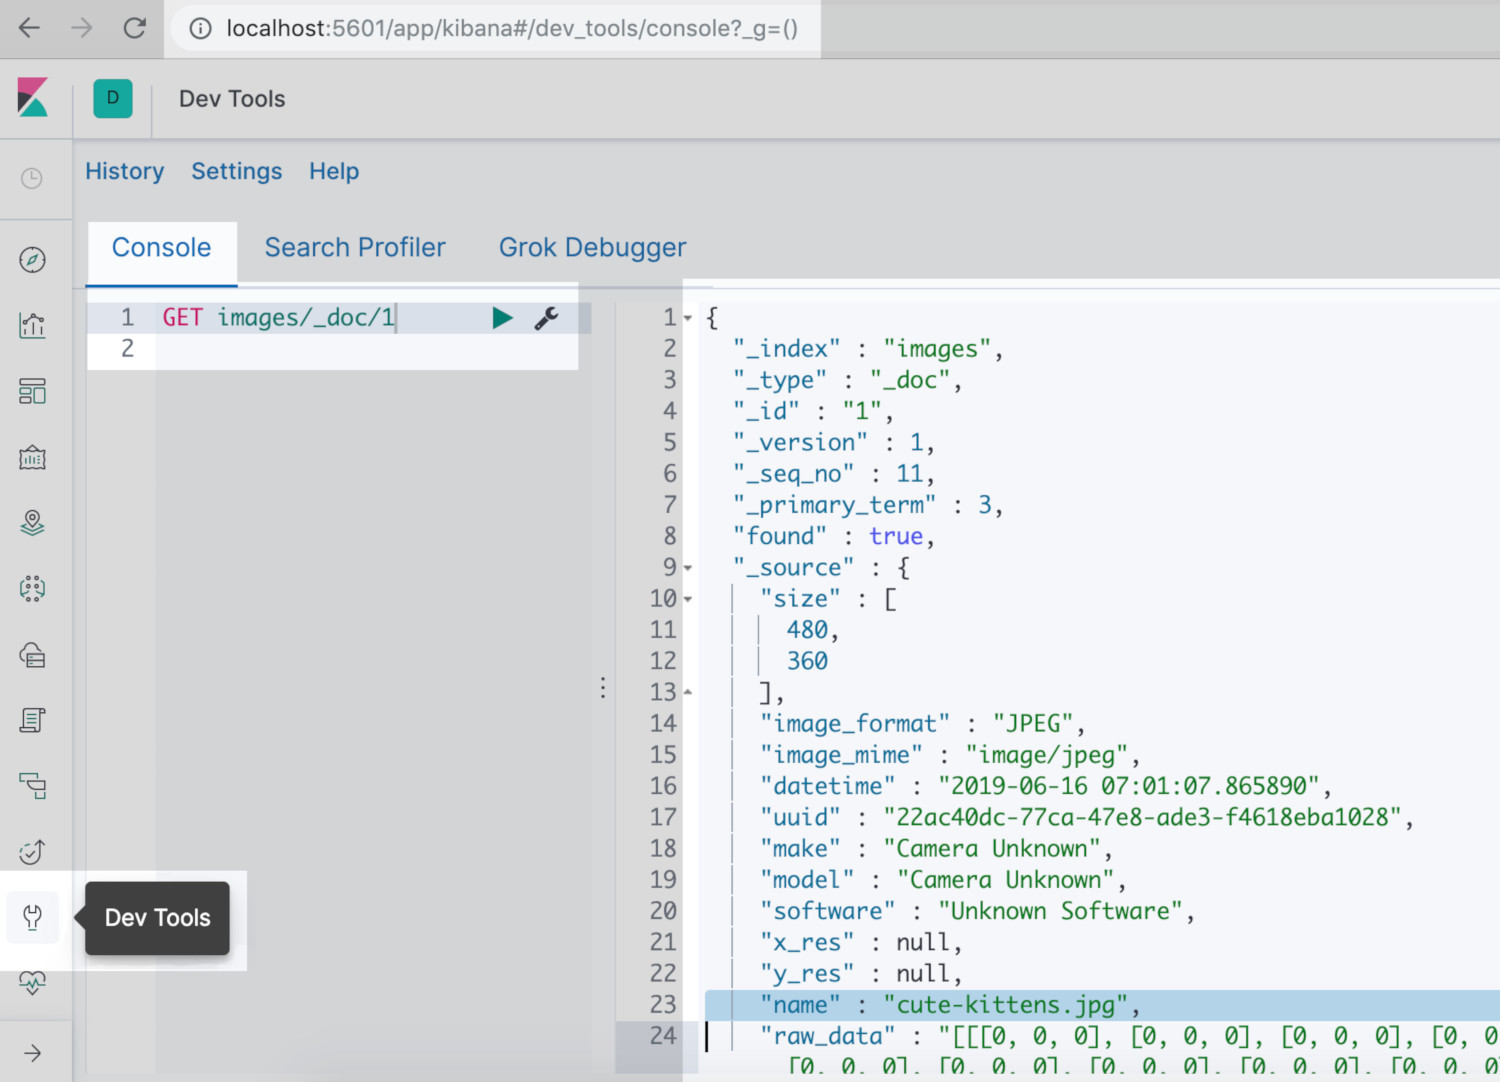
Open up the Kibana Console UI to verify that the image was indexed
If you’d like to verify that your image was indexed properly, you can use the Kibana Console UI. Simply navigate to port 5601 on your server’s domain (or to localhost:5601) in a web browser, and click on Dev Tools (represented by a small “wrench” icon in Kibana v7.x). Then, make the following GET request in the left console pane to verify that the image indexed properly:
1 | GET images/_search |
You can also pass the document’s _id to an HTTP request directly using _doc as the document type (as specified in the index() method):
1 | GET images/_doc/1 |
Once you click on the green arrow icon, the right pane of the Kibana Console will display information about the indexed image:
Just the Code
We’ve looked at our example code one section at a time throughout this tutorial. The following code represents the complete script needed to index images in Elasticsearch:
1 2 3 4 5 6 7 8 9 10 11 12 13 14 15 16 17 18 19 20 21 22 23 24 25 26 27 28 29 30 31 32 33 34 35 36 37 38 39 40 41 42 43 44 45 46 47 48 49 50 51 52 53 54 55 56 57 58 59 60 61 62 63 64 65 66 67 68 69 70 71 72 73 74 75 76 77 78 79 80 81 82 83 84 85 86 87 88 89 90 91 92 93 94 95 96 97 98 99 100 101 102 103 104 105 106 107 108 109 110 111 112 113 114 115 116 117 118 119 120 121 122 123 124 125 126 127 128 129 130 131 132 133 134 135 136 137 138 139 140 141 142 143 144 145 146 147 148 149 150 151 152 153 154 155 156 157 158 159 | #!/usr/bin/env python3 #-*- coding: utf-8 -*- # import the Elasticsearch low-level client from elasticsearch import Elasticsearch # import the Image and TAGS classes from Pillow (PIL) from PIL import Image from PIL.ExifTags import TAGS import uuid # for image meta data ID import base64 # convert image to b64 for indexing import datetime # for image meta data timestamp # create a client instance of Elasticsearch elastic_client = Elasticsearch([{'host': 'localhost', 'port': 9200}]) """ Function that uses PIL's TAGS class to get an image's EXIF meta data and returns it all in a dict """ def get_image_exif(img): # use PIL to verify image is not corrupted img.verify() try: # call the img's getexif() method and return EXIF data exif = img._getexif() exif_data = {} # iterate over the exif items for (meta, value) in exif.items(): try: # put the exif data into the dict obj exif_data[TAGS.get(meta)] = value except AttributeError as error: print ('get_image_meta AttributeError for:', file_name, '--', error) except AttributeError: # if img file doesn't have _getexif, then give empty dict exif_data = {} return exif_data """ Function to create new meta data for the Elasticsearch document. If certain meta data is missing from the orginal, then this script will "fill in the gaps" for the new documents to be indexed. """ def create_exif_data(img): # create a new dict obj for the Elasticsearch doc es_doc = {} es_doc["size"] = img.size # put PIL Image conversion in a try-except indent block try: # create PIL Image from path and file name img = Image.open(_file) except Exception as error: print ('create_exif_data PIL ERROR:', error, '-- for file:', _file) # call the method to have PIL return exif data exif_data = get_image_exif(img) # get the PIL img's format and MIME es_doc["image_format"] = img.format es_doc["image_mime"] = Image.MIME[img.format] # get datetime meta data from one of these keys if possible if 'DateTimeOriginal' in exif_data: es_doc['datetime'] = exif_data['DateTimeOriginal'] elif 'DateTime' in exif_data: es_doc['datetime'] = exif_data['DateTime'] elif 'DateTimeDigitized' in exif_data: es_doc['datetime'] = exif_data['DateTimeDigitized'] # if none of these exist, then use current timestamp else: es_doc['datetime'] = str( datetime.datetime.now() ) # create a UUID for the image if none exists if 'ImageUniqueID' in exif_data: es_doc['uuid'] = exif_data['ImageUniqueID'] else: # create a UUID converted to string es_doc['uuid'] = str( uuid.uuid4() ) # make and model of the camera that took the image if 'Make' in exif_data: es_doc['make'] = exif_data['Make'] else: es_doc['make'] = "Camera Unknown" # camera unknown if none exists if 'Model' in exif_data: es_doc['model'] = exif_data['Model'] else: es_doc['model'] = "Camera Unknown" if 'Software' in exif_data: es_doc['software'] = exif_data['Software'] else: es_doc['software'] = exif_data['Unknown Software'] # get the X and Y res of image if 'XResolution' in exif_data: es_doc['x_res'] = exif_data['XResolution'] else: es_doc['x_res'] = None if 'YResolution' in exif_data: es_doc['y_res'] = exif_data['YResolution'] else: es_doc['y_res'] = None # return the dict return es_doc # create an Image instance of photo _file = "cute-kittens-in-basket.jpg" _index = "images" _id = 1 img = Image.open(open(_file, 'rb')) # get the _source dict for Elasticsearch doc _source = create_exif_data(img) # store the file name in the Elasticsearch index _source['name'] = _file # covert NumPy of PIL image to simple Python list obj img_array = np.asarray( Image.open( _file ) ).tolist() # convert the nested Python array to a str img_str = str( img_array ) # put the encoded string into the _source dict _source["raw_data"] = img_str # create the "images" index for Elasticsearch if necessary resp = elastic_client.indices.create( index = _index, body = "{}", ignore = 400 # ignore 400 already exists code ) print ("\nElasticsearch create() index response -->", resp) # call the Elasticsearch client's index() method resp = elastic_client.index( index = _index, doc_type = '_doc', id = _id, body = _source, request_timeout=60 ) print ("\nElasticsearch index() response -->", resp) |


Pilot the ObjectRocket Platform Free!
Try Fully-Managed CockroachDB, Elasticsearch, MongoDB, PostgreSQL (Beta) or Redis.
Get Started