How To Setup A MongoDB App Using The Flask Framework
Introduction
This tutorial will explain how to use the Flask micro-framework to create a MongoDB restful API in Python using the flask_pymongo library. The Flask app for MongoDB serves as a lightweight wrapper for the PyMongo client driver needed for creating a python HTTP client for MongoDB. This Flask-PyMongo tutorial will provide examples for installing PyMongo and Flask PyMongo packages for Python 3 and configuring Flask for MongoDB.
Prerequisites for Creating a MongoDB Web Application using Python and Flask
The MongoDB server must be running; execute the
mongodcommand to confirm its status.A working knowledge of Python 3; confirm a supported version of Python 3 and the PIP3 package manager are installed on the same server running MongoDB.
NOTE: Python versions 2.7 or earlier are not recommended for the operations in this tutorial as it is deprecated and will lose official support by 2020.
The Flask libraries and modules, including PyMongo and the Flask-PyMongo wrapper for Flask and PyMongo, must all be installed on the MongoDB server. It is highly recommended all programs be installed with the
pip3 installorpython3 pip installcommands.A web server, like Apache, must be installed and configured on the server running MongoDB and Flask. This tutorial will use a
localhost:5000domain and port for the web application server.
How to Install the PyMongo and Flask-PyMongo Python Libraries
Install the required Flask and PyMongo modules using the following pip3 commands:
1 2 | pip3 install pymongo pip3 install Flask-PyMongo |
How to install PyMongo and Flask-PyMongo packages for a specific version of Python 3
Optionally specify the Python 3 version to install the packages and then use the below python3.6 or python3.7 commands:
1 | python3 --version && pip3 --version |
Here is how to install the Flask modules using pip3 for Python 3.6:
1 2 3 | # Example installation using Python 3.6 python3.6 -m pip install pymongo python3.6 -m pip install Flask-PyMongo |
How to handle the Flask app returning a ‘ModuleNotFoundError’ error
WARNING: Do not install the isolated bson library for PyMongo using pip or there may be conflicts that will produce ModuleNotFound errors. If these conflicts or errors occur, use pip3 to uninstall the bson, pymongo and Flask-PyMongo modules and then reinstall only the last two.
How to install the Flask command-line tools on Linux using the APT repository
Execute the following command to install the command-line tools for Flask on Linux from the apt repository:
1 | sudo apt install python3-flask |
Type flask or flask shell in a terminal window. In the case of multiple installations, execute the flask --version command to determine what version of Python 3 is installed.
How to Create a Directory for the MongoDB Application
Create a directory in the web root directory for the Flask application. Typically this will be /var/www/html on an Apache server in Linux. Execute the following mkdir command in a UNIX terminal:
1 | mkdir -p /var/www/html/mongo-app |
How to create a Python script for the Flask application
Change the directory using the cd command and create a new Python script for the Flask application. The following example uses the name mongo_connect.py for the Python script:
1 | cd /var/www/html/mongo-app && touch mongo_connect.py |
Use a text editor, like nano or gedit, to add code to the new script.
How to Create a Flask Application that Will Connect to the MongoDB Server
This section will explain how to edit the Python script for the Flask application that will run the RESTful API for MongoDB.
First, use the following commands at the start of the Python script to import the Flask and PyMongo modules:
1 2 3 | from flask import Flask from flask_pymongo import PyMongo from pymongo import MongoClient |
How to configure the Flask app to connect to the MongoDB server
Confirm the domain URI, port, database, secret key and any other environmental variables are set properly, as shown here:
1 2 3 4 | app = Flask(__name__) app.config["MONGO_URI"] = "mongodb://localhost:27017/SomeDatabase" app.config['MONGO_DBNAME'] = 'SomeCollection' app.config['SECRET_KEY'] = 'secret_key' |
NOTE: In newer versions of Flask-PyMongo, the MongoDB client’s database will return None if a variable is not specified:
How to pass the application object to Flask’s PyMongo class
Pass the Flask application configuration to the PyMongo() method with the following script:
1 2 3 4 | mongo = PyMongo(app) db = mongo.db col = mongo.db["Some Collection"] print ("MongoDB Database:", mongo.db) |
How to Connect to MongoDB and Have Flask Return Data as HTML
Use the application’s route parameter to specify the route for the below function. Use the app’s routing to create multiple functions that can be used on different pages of your website.
The following command shows how to declare a function that will return MongoDB data as HTML:
1 2 3 | # Declare an app function that will return some HTML @app.route("/") def connect_mongo(): |
How to Create an HTML String from MongoDB Data
The MongoDB database and collection must be explicitly cast as a Python string (str) when concatenating the HTML string in order to avoid a TypeError. The following example shows how to get Flask to return a MongoDB database, its collection and single documents in the collection:
1 2 3 4 5 6 7 8 9 10 11 12 13 14 15 16 17 18 19 20 21 22 23 24 25 26 27 28 29 30 31 32 33 34 35 36 37 38 39 40 | # Setup the webpage for app's frontend html_str = ''' <!DOCTYPE html> <html lang="en"> ''' # Have Flask return some MongoDB information html_str = html_str + " # Object Rocket Flask App Tutorial " html_str = html_str + " ## mongo.cx client instance:" + str(mongo.cx) + " " html_str = html_str + " ### " + str(db) + " " html_str = html_str + " ### " + str(col) + " " # Get a MongoDB document using PyMongo's find_one() method html_str = html_str + " " + str(col.find_one()) + " </html>" return html_str if __name__ == '__main__': app.run(debug=True) |
NOTE: Set debug to True whenever running the app in order to make changes to the code without having to restart the Flask server each time.
How to Export the Application Path and Run the Flask Server
First, open a terminal window and navigate to the app’s directory. Now use the belowexport command to set the debugging mode and export the path to the Python script. Lastly, as shown in the following example, use the run command to start the Flask-MongoDB server.
1 2 3 | export FLASK_DEBUG=1 export FLASK_APP=mongo_connect.py flask run |
How to use the ‘export’ command to Troubleshoot Flask while it is running
If any issues occur, execute the following command to obtain help with the shell commands or for help exporting the Flask app:
1 | python3 -m flask |
Note that Flask runs on the default port 5000. If it cannot run and connect to MongoDB because of an “[Errno 98] Address already in use” OS error, then execute the following terminal command to determine the PID of the service occupying the port:
1 | lsof -n -i4TCP:5000 |
Take the five-digit PID number from the response, typically the second column from the left, and use it after the following kill -9 command to terminate the process:
1 | sudo kill -9 12345 |
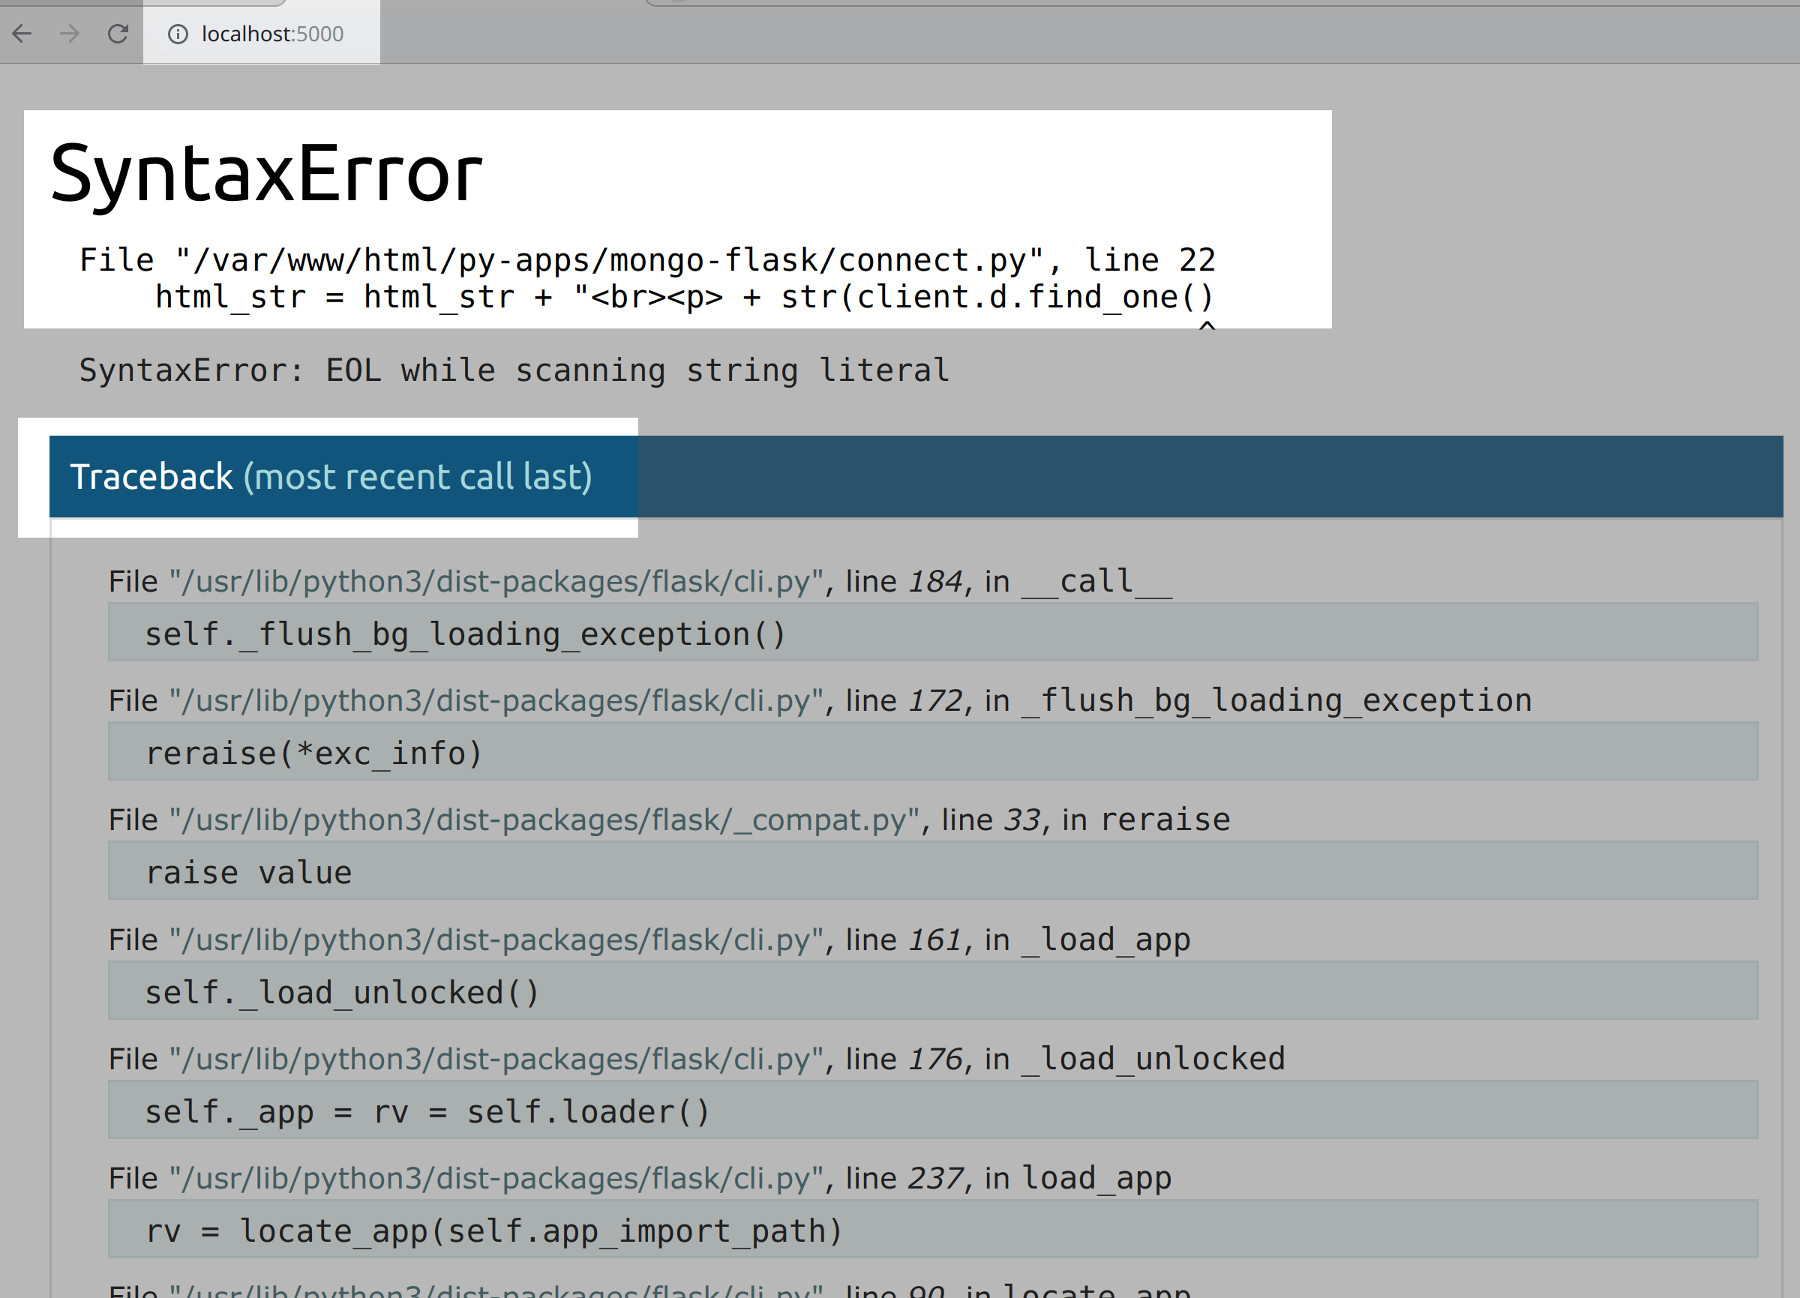
How to use the Wergzeug interactive debugger to troubleshoot the Flask application in a browser
Below is a screenshot of the Wergzeug interactive debugger catching a Python syntax error in the Flask application:
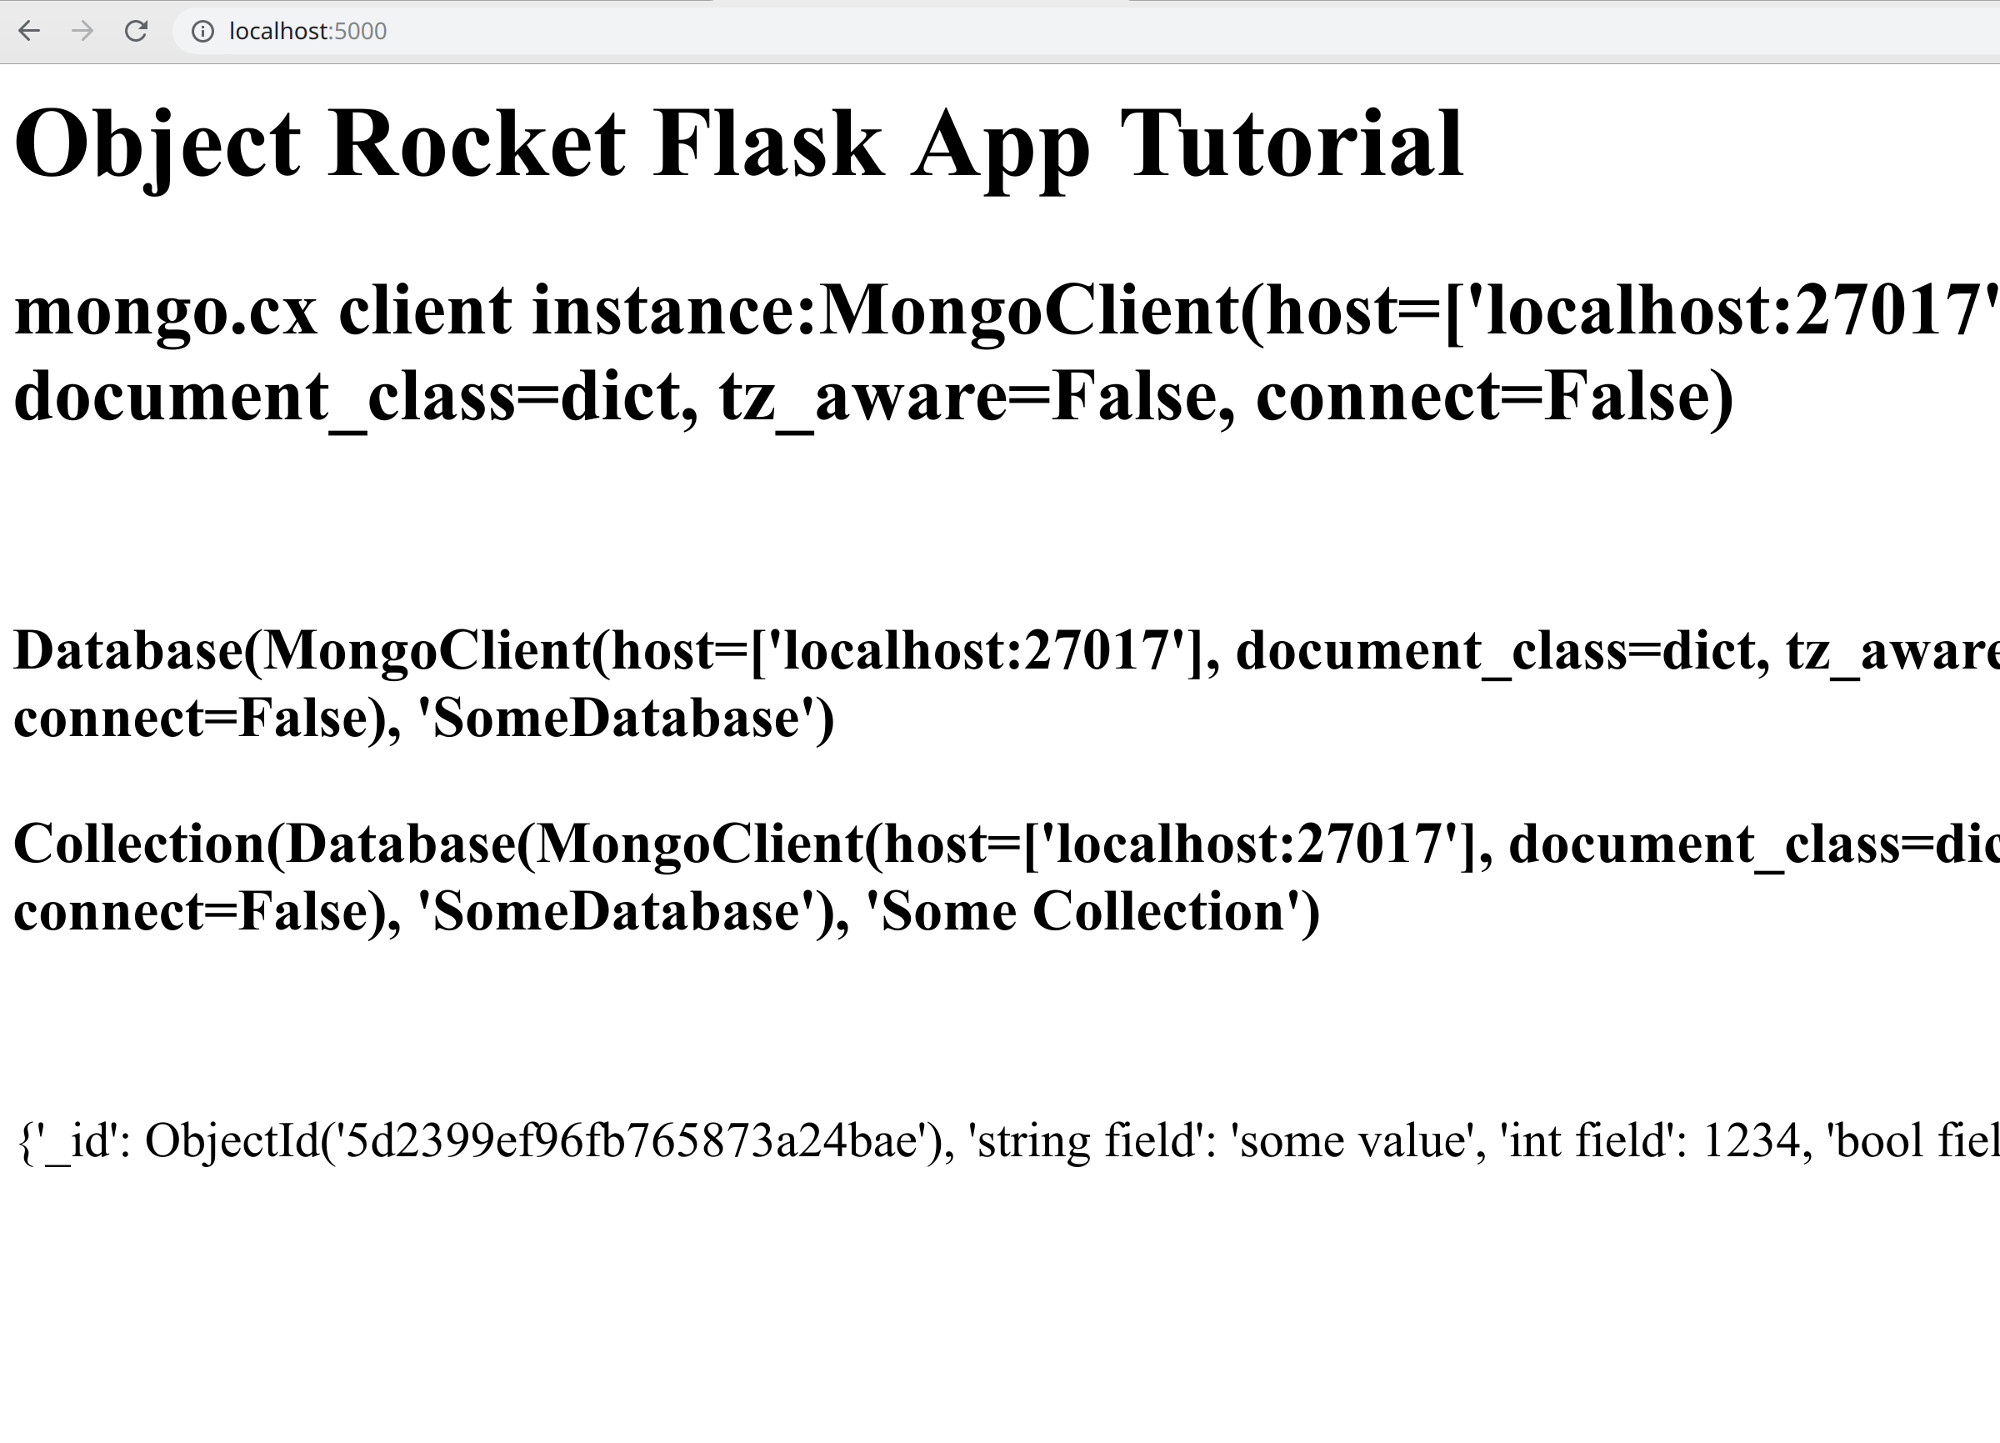
The MongoDB database and collection data should load as HTML in a webpage when navigated to http://localhost:5000 in a browser:
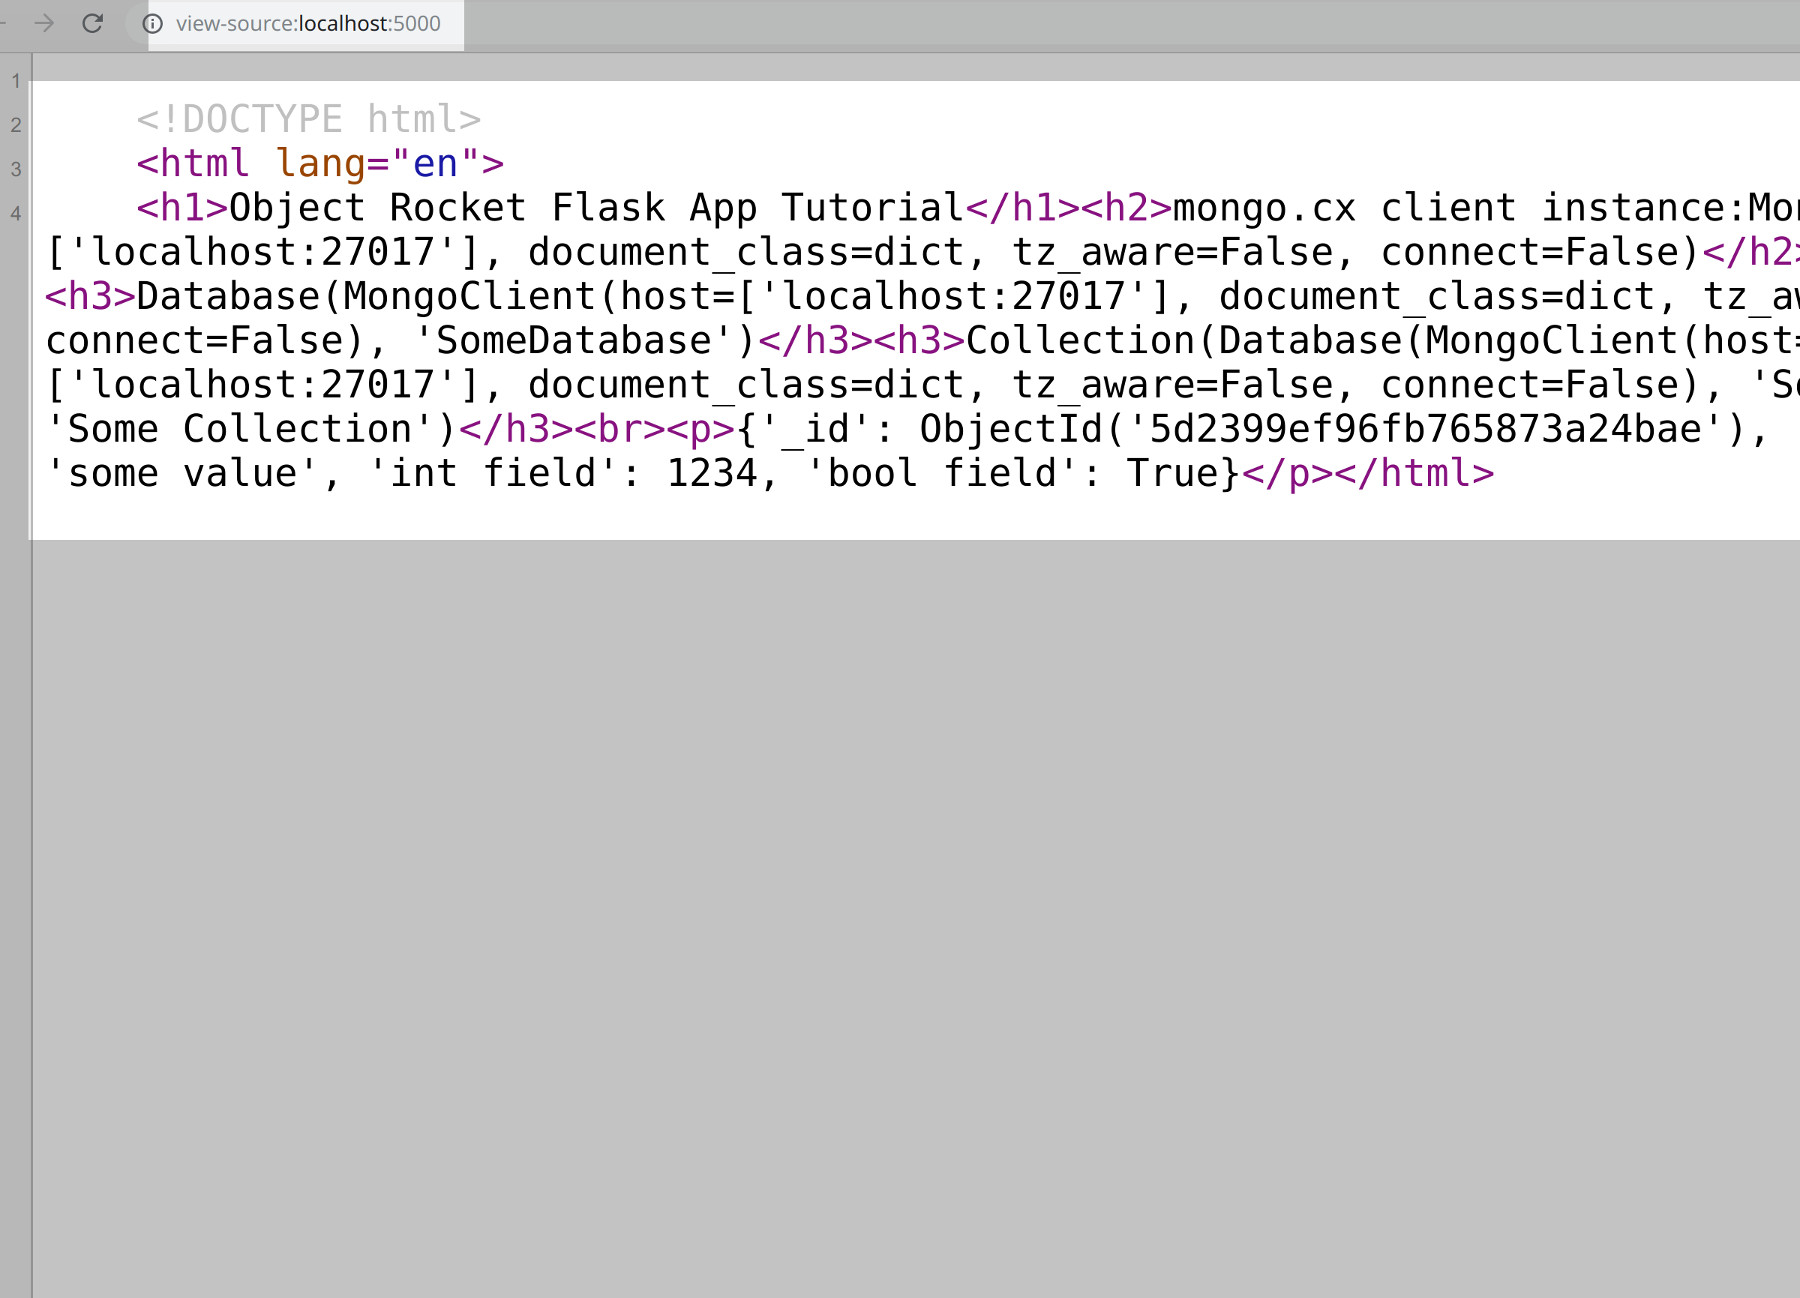
Source HTML of the MongoDB data returned by Flask-PyMongo
Conclusion
This Flask-pyMongo tutorial explained how to easily create a MongoDB restful API in Python. Explanations were provide for how to use the Flask app with MongoDB to create a directory and a Python HTTP client with MongoDB, how to install PyMongo and flask pyMongo packages for Python 3 and configure flask for MongoDB. Instructions were also provided for using the export command to Troubleshoot Flask and creating a Python script for the Flask application. Remember to always set debug to True when making changes to the code to prevent having to continually restart the Flask server.
Just the Code
1 2 3 4 5 6 7 8 9 10 11 12 13 14 15 16 17 18 19 20 21 22 23 24 25 26 27 28 29 30 31 32 33 34 35 36 37 38 39 40 41 42 43 44 45 46 47 48 49 50 51 52 53 54 55 56 57 58 59 60 61 62 63 64 | #!/usr/bin/env python3 #-*- coding: utf-8 -*- # Import the required Python modules and Flask libraries from flask import Flask from flask_pymongo import PyMongo from pymongo import MongoClient # Configure the Flask application to connect with the MongoDB server app = Flask(__name__) app.config["MONGO_URI"] = "mongodb://localhost:27017/SomeDatabase" app.config['MONGO_DBNAME'] = 'SomeCollection' app.config['SECRET_KEY'] = 'secret_key' # Connect to MongoDB using Flask's PyMongo wrapper mongo = PyMongo(app) db = mongo.db col = mongo.db["Some Collection"] print ("MongoDB Database:", mongo.db) # Declare an app function that will return some HTML @app.route("/") def connect_mongo(): # Setup the webpage for app's frontend html_str = ''' <!DOCTYPE html> <html lang="en"> ''' # Have Flask return some MongoDB information html_str = html_str + " # Object Rocket Flask App Tutorial " html_str = html_str + " ## mongo.cx client instance:" + str(mongo.cx) + " " html_str = html_str + " ### " + str(db) + " " html_str = html_str + " ### " + str(col) + " " # Get a MongoDB document using PyMongo's find_one() method html_str = html_str + " " + str(col.find_one()) + " </html>" return html_str if __name__ == '__main__': app.run(debug=True) |


Pilot the ObjectRocket Platform Free!
Try Fully-Managed CockroachDB, Elasticsearch, MongoDB, PostgreSQL (Beta) or Redis.
Get Started