How To Replace A Document In Elasticsearch
Introduction:
If you’re using Elasticsearch to store and manage your data, you’ll probably need to replace documents from time to time. With Elasticsearch, replacing a document is a simple process– it’s the same process as updating a document in Elasticsearch using the Update API and replacing all the old data within the document with new data. This step-by-step tutorial will demonstrate how to replace a document in Elasticsearch using the Update API.
Prerequisites:
Before we attempt to replace a document in Elasticsearch, it’s important to make sure certain prerequisites are in place. For this task, the system requirements are simple:
- The Elasticsearch service must be running, and there should be an index, with some documents in it, that you’ve already created and can modify. You can use cURL in a UNIX terminal or a Windows command prompt to make an HTTP request to the Elasticsearch cluster to make sure it’s working.
- You can also make HTTP requests using the Kibana Console UI to check if there are indices in the cluster. The Kibana service needs to be running on your server (the default port is
5601) if you want to use the Kibana Console.
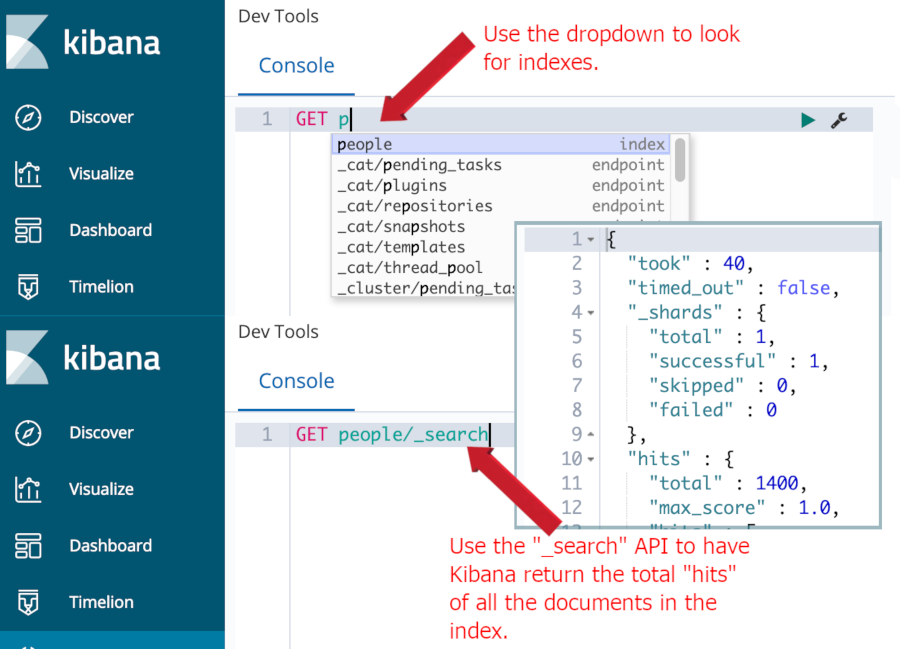
Using the Kibana Console to look for documents in an Elasticsearch index
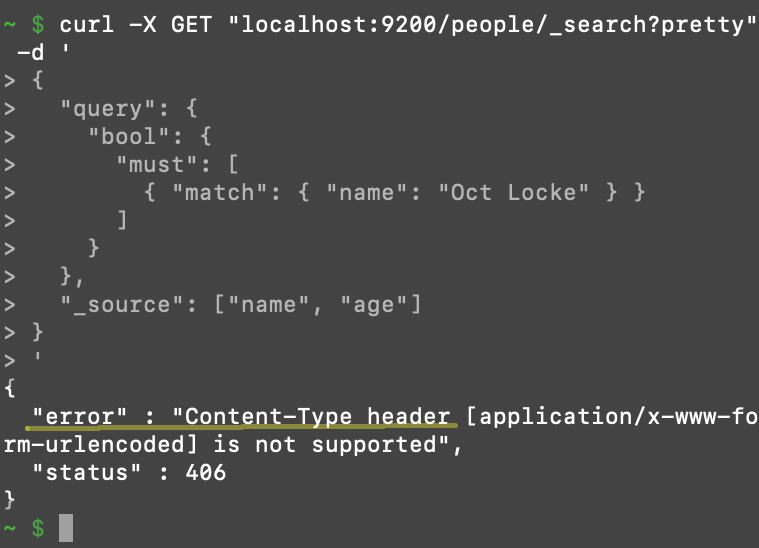
WARNING: Since version 6.0 of Elasticsearch, a strict content-type check is enforced for all cURL requests that contain a JSON object in the body of the request. This means that the request header for your cURL must contain the following header option: -H 'Content-Type: application/json' in it.
Failing to include this will produce a 406 Content-Type header error:
Getting a 406 Content-Type header error after making a cURL request to Elasticsearch:
Use the curl --help command to get more information about all of cURL’s features.
Finding or creating an Elasticsearch document
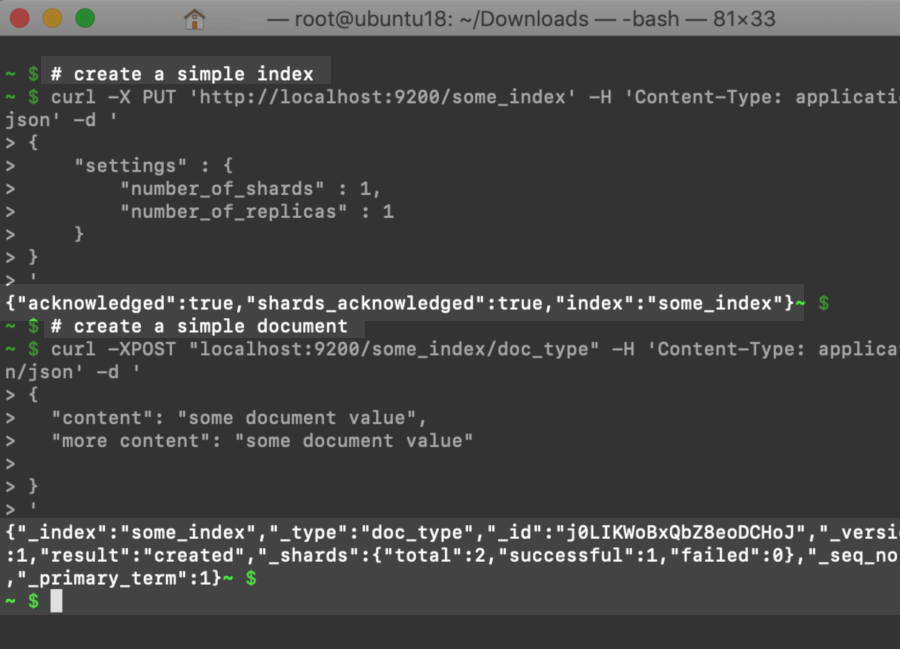
In order to replace a document, it needs to exist and be indexed in Elasticsearch. If the Elasticsearch cluster has no indices or documents in them, you can quickly create both with just two HTTP requests in a terminal:
1 2 3 4 5 6 7 8 9 10 11 12 13 14 15 16 17 | # first, we'll create a simple index curl -X PUT 'http://localhost:9200/some_index' -H 'Content-Type: application/json' -d ' { "settings" : { "number_of_shards" : 1, "number_of_replicas" : 1 } } ' # next, we'll create a simple document curl -XPOST "localhost:9200/some_index/doc_type" -H 'Content-Type: application/json' -d ' { "content": "some document value", "more content": "some document value" } ' |
Kibana Console’s _search response for some_index:
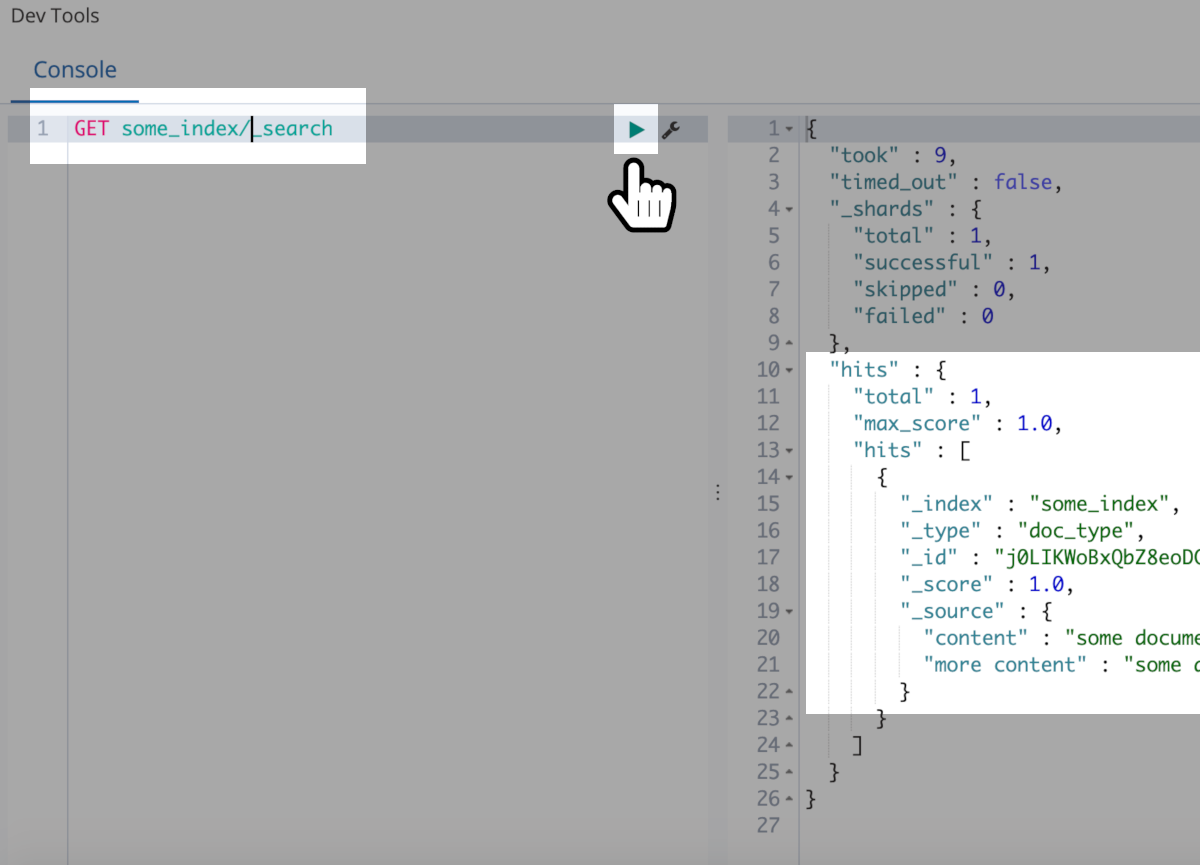
As you can see in the screenshot above, Elasticsearch dynamically created a unique ID of "j0LIKWoBxQbZ8eoDCHoJ" for the new document. In order to replace this document, we can just update it with new information, using that exact same ID.
Replace an Elasticsearch document with new data
We can use a PUT request in Kibana, or curl command in a terminal window, to update the document’s data and essentially replace it:
1 2 3 4 5 6 | PUT some_index/doc_type/j0LIKWoBxQbZ8eoDCHoJ { "new_field1" : "new data here!", "new_field2" : "more new data!", "new_field3" : "data data data!!!" } |
To verify that the update was successful, we can just make another GET request to retrieve the updated document:
1 | GET some_index/doc_type/j0LIKWoBxQbZ8eoDCHoJ |
The JSON response should contain a Boolean field called "found" with a value of true, as well as some new "_source" data in it:
1 2 3 4 5 6 7 8 9 10 11 12 13 14 | { "_index" : "some_index", "_type" : "doc_type", "_id" : "j0LIKWoBxQbZ8eoDCHoJ", "_version" : 3, "_seq_no" : 2, "_primary_term" : 1, "found" : true, "_source" : { "new_field1" : "new data here!", "new_field2" : "more new data!", "new_field3" : "data data data!!!" } } |
Looking at the JSON response shown above, we can see that Elasticsearch replaced the existing document’s source data with the data that we passed in the JSON body of the PUT request. This confirms that our replacement was successful.
If a document with the particular _id we specified doesn’t exist, it won’t return an error. Instead, Elasticsearch will index it as a new document, and assign the source data to that ID explicitly passed as an argument in the request’s header.
Enforce perfect mapping when updating an index’s document
It can be helpful to use the "strict" option when mapping an Elasticsearch index to prevent new fields from being dynamically added to a document. Without this option, new fields can be added to a document just by indexing a replacement document that contains the new fields. The "strict" setting is used with the dynamic option for the index’s mapping:
1 2 3 4 5 6 7 8 9 10 11 12 13 14 15 16 17 18 19 20 21 22 | # explicit "mappings" with the dynamic option set to "strict" curl -X PUT 'localhost:9200/mapped_index?pretty' -H 'Content-Type: application/json' -d ' { "mappings": { "doc_type": { "dynamic": "strict", "properties": { "field_text": { "type" : "text" }, "field_int": { "type" : "integer" }, "field_date": { "type": "date", "format": "yyyy-MM-dd" } } } } } ' |
When the strict option is enabled, if you try to replace a document, or even just PUT a new document into the index, using dynamically introduced fields, you’ll receive a 400 HTTP Bad Request error:

This is a simple way to prevent updating or replacing a document’s _source data with values that don’t conform to the mapping schema of the index.
Conclusion:
Replacing a document is a common task when you’re working with data stored in Elasticsearch. Fortunately, the Update API makes the process simple and efficient. In this article, we demonstrated how replacing an Elasticsearch document is nothing more than updating a document in Elasticsearch with an entirely new set of data properties. It’s helpful to set the "dynamic" option to "strict" while creating an index with an explicit mapping; this option will keep your index clean by ensuring that a document can only be replaced with data that conforms to the original mapping schema. With the instructions and tips offered in this article, you should have no trouble updating and replacing any document in Elasticsearch.

Pilot the ObjectRocket Platform Free!
Try Fully-Managed CockroachDB, Elasticsearch, MongoDB, PostgreSQL (Beta) or Redis.
Get Started