How To Perform Rolling Upgrades To An Elasticsearch Cluster
Introduction:
The benefit of a rolling upgrade is that it doesn’t interrupt the Elasticsearch service. In essence, you shut down a node, upgrade it, and then restart it. You’ll repeat the process until all the nodes are updated. When a node is being updated, shards are sent to other nodes. Everything runs smoothly without having to stop the Elasticsearch service.
A full cluster restart upgrade is the opposite of a rolling upgrade, mainly because a full cluster restart upgrade is accomplished all at once. The Elasticsearch service is shut down in that case. You’ll need to do that when you upgrade to a higher version of Elastic Stack. If a cluster has more than one Elasticsearch version, an upgraded index’s shards are unable to be replicated. It’s important to disable shard replication in a full cluster restart upgrade as well, just so you know.
That’s the difference between rolling upgrades and a full cluster restart upgrade. This step-by step tutorial explains how to perform an Elasticsearch cluster rolling upgrade, the one that requires shutting down one node at a time.
Prerequisites
It’s always a good practice to back up everything before you upgrade an Elasticsearch cluster. Before the upgrade, take an image of the cluster just in case a roll back calls for it. That’s because roll backs for a few breaking changes will likely be needed.
Check for compatibility among Elastic products. The versions (for example 7.x and so on) should be the same.
Do a full cluster restart If you need to upgrade from 5.5 or any other major version. Otherwise, all you’ll need is a rolling upgrade.
NOTE: Reindexing all indexes are required to update Elasticsearch clusters 5.6 and earlier versions.
Get ready for a rolling upgrade
Backup the cluster data
- The most important step to do before you upgrade. As discussed in the Prerequisite section, if you hadn’t already, back up your data. One error such as a node fail during the upgrade can cause a loss of irreplaceable data. Use a command-line interface tool to export the data in Elasticsearch in CSV format.
Verify the status of the cluster
- Make sure the cluster is robust and ready for the upgrade. Perform a cURL GET
_clusterhealth request.
1 2 3 4 5 | # get health of an Elasticsearch cluster curl -X GET 'localhost:9200/_cluster/health?pretty' # use the cURL request to get the index health as well: curl -X GET "localhost:9200/_cluster/health/some_index,another_index" |
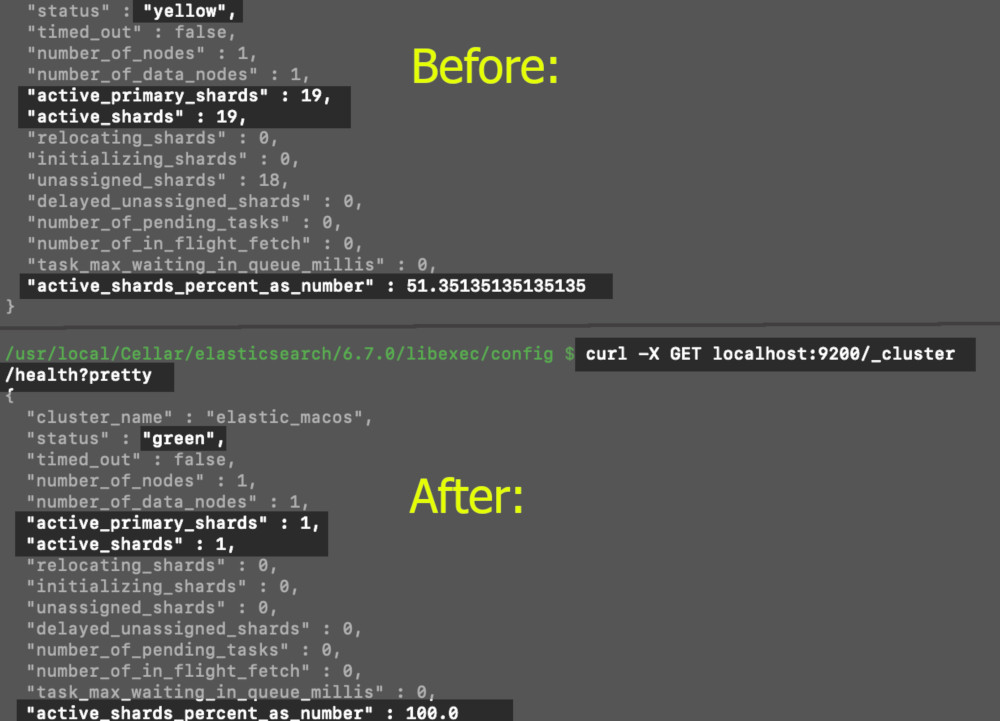
- A
"yellow"value returned of the JSON object is a sign of unhealthy status value. To decrease the chance of losing data, check that your shard replicas are allocated. If you have to, modify the cluster or create more clusters so you have the number of shards and replicas you need.
The unhealthy "yellow" "status" turns to a "green" healthy "status":
Here’s another way to check the status of a cluster (_cluster/state):
1 | curl -XGET 'http://localhost:9200/_cluster/state?pretty' |
Disable allocation of replica shards:
Keep nodes from automatically trying to adjust, make
"primaries"the"cluster.routing.allocation.enable"option.Route just primary nodes. To do this, use the terminal window or command line and create an HTTP request.
1 2 3 4 5 6 7 | # Kibana Console PUT _cluster/settings { "persistent": { "cluster.routing.allocation.enable": "primaries" } } |
- Alternatively, here’s how to do this is in
curl:
1 2 3 4 5 6 7 | curl -X PUT "https://{DOMAIN_NAME}:9200/_cluster/settings?pretty" -H 'Content-Type: application/json' -d' { "persistent": { "cluster.routing.allocation.enable": "none" } } ' |
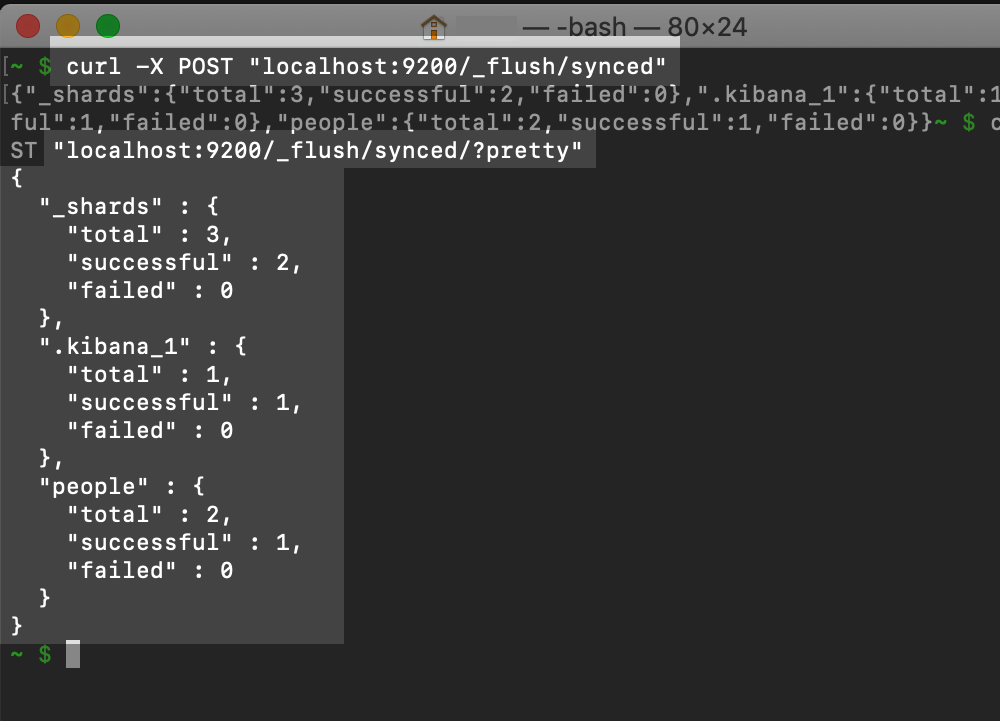
Conduct a synced flush by doing a POST request
- To streamline the process, in cURL or Kibana, perform a sync-flush, then restart the cluster. Although this step is not mandatory, you’ll expedite the recovery of the shards if you do
POSTsync-flush.
1 | POST _flush/synced |
- This is how it’s done in cURL:
1 | curl -X POST "https://{DOMAIN_NAME}/_flush/synced/?pretty" |
Sometimes different processes occurring at the same time can cause the sync-flush to fail the first time. It’s not uncommon to have to repeat the request.
A synced flush is performed using the POST request in cURL:
Begin the Rolling Upgrades (per node)
Select one node from a cluster in Elasticsearch.
Locate the service management framework of the server. You’ll need this information so you can shut down the node with the command that will work. If you’re using Linux, try “SysV Init” or “systemd”. Either one of those usually works.
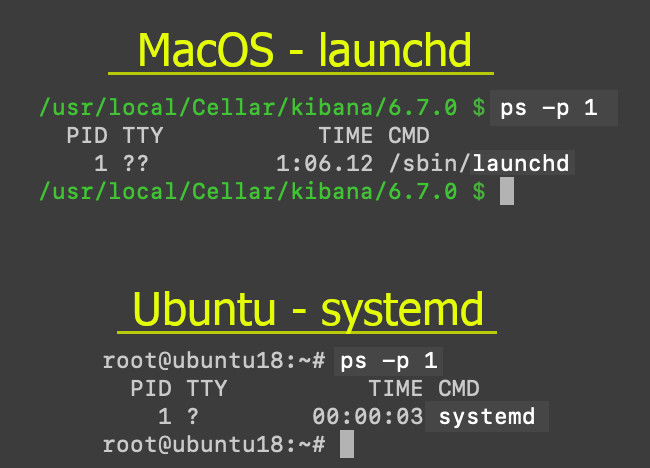
The best way to find out which one will work for you is, from the terminal command line, use ps -p 1.
How to shut a node down
It’s simple when the cluster is configured to have on a machine or server just one node. In that case, all you need to use to shut down an instance of Elasticsearch service management of the server or the Java service.
Here’s how you do it. Go to the
systemdservice management system framework. On a command line on a server there, usestop.
1 2 3 | sudo systemctl stop elasticsearch.service # ..or sudo -i service elasticsearch stop |
- Use
grepfor background daemon Elasticsearch, if it’s running that way. You’ll need to find thePIDfirst. Next, usekill-9.
1 2 3 4 5 6 7 8 9 10 11 12 | # grep the JVM Process Status for the Elastic PID sudo service --status-all | grep 'elastic' # ..or return cat info on the PID: cat /tmp/elasticsearch-pid && echo # ..or grep the JVM Process Status for the Elastic PID jps | grep Elasticsearch # kill the service # replace {PID} with the service's PID number sudo kill -9 {PID} # e.g. 12345 |
Elasticsearch node is ready. Upgrade it.
Download the latest installation version:
Download Elasticsearch – Check that your archive is compatible with other Elastic products. If you’ve already completed this step, great.
Linux is a little different. All you have to do to download the package is use the
wgetcommand and then the URL to the archive. This will download it to the(pwd)current working directory.This will be just an upgrade that is minor yet works properly with the rolling upgrade you’re making.
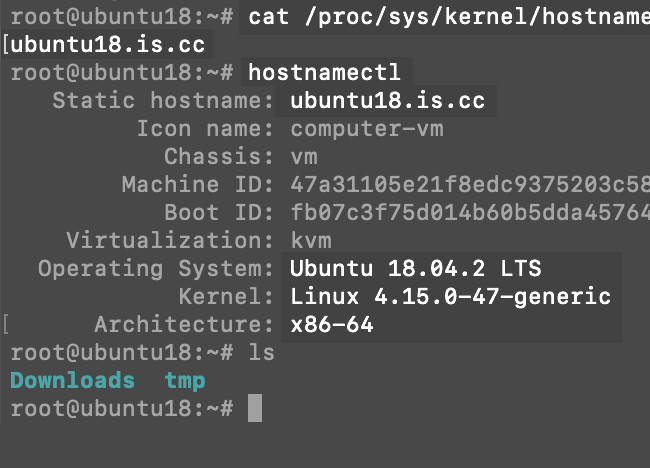
Get the
hostnamect1information if you need to find out the Linux distribution on your server. To do this, connect remotely to your server through a terminal window and use thehostnamect1command.
1 | hostnamectl |
The hostnamect command lets you know which Linux distribution you have installed.
 Older versions are available if you require one other than the 7.x version made available in April 2019. Go to Elastic’s Past Releases to download the version you need.
Time to upgrade Elasticsearch plugins for the node
Plugin upgrading adds the finishing touch. You’ll want everything to be compatible and leave no room for error. Take time to complete this step to increase the chances of a successful upgrade.
Note that Elasticsearch plugins must be upgraded when upgrading a node.
- Plugin upgrading is easy to do if you use the script
elasticsearch-pluginfrom a terminal in Linux to return a plugin list.
1 | sudo bin/elasticsearch-plugin list |
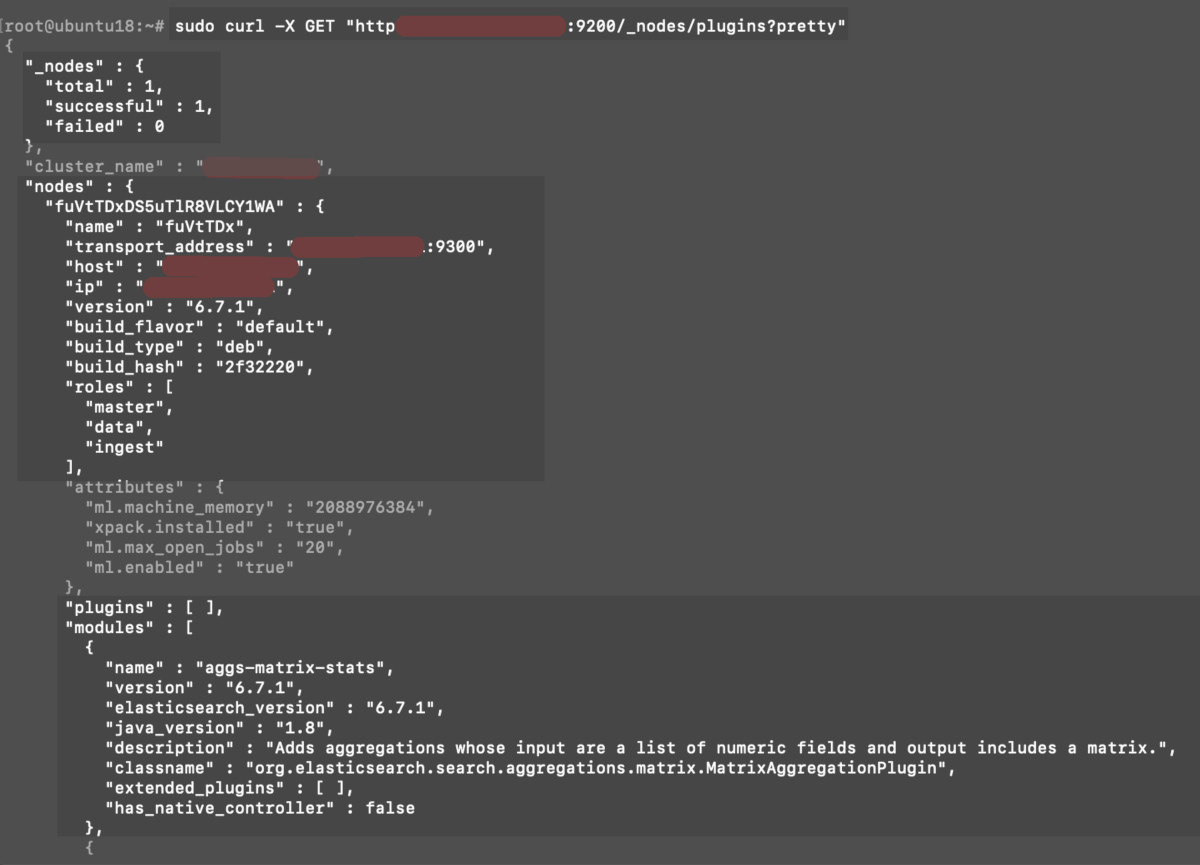
In cURL, do a _nodes request to return a list of nodes and corresponding plugins from the cluster in Elasticsearch.
1 2 | # replace {SERVER_DOMAIN} with the IP address or domain name sudo curl -X GET "http://{SERVER_DOMAIN}:9200/_nodes/plugins?pretty" |
Using cURL from remote access to a server in Linux. The GET request _nodes/plugins?pretty returns a nodes and plugins list.
Delete or upgrade plugins in Elasticsearch
- Remove any plugins you don’t want. Upgrade the plugins that remain. The script
elasticsearch-pluginalong with the commandinstallupdates the plugin. Here’s the official Elastic documentation for plugin updating and removing.
The quick steps are listed in the example here.
1 2 3 4 5 | # replace {PLUGIN_NAME} with the actual plugin name sudo bin/elasticsearch-plugin install {PLUGIN_NAME} # use the 'remove' command to uninstall the plugin sudo bin/elasticsearch-plugin remove {PLUGIN_NAME} |
The Elasticsearch upgraded node is ready. Restart it.
- Great job! You’ve completed the installation and have updated the plugins. Restarting the upgraded node is the next step.
Restart Elasticsearch:
Use the service management system framework to restart Elasticsearch.
1 2 3 | sudo systemctl start elasticsearch.service # ..or sudo -i service elasticsearch start |
Verify that the node has recovered completely
- Check the recovery of the node by making a
GETrequest in cURL.
1 2 | # replace {DOMAIN_NAME} with IP address or domain name sudo curl -X GET "https://{DOMAIN_NAME}:9200/_cat/nodes/" |
- If everything is working okay for the node, you’ll see the IP address of the server in the HTTP response. If something is wrong, you’ll see a “Failed to connect to {DOMAIN_NAME} port 9200:” response.
1 2 | Failed to connect to {DOMAIN_NAME} port 9200: Connection refused |
Disable cluster attempts to restore shard allocation
Make the cluster.routing.allocation.enable settings value of null to stop the cluster from continually trying to shard allocate.
1 2 3 4 5 6 7 | sudo curl -X PUT "https://{DOMAIN_NAME}:9200/_cluster/settings" -H 'Content-Type: application/json' -d' { "persistent": { "cluster.routing.allocation.enable": null } } ' |
Wait three minutes, then look at the nodes health to verify the status and find out if the node has recovered:
1 2 3 4 5 | # get the node's health sudo curl -XGET 'https://{DOMAIN_NAME}:9200/_cat/health?pretty' # get the node's recovery status sudo curl -XGET 'https://{DOMAIN_NAME}:9200/_cat/recovery?pretty' |
The cluster health and node is checked after starting Elasticsearch on a Linux server’s terminal.

Be patient. The node might take a little longer to recover.
Sometimes, nodes take more than a few minutes to recover. Check the node every five minutes a few times if you get a “Fail to connect” response. The POSTsync-flush command you completed earlier should make a difference right now. It was recommended for this purpose.
WARNING: It’s important to wait until the current node you are working on has recovered completely before you move on the next node. The cluster must be stable in between each node upgrade. Set aside enough time to complete each node, because after you start the process, you’ll want to finish all of a cluster’s nodes in succession.
Conclusion
In this tutorial, you learned how to complete an Elasticsearch cluster rolling upgrade, node by node. Rolling upgrades enable you to keep Elasticsearch running without disrupting the service. In this way, we can say that the method doesn’t affect productivity. This is different from a full cluster restart upgrade, which requires the service to be totally shut down during an upgrade. Major version upgrades require a full cluster restart type of upgrade.
Some important facts to keep in mind:
Rolling upgrades for each node must be finished before any new functions or features are activated or else it won’t work.
The corresponding minor-update and Elastic Stack upgraded version has to match.
Elastic is currently updating its Rolling Restarts official documentation to ensure compatibility with its latest 7.x version of Elastic Stack products. Refer to Elastic’s additional information on upgrading to learn more about it.
`

Pilot the ObjectRocket Platform Free!
Try Fully-Managed CockroachDB, Elasticsearch, MongoDB, PostgreSQL (Beta) or Redis.
Get Started