How To Modify Elasticsearch Documents Using The Node.JS Low-Level Client
Introduction
If you’re working with data in Elasticsearch, you’ll probably need to modify, or update, your documents from time to time. This task can be accomplished quickly and easily in NodeJS — a runtime environment that allows Javascript code to be executed outside of a browser. In this tutorial, we’ll explain how to modify Elasticsearch documents in NodeJS using Elasticsearch’s client library.
Prerequisites
Before we attempt to modify Elasticsearch documents in NodeJS, it’s important to make sure a few prerequisites are in place. For this task, there are a few key system requirements:
- First, the Elasticsearch service needs to be running. You can make an HTTP request to the Elasticsearch cluster to check if the service is running:
1 | curl -X GET localhost:9200 |
As an alternative, you can simply navigate to port 9200 of your localhost server or domain name in a browser:
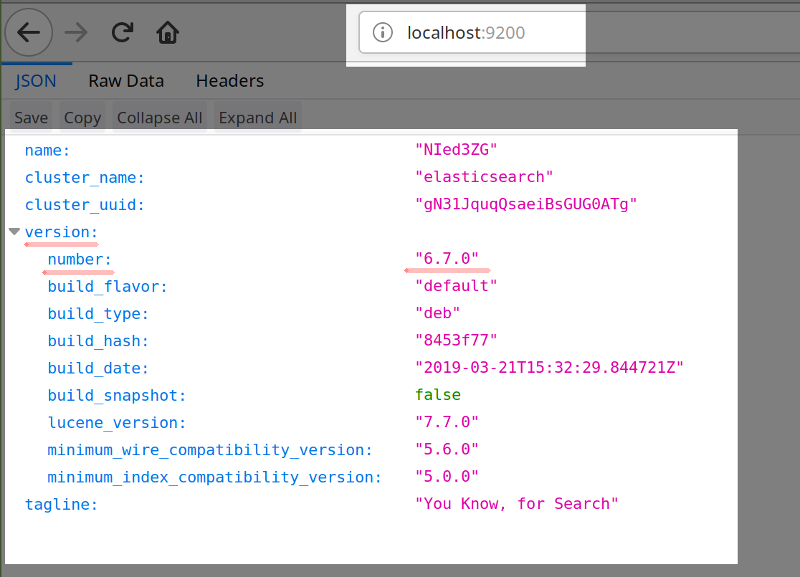
NOTE: As of April 2019, Elasticsearch version 7.0 is only available as a beta release for the Node.JS client library.
- If you’re planning to use the Kibana Console UI to make HTTP requests to the Elasticsearch cluster, you’ll need to have Kibana installed and running.
- Node, as well as the NPM package manager used to install Node.JS modules, must be installed on the system running the Elasticsearch cluster. To check if Node is installed, use the
node -vcommand in a UNIX terminal. This command will also indicate what version of Node is installed. To find out if NPM is installed, use:npm -v
NOTE: Elasticsearch requires that the version of Node be at least v8.
- If you need to install Node, the Windows or macOS package, as well as the source code, can be downloaded from the Node.JS website. On macOS it can be installed using Homebrew’s
brewcommand:
1 2 | brew update brew install node |
- In order to use the Elasticsearch client library in Node.js, you should have a working knowledge of the Javascript language, as well as SSH remote access to the server where Elasticsearch is installed using a private key.
- The example we’ll show in this tutorial also assumes that there is already an index, with some documents in it, on your Elasticsearch cluster.
Create a new Node.JS project for the Elasticsearch client
Now that we’ve reviewed the system requirements, let’s dive into our example. Our first task will be to create a folder, and run the npm install command inside the folder, to get a Node.JS Elasticsearch project started. If you already have an Elasticsearch project set up, you can skip this section.
In our example, we’ll use the folder name elastic-nodejs:
1 2 3 4 5 6 7 8 | # create a directory that contains the Node.JS project sudo mkdir elastic-nodejs # navigate into the directory cd elastic-nodejs # create the JSON file used to install Elastic client via NPM sudo nano package.json |
The entire package.json file (which contains the Elasticsearch client library’s dependencies and meta data) must be in your project folder before you run the sudo npm install elasticsearch command. Consult Elastic’s official Node.JS github repository for more information.
Once you’ve verified that a local copy of the repository’s package.json file has been made in your project folder, you can run the following command to install the client library:
1 | sudo npm install elasticsearch |
Connecting Node to an Elasticsearch cluster
Next, we’ll create another Javascript file, using the nano editor, and call it test.js:
1 | sudo nano test.js |
Once you’re in the Nano editor, paste the snippet of Javascript code shown below into your terminal window. Be sure to change the username, password, domain name, and port to match your Elasticsearch configuration:
1 2 3 4 5 6 7 8 9 10 11 12 13 14 15 16 17 | // require the elasticsearch client library var elasticsearch = require('elasticsearch'); /* Follow this format for the 'hosts' array used to connect: hosts: ['https://username:password@host:port'] */ var client = new elasticsearch.Client( { hosts: ['http://johndoe:password@localhost:9200'] }); // Have Node print out some cluster health data to terminal: client.cluster.health({},function(error, response, status) { console.log("Errors:", error, '\n'); console.log("Cluster health:", response, '\n'); console.log("Status:", status, '\n'); }); |
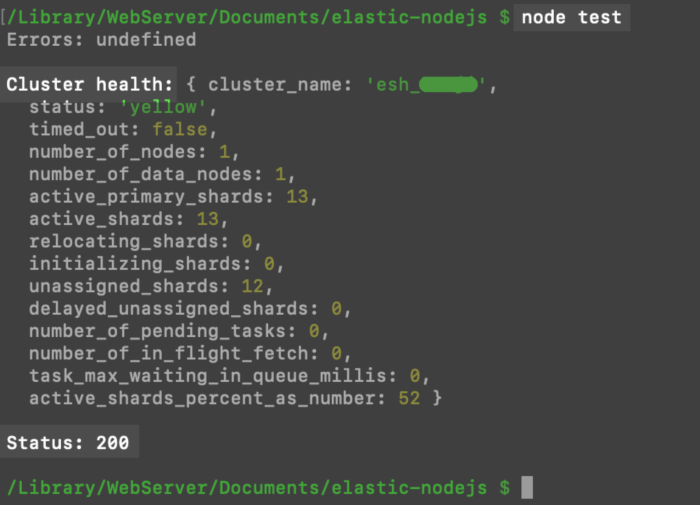
To save the script in the nano editor, press CTRL+O, and then press CTRL+X to exit and return to the terminal. Once you’re back in the terminal window, run node test (substituting the name of your JS file for “test”), and it should return information about the health of your Elasticsearch cluster:
Elasticsearch cluster health information returned using the Node.JS client library:
Elasticsearch’s Update API in Node.JS
The Update API for the Node.JS client library maps closely to Elasticsearch’s syntax structure, with just a few minor exceptions: The _source JSON data for the document is referred to as the body, when it’s passed as an argument in the Node.JS client library. It’s declared as a nested associative array, with doc as its key.
Let’s look at an example of this syntax:
1 2 3 4 5 6 7 | var param = { // referred to as '_source' in Elastic's JSON doc : { "field_1" : "some content", "field_2" : "more content" } } |
When you pass the _id field as a key in a Node.JS API call, be sure to refer to it as id without the underscore (_). Similarly, the document type and index fields do not have underscores,
Create a JS array for the Elasticsearch document’s body:
Next, we’ll create a Javascript associative array object that contains a nested doc array. This nested array contains all of the new _source data that we’ll use to modify the document:
1 2 3 4 5 6 7 8 9 10 11 12 13 14 15 | /* DOCUMENT BODY: The "_source" data, or "body", of the document, needs to be a nested array, with a 'doc:' key containing all of the document's _source data */ sourceData = { doc: { "color" : "blue", "engine" : "v6", "model" : "Prius", "year" : "2010", "time_stamp" : Math.floor(Date.now() / 1000) } } |
You can see in this example how easy it is to create a timestamp marking the precise time the update request was made by using Javascript’s built-in Math.floor() method, which returns an integer representing the epoch time in seconds.
Create another JS array, representing the target document, that will be passed as a parameter to the client instance:
We’re going to need another Javascript associative array at this point, and it will need to have the Elasticsearch document’s id (make sure it’s not _id like in the Elasticsearch JSON objects), the document’s index, and the document type.
1 2 3 4 5 6 7 8 9 10 11 | /* This example is found in Elastic's documentation: client.update([params] [, options] [, callback]) params = {id, index, type} */ var docParam = { id: 4, index:'cars', type: 'toyota', body: sourceData }; |
The docParam array used in this example allows the client to find the index, and one of the documents found in that index, in order to make an API call to the client’s update() method. This will update the document ID specified in the array.
Pass the arrays as arguments while calling the client’s update() method:
1 2 3 4 5 | // create a response object from the API call var response = client.update(docParam, sourceData); // print the response object out in terminal console.log('\nclient.update RESPONSE:', response); |
At this point, we’re ready to put all three of the code components we’ve looked at (the document body array, the document parameters array, and the call to the client.update() method) into our Javascript file and save it. In your terminal window, navigate to the directory of your Node.JS project folder, and run the node command followed by your Javascript filename:
1 2 | node test.js # or just: node test |
If the update is successful, you should see some sort of response. You can make an HTTP request using cURL, or you can use the Kibana Console UI in a browser, to confirm that the document modification was successful:
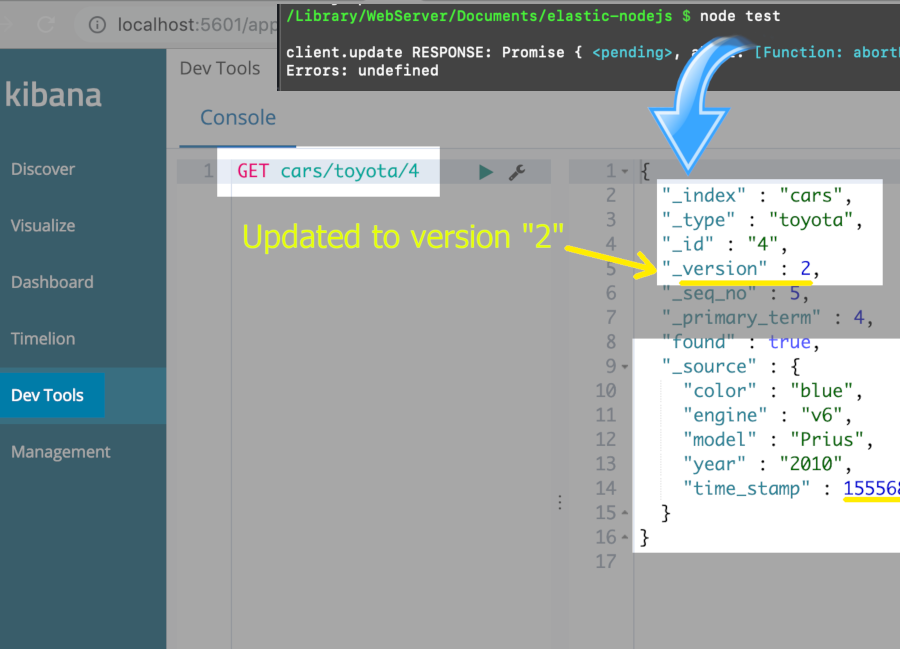
WARNING: If the document id (or the name of the index) specified in the parameters array does not exist in the server’s Elasticsearch cluster, then the client.update() method will return a document_missing_exception error, and the update call will fail.
Update multiple Elasticsearch documents using a query in Node.JS
In some cases, you might not know the ID of the document(s) that need to be updated, but you have a certain set of criteria that you’d like to use to decide which ones get changed. The syntax for an updateByQuery API call would follow this structure:
1 2 3 4 5 6 7 8 9 10 11 12 | /* use a callback to update multiple documents using Elasticsearch query parameters: /* client.updateByQuery({ /* PARAMETERS */, /* QUERY */, }, function(errors, response) { /* DO STUFF HERE */ /* LOG STUFF TO CONSOLE */ }); |
Using the same index that we used in the previous example, a call to that method would look like the following:
1 2 3 4 5 6 7 8 9 10 | client.updateByQuery( { index: "cars", type: "toyota", body: { "query": { "match": { "model": "Corolla" } }, "script": { "inline": "ctx._source.color = 'pink'"} } }, function(errors, response) { console.log("updateByQuery errors: ", errors); console.log("\nupdateByQuery response: ", response); }); |
Let’s look closely at what just happened in this code. After the updateByQuery() API call, using the parameters we provided, every Toyota Corolla in the index will now have a color of pink.
Conclusion
Modifying, or updating, documents in an Elasticsearch index is a common administrative task. With the Elasticsearch client library for NodeJS, the process couldn’t be simpler. Using the step-by-step instructions included in this tutorial, you should have no trouble modifying Elasticsearch documents in NodeJS.
Consult Elastic’s Javascript API documentation on the Update API for more details.
If you’re already familiar with Node.JS and the Elasticsearch Update API, here’s the Node.JS code to modify an Elasticsearch document in its entirety:
1 2 3 4 5 6 7 8 9 10 11 12 13 14 15 16 17 18 19 20 21 22 23 24 25 26 27 28 29 30 31 32 33 34 35 36 37 38 39 40 41 42 43 44 45 46 47 48 49 50 51 52 53 | /* REQUIRE THE API: require the elasticsearch client library */ var elasticsearch = require('elasticsearch'); /* CLIENT INSTANCE: Create a new 'client' instance of the Elasticsearch Node.JS client library. Follow this format for the 'hosts' array used to connect: hosts: ['https://username:password@host:port'] */ var client = new elasticsearch.Client( { hosts: ['http://johndoe:password@localhost:9200'] }); /* DOCUMENT BODY: The _source data, or "body", of the document, needs to be a nested array, with a 'doc:' key containing all of the document's _source data */ sourceData = { // nested array with a 'doc' key doc: { "color" : "blue", "engine" : "v6", "model" : "Prius", "year" : "2010", "time_stamp" : Math.floor(Date.now() / 1000) } } /* FROM Elastic's Documentation: client.update([params] [, options] [, callback]) params = {id, index, type} */ var docParam = { id: 4, index:'cars', type: 'toyota', body: sourceData }; // create a response object from the API call var response = client.update(docParam, sourceData); // print the response object out in terminal // using Javascript's console.log() function console.log('\nclient.update RESPONSE:', response); |

Pilot the ObjectRocket Platform Free!
Try Fully-Managed CockroachDB, Elasticsearch, MongoDB, PostgreSQL (Beta) or Redis.
Get Started