How To Index A PDF File As An Elasticsearch Index
Introduction
Oftentimes, you’ll have PDF files you’ll need to index in Elasticsearch. The attachment processor Elasticsearch works hard to deliver indexing reliability and flexibility for you. To save resources in the process of indexing a PDF file for Elasticsearch, it’s best to run pipelines and use the ingest_attachment method. Both techniques play a large role in the way indexing a PDF file is performed expediently. There’s much more to it though. Read on to learn more about index PDF Elasticsearch Python, attachment processor Python, and more. This step-by-step tutorial explains how to index PDF file Elasticsearch Python. If you already know the steps and want to bypass the details in this tutorial, skip to Just the Code.
Prerequisites
Python 3 – Install Python 3 for your macOS, linux/Unix, or Windows platform. If you have another OS, download the Python 3 version for it.
Elasticsearch – Download, install and run the application.
Just For Elasticsearch – The Python low-level client library – Download the version for Python 3.
Kibana – This is optional. Download and install Kibana to use its UI for the indexes of PDF documents
GETrequests.Use
cURLto view information about the cluster.
1 | curl -XGET "localhost:9200" |
Use PIP to install the PyPDF2 package. That package is for PDF file parsing.
If you haven’t already installed Python low-level client Elasticsearch, use PIP to install it now.
1 2 | pip3 install elasticsearch pip3 install PyPDF2 |
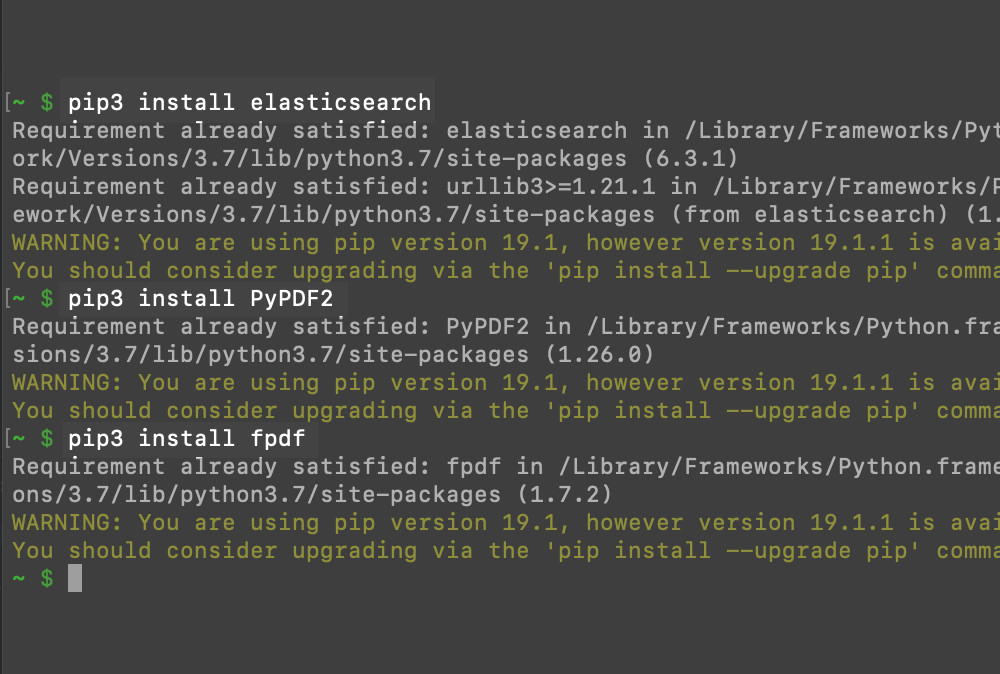
- Next, install the Python library
FPDFto create a PDF file using Python.
1 | pip3 install fpdf |
- Run Kibana for the
GETrequests you’ll be making for the PDF document indexes if you plan on using the Kibana console.
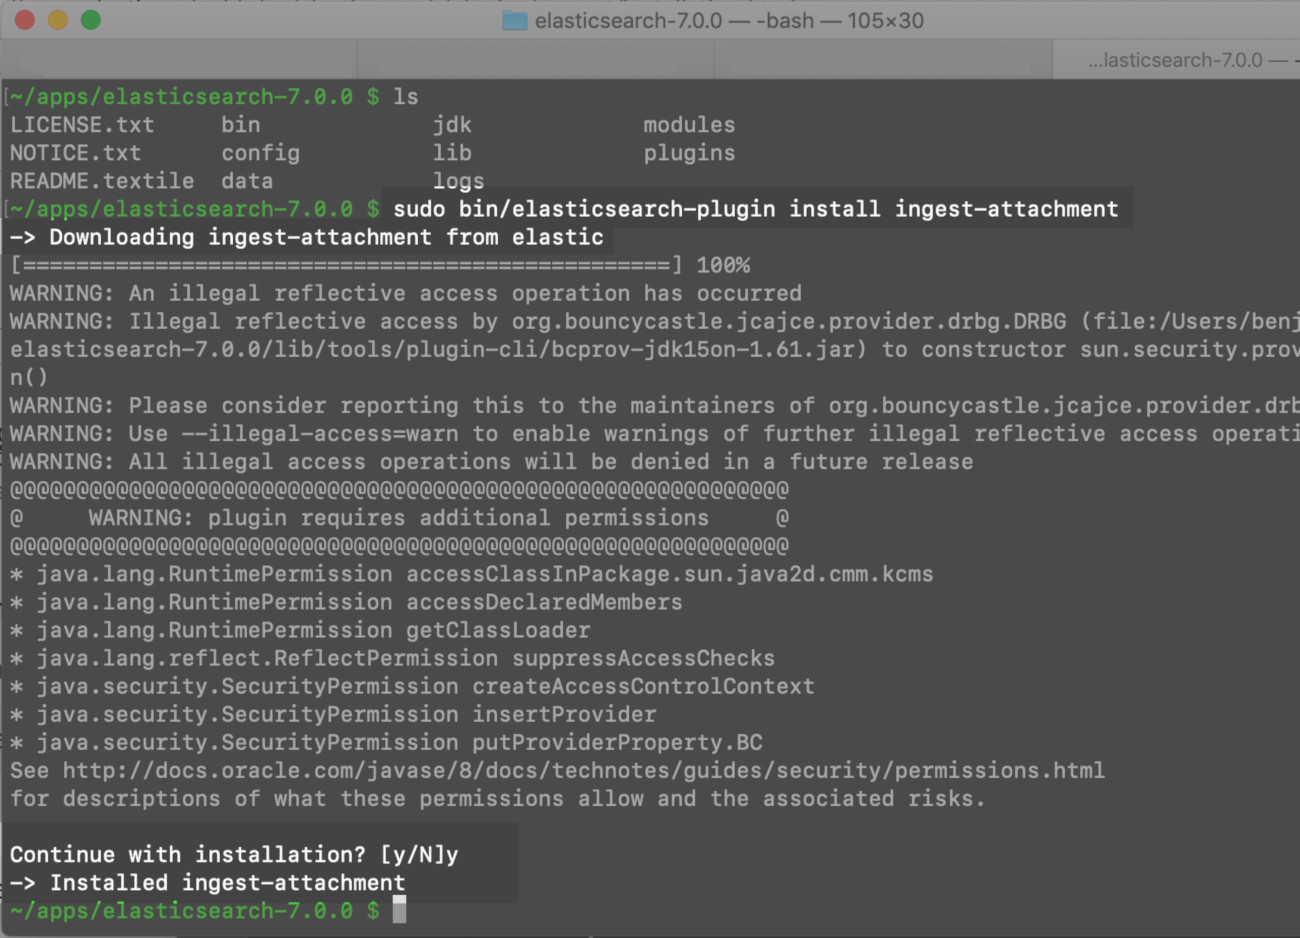
To install the Elasticsearch mapper-attachment plugin use ingest-attachment
The sudo command gives you permissions to install the mapper-attachment plugin. In a terminal window, install the plugin now if you haven’t already.
1 | sudo bin/elasticsearch-plugin install ingest-attachment |
Map the attachment field with a pipeline request
The Elasticsearch indices must be mapped with the
attachmentfield.In a terminal window, use
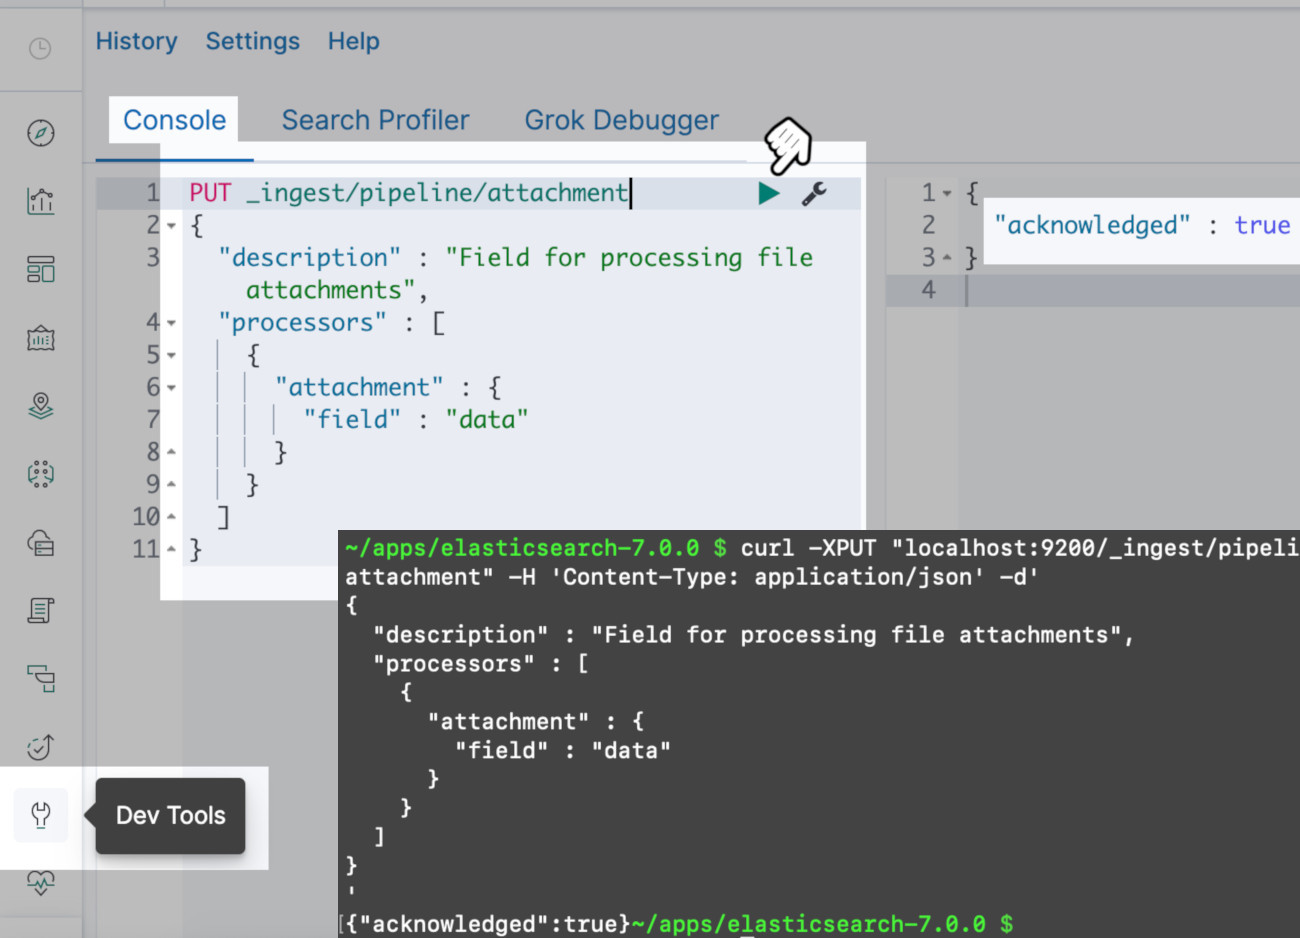
cURLto make the attachment processor pipeline HTTP request.
1 2 3 4 5 6 7 8 9 10 11 12 | curl -XPUT "localhost:9200/_ingest/pipeline/attachment?pretty" -H 'Content-Type: application/json' -d' { "description" : "Field for processing file attachments", "processors" : [ { "attachment" : { "field" : "data" } } ] } ' |
NOTE: If you get an error saying "No processor type exists with name [attachment]" then restart the Elasticsearch service and try to make the cURL request again.
- Alternatively, use Kibana to make the request. Open the console and navigate to either its port or port
5601.
An “acknowledged:true” JSON response is returned to indicate the cURL request for the attachment processor has been successful
Elasticsearch API calls need a Python script
- The project environment requires a new directory for it as well as a script and any required libraries. Get them ready.
Use “mkdir” and “cd” to create a Elasticsearch project directory
1 2 3 | # create a directory for PDF project mkdir pdf-elastic cd pdf-elastic |
Use the “touch” command and Python’s underscore naming conventions to create the script
1 2 3 | # Pythonic naming convention uses underscores "_" touch pdf_elastic.py nano pdf_elastic.py |
- See above. After you create a script using Python, edit the file with a command line editor like
nano.
How to import libraries for your Python script
- Next, for creating and reading PDF files, import the required libraries. Use Python’s low-level client library for Elasticsearch that you installed earlier. You’ll also need to parse the PDF data. Use
importto add the libraries if you haven’t already.
1 2 3 4 5 6 7 8 | # import libraries to help read and create PDF import PyPDF2 from fpdf import FPDF import base64 import json # import the Elasticsearch low-level client library from elasticsearch import Elasticsearch |
Use the library FPDF to create a PDF file
If you don’t already have a PDF file, then use the FPDF library to create one.
Add content with a new instance using
fpdf().Add pages with the method
cell().
1 2 3 4 5 6 7 8 | # create a new PDF object with FPDF pdf = FPDF() # use an iterator to create 10 pages for page in range(10): pdf.add_page() pdf.set_font("Arial", size=14) pdf.cell(150, 12, txt="Object Rocket ROCKS!!", ln=1, align="C") |
You can modify the contents of the page with the
txtparameter to pass a string.Multiple text sections need multiple instances of the
cell()method.Create a new PDF file with the
output()method when you’re done.
1 2 | # output all of the data to a new PDF file pdf.output("object_rocket.pdf") |
Use PdfFileReader() to extract the PDF data
Verify that one directory has both the Python script and the PDF file.
Then, use the library
PyPDF2for extracting of the PDF file’s data including its meta data. Use the methodPdfFileReader()to do that.
1 2 3 4 | # get the PDF path and read the file file = "object_rocket.pdf" read_pdf = PyPDF2.PdfFileReader(file, strict=False) print (read_pdf) |
A dictionary (JSON) is where you put the data from the PDF
Use the library
PyPDF2to read the file.Place the data for the pages in a dictionary (Python)
Create a JSON string to complete the JSON object conversion. A JSON object holds the pages of the PDF data.
1 2 3 4 5 6 7 8 9 10 11 12 13 14 15 16 17 18 19 20 21 22 23 24 25 26 27 28 29 30 31 32 | # get the read object's meta info pdf_meta = read_pdf.getDocumentInfo() # get the page numbers num = read_pdf.getNumPages() print ("PDF pages:", num) # create a dictionary object for page data all_pages = {} # put meta data into a dict key all_pages["meta"] = {} # Use 'iteritems()` instead of 'items()' for Python 2 for meta, value in pdf_meta.items(): print (meta, value) all_pages["meta"][meta] = value # iterate the page numbers for page in range(num): data = read_pdf.getPage(page) #page_mode = read_pdf.getPageMode() # extract the page's text page_text = data.extractText() # put the text data into the dict all_pages[page] = page_text # create a JSON string from the dictionary json_data = json.dumps(all_pages) print ("\nJSON:", json_data) |
Use bytes_string or encode() to convert the JSON object
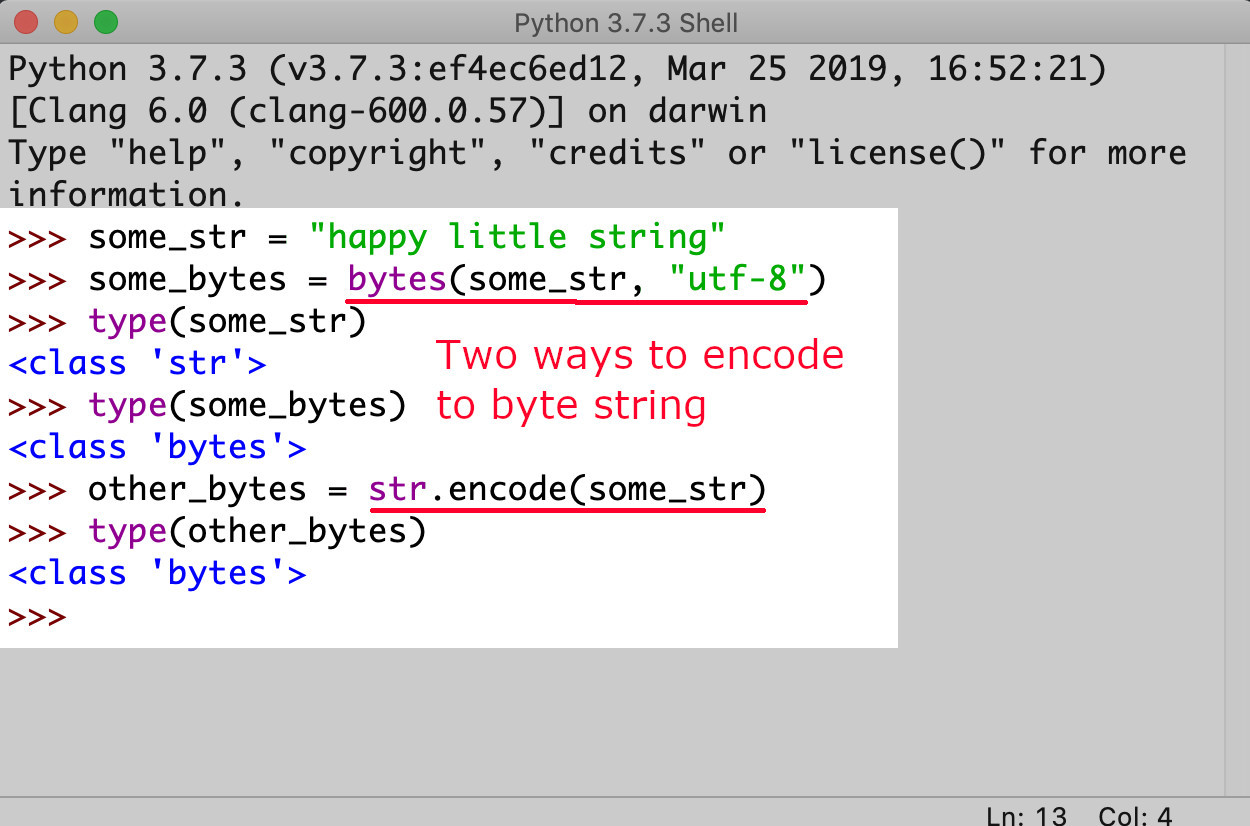
You have two options to choose from to convert the JSON object to a bytes string to a base64 object.
- Use the method
bytes ()which is a component of Python.
1 | bytes_string = bytes(page_text, 'utf-8') |
- Alternatively, try the attribute
encode()method.
1 | bytes_string = str.encode(page_text) |
>TIP: If you want to write special characters or foreign languages using UTF-8, for example, use the bytes () method.
Perform a bytes object conversion for all strings, then do the Elasticsearch encode and index
- An example of the JSON data from PDF file bytes string conversion is here below.
1 2 3 | # convert JSON string to bytes-like obj bytes_string = bytes(json_data, 'utf-8') print ("\nbytes_string:", bytes_string) |
Data indexing and updating using Base64 happens after the JSON bytes string is encoded
- Use
encoded_pdfand the Base64 library to encode the JSON bytes string so that the data can be indexed or updated to an Elasticsearch document.
1 2 3 4 | # convert bytes to base64 encoded string encoded_pdf = base64.b64encode(bytes_string) encoded_pdf = str(encoded_pdf) print ("\nbase64:", encoded_pdf) |
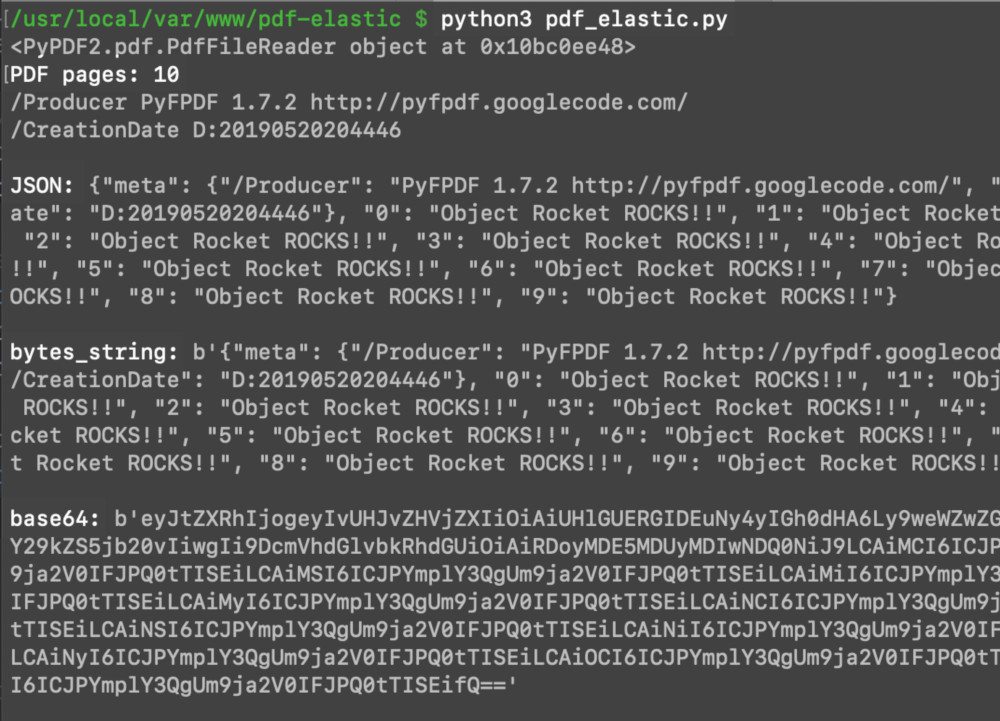
Use Elasticsearch’s index() method to index the encoded Base64 JSON string
- The way to successfully index the Base64 is with the index from the client’s library from Elasticsearch.
To index the data, use a cURL request
Use cURL to index the encoded data to Elasticsearch.
Here’s an example of an index in Elasticsearch where the string will be indexed. The index is named
pdf_indexand it has1234as theid.
1 2 3 4 5 | curl -X PUT "localhost:9200/pdf_index/_doc/1234?pipeline=attachment" -H 'Content-Type: application/json' -d' { "data": "T2JqZWN0IFJvY2tldCBST0NLUyEh" } ' |
Use Python to index to Elasticsearch the byte string that is encoded
- Another way to index the byte string is to use Elasticsearch’s low-level client library. You can accomplish this in the Python script using the
index()method.
1 2 3 4 5 6 7 8 | # put the PDF data into a dictionary body to pass to the API request body_doc = {"data": encoded_pdf} # call the index() method to index the data result = elastic_client.index(index="pdf", doc_type="_doc", id="42", body=body_doc) # print the returned results print ("\nindex result:", result['result']) |
- You want to see a response of
createdorupdatedreturned from the"result"of theresultobject. Which one you get is based on the document ID beforehand.
1 | index result: created |
Use cURL or Kibana to get the PDF indexed document
- Try
cURLto make aGETrequest to confirm proper indexing of the PDF.
1 | curl -XGET "localhost:9200/pdf/_doc/42?pretty=true" |
- If you don’t want to use
cURLmethod, try Kibana to verify the data of the PDF was correctly indexed.
Kibana with the pasted cURL request verifies the data
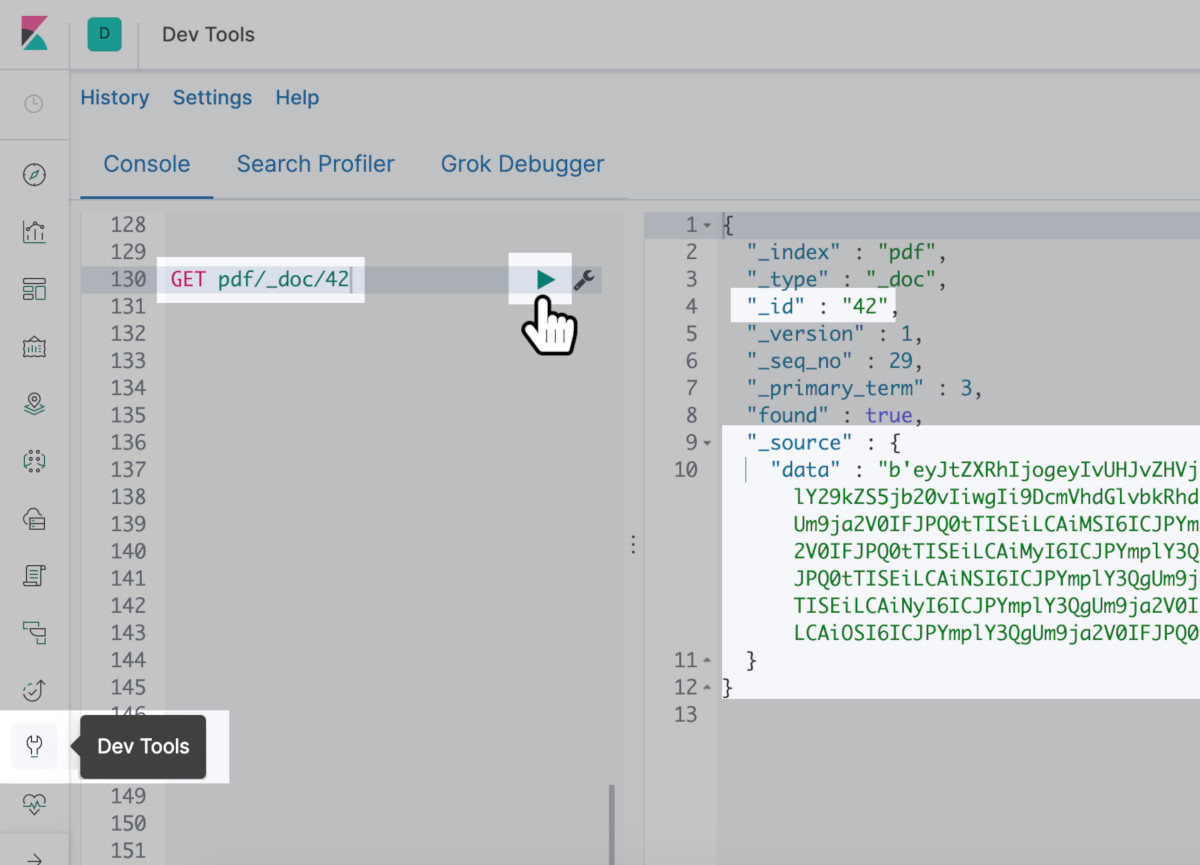
- The
get()method in Python retrieves the document.
1 2 3 4 5 6 | # make another Elasticsearch API request to get the indexed PDF result = elastic_client.get(index="pdf", doc_type='_doc', id=42) # print the data to terminal result_data = result["_source"]["data"] print ("\nresult_data:", result_data, '-- type:', type(result_data)) |
- A large amount of a string consisting of data encoded Base64 should return as the
result_dataobject.
Get the JSON object by decoding the Base64 string

>TIP: Omit the 'b in the front of the string and remove the ' at the end of it too. You can cut them off with [:].
1 2 3 4 | # decode the base64 data (use to [:] to slice off # the 'b and ' in the string) decoded_pdf = base64.b64decode(result_data[2:-1]).decode("utf-8") print ("\ndecoded_pdf:", decoded_pdf) |
The PDF file needs a newly created Python dictionary JSON object
- The method
loads()from the JSON library is what you use to create from the PDF decoded string, the JSON Python dictionary object.
1 2 3 | # take decoded string and make into JSON object json_dict = json.loads(decoded_pdf) print ("\njson_str:", json_dict, "\nntype:", type(json_dict)) |
- A sucessful result of the JSON Python dictionary object is shown below:
1 | {'meta': {'/Producer': 'PyFPDF 1.7.2 http://pyfpdf.googlecode.com/', '/CreationDate': 'D:20190520213322'}, '0': 'Object Rocket ROCKS!!', '1': 'Object Rocket ROCKS!!', '2': 'Object Rocket ROCKS!!', '3': 'Object Rocket ROCKS!!', '4': 'Object Rocket ROCKS!!', '5': 'Object Rocket ROCKS!!', '6': 'Object Rocket ROCKS!!', '7': 'Object Rocket ROCKS!!', '8': 'Object Rocket ROCKS!!', '9': 'Object Rocket ROCKS!!'} |
Elasticsearch has the JSON object so use FPDF() library to create a new PDF file from the PDF
- A cluster in Elasticsearch holds the encoded data from the PDF file. Use
FPDFto create a new instancepdf.
1 2 | # create new FPDF object pdf = FPDF() |
- The instance that you just made is where you can also create additional pages. To do this, you’ll take the JSON data and do key:value pair iteration.
1 2 3 4 5 6 7 8 9 10 11 12 13 14 15 16 17 18 | # build the new PDF from the Elasticsearch dictionary # Use 'iteritems()` instead of 'items()' for Python 2 for page, value in json_dict.items(): if page != "meta": # create new page pdf.add_page() pdf.set_font("Arial", size=14) # add content to page output = value + " -- Page: " + str(int(page)+1) pdf.cell(150, 12, txt=output, ln=1, align="C") else: # create the meta data for the new PDF for meta, meta_val in json_dict["meta"].items(): if "title" in meta.lower(): pdf.set_title(meta_val) elif "producer" in meta.lower() or "creator" in meta.lower(): pdf.set_creator(meta_val) |
Get a list of FPDF class attributes
You might want to change different properties of the PDF file now or at a later time. Here’s a fast way to get a FPDF attribute list from Python when you’re ready to edit PDF files. Use the dir(FPDF) command:
1 | ['_beginpage', '_dochecks', '_dounderline', '_enddoc', '_endpage', '_escape', '_freadint', '_getfontpath', '_newobj', '_out', '_parsegif', '_parsejpg', '_parsepng', '_putTTfontwidths', '_putcatalog', '_putfonts', '_putheader', '_putimage', '_putimages', '_putinfo', '_putpages', '_putresourcedict', '_putresources', '_putstream', '_puttrailer', '_putxobjectdict', '_set_dash', '_textstring', 'accept_page_break', 'add_font', 'add_link', 'add_page', 'alias_nb_pages', 'cell', 'check_page', 'close', 'code39', 'dashed_line', 'ellipse', 'error', 'footer', 'get_string_width', 'get_x', 'get_y', 'header', 'image', 'interleaved2of5', 'line', 'link', 'ln', 'multi_cell', 'normalize_text', 'open', 'output', 'page_no', 'rect', 'rotate', 'set_author', 'set_auto_page_break', 'set_compression', 'set_creator', 'set_display_mode', 'set_draw_color', 'set_fill_color', 'set_font', 'set_font_size', 'set_keywords', 'set_left_margin', 'set_line_width', 'set_link', 'set_margins', 'set_right_margin', 'set_subject', 'set_text_color', 'set_title', 'set_top_margin', 'set_x', 'set_xy', 'set_y', 'text', 'write'] |
- You’re almost done. Save the PDF with the method
output()
1 2 | # output the PDF object's data to a PDF file pdf.output("object_rocket_from_elaticsearch.pdf") |
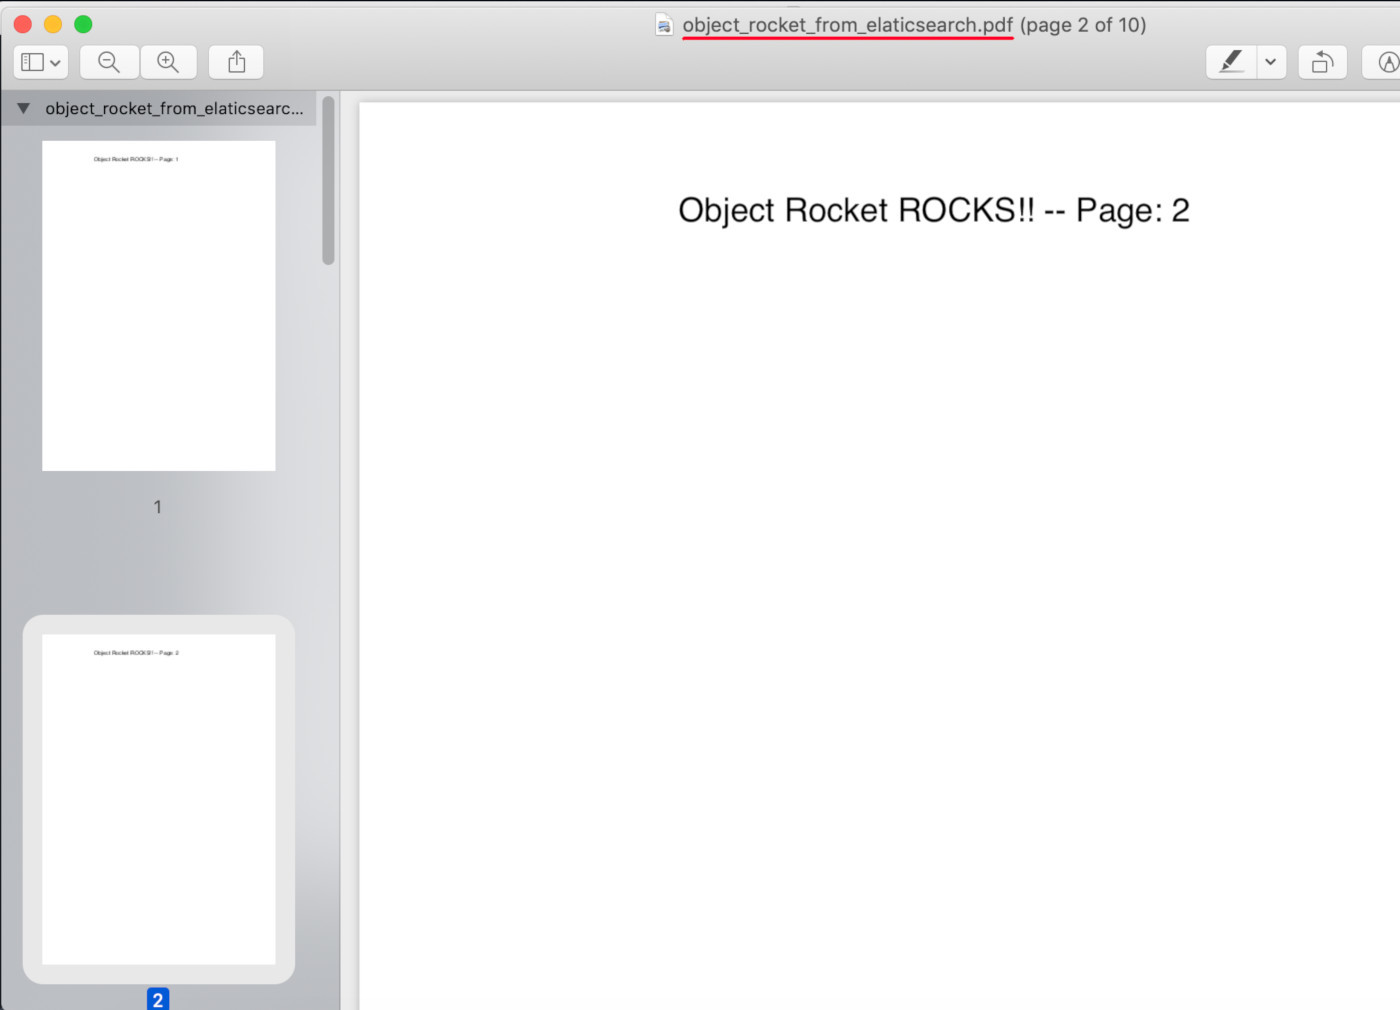
Open the newly created PDF from Elasticsearch
Use a PDF viewer to open the PDF file created from the "pdf" Elasticsearch index’s document:
Conclusion
This tutorial explained how to use Python to index a PDF file as an Elasticsearch Index. You learned about how the attachment processor Elasticsearch and the ingest_attachment methods streamline everything. Bytes object string conversions for encoding and indexing were reviewed as well. It’s important to follow the steps, but once you complete a couple of examples, you may be surprised at how quickly index PDF Elasticsearch Python, attachment processor Python, and attachment processor Elasticsearch indexing PDF files becomes a natural habit.
Just the Code:
Here’s the complete code example of how to use Python to index a PDF file as an Elasticsearch index.
1 2 3 4 5 6 7 8 9 10 11 12 13 14 15 16 17 18 19 20 21 22 23 24 25 26 27 28 29 30 31 32 33 34 35 36 37 38 39 40 41 42 43 44 45 46 47 48 49 50 51 52 53 54 55 56 57 58 59 60 61 62 63 64 65 66 67 68 69 70 71 72 73 74 75 76 77 78 79 80 81 82 83 84 85 86 87 88 89 90 91 92 93 94 95 96 97 98 99 100 101 102 103 104 105 106 107 108 109 110 111 112 113 114 115 116 117 118 119 120 121 122 123 124 125 126 127 128 129 130 131 132 | #!/usr/bin/env python3 #-*- coding: utf-8 -*- # import libraries to help read and create PDF import PyPDF2 from fpdf import FPDF import base64 import json # import the Elasticsearch low-level client library from elasticsearch import Elasticsearch # create a new client instance of Elasticsearch elastic_client = Elasticsearch(hosts=["localhost"]) # create a new PDF object with FPDF pdf = FPDF() # use an iterator to create 10 pages for page in range(10): pdf.add_page() pdf.set_font("Arial", size=14) pdf.cell(150, 12, txt="Object Rocket ROCKS!!", ln=1, align="C") # output all of the data to a new PDF file pdf.output("object_rocket.pdf") ''' read_pdf = PyPDF2.PdfFileReader("object_rocket.pdf") page = read_pdf.getPage(0) page_mode = read_pdf.getPageMode() page_text = page.extractText() print (type(page_text)) ''' #with open(path, 'rb') as file: # get the PDF path and read the file file = "object_rocket.pdf" read_pdf = PyPDF2.PdfFileReader(file, strict=False) print (read_pdf) # get the read object's meta info pdf_meta = read_pdf.getDocumentInfo() # get the page numbers num = read_pdf.getNumPages() print ("PDF pages:", num) # create a dictionary object for page data all_pages = {} # put meta data into a dict key all_pages["meta"] = {} # Use 'iteritems()` instead of 'items()' for Python 2 for meta, value in pdf_meta.items(): print (meta, value) all_pages["meta"][meta] = value # iterate the page numbers for page in range(num): data = read_pdf.getPage(page) #page_mode = read_pdf.getPageMode() # extract the page's text page_text = data.extractText() # put the text data into the dict all_pages[page] = page_text # create a JSON string from the dictionary json_data = json.dumps(all_pages) print ("\nJSON:", json_data) # convert JSON string to bytes-like obj bytes_string = bytes(json_data, 'utf-8') print ("\nbytes_string:", bytes_string) # convert bytes to base64 encoded string encoded_pdf = base64.b64encode(bytes_string) encoded_pdf = str(encoded_pdf) print ("\nbase64:", encoded_pdf) # put the PDF data into a dictionary body to pass to the API request body_doc = {"data": encoded_pdf} # call the index() method to index the data result = elastic_client.index(index="pdf", doc_type="_doc", id="42", body=body_doc) # print the returned sresults print ("\nindex result:", result['result']) # make another Elasticsearch API request to get the indexed PDF result = elastic_client.get(index="pdf", doc_type='_doc', id=42) # print the data to terminal result_data = result["_source"]["data"] print ("\nresult_data:", result_data, '-- type:', type(result_data)) # decode the base64 data (use to [:] to slice off # the 'b and ' in the string) decoded_pdf = base64.b64decode(result_data[2:-1]).decode("utf-8") print ("\ndecoded_pdf:", decoded_pdf) # take decoded string and make into JSON object json_dict = json.loads(decoded_pdf) print ("\njson_str:", json_dict, "\n\ntype:", type(json_dict)) # create new FPDF object pdf = FPDF() # build the new PDF from the Elasticsearch dictionary # Use 'iteritems()` instead of 'items()' for Python 2 for page, value in json_dict.items(): if page != "meta": # create new page pdf.add_page() pdf.set_font("Arial", size=14) # add content to page output = value + " -- Page: " + str(int(page)+1) pdf.cell(150, 12, txt=output, ln=1, align="C") else: # create the meta data for the new PDF for meta, meta_val in json_dict["meta"].items(): if "title" in meta.lower(): pdf.set_title(meta_val) elif "producer" in meta.lower() or "creator" in meta.lower(): pdf.set_creator(meta_val) # output the PDF object's data to a PDF file pdf.output("object_rocket_from_elaticsearch.pdf") |
Pilot the ObjectRocket Platform Free!
Try Fully-Managed CockroachDB, Elasticsearch, MongoDB, PostgreSQL (Beta) or Redis.
Get Started


