How to Create and Delete Elasticsearch Indexes Using the Python Client Library
Introduction
This step-by-step tutorial explains how to create Elasticsearch index Python, and delete Elasticsearch index Python. These tasks are extremely important as they allow you to manage data on a day-to-day basis. Troubleshooting error messages and finding fast solutions to them are keys to successful and productive document indexing. With Elasticsearch and Python, you get the best of both worlds.
You can name your index in several ways. There are limitations though. They are:
No upper case letters, so lower case letters only can be used
Cannot include commas, spaces,
",<,>,|, or#\,/,*, or?No colon (
:) (This rule began with 7.x version and continues from that time forward.)Cannot start with
+,-(dash),_(underscore), however, you can use the characters in the name of your indexThe index cannot just be
..(two periods) or.(one period)Must be 255 characters or less
It’s good to know: For API calls, the Elasticsearch client has a way to get around naming the same keywords as Python’s. Instead of using type, it uses doc_type, and in place of from, it uses from_.
Prerequisites
Python – Download and install the latest version. Python is available for Windows, MacOS, Linus/Unix, and other platforms.
Python low-level client library for Elasticsearch – Download and install the matching major version (preferably it’s the latest version) on your server. Use Python 3 because by the year 2020, Python 2 will be defunct.
Create an Elasticsearch index
Create a new index with the Python library. Use a client instance.
1 | elastic = Elasticsearch() |
To create a new index, use the indices inner class.
1 | elastic.indices.create(index='some-new-index') |
Delete an Elasticsearch index
You can also delete the indices class in Elasticsearch using this technique:
1 | elastic.indices.delete(index='some-old-index') |
Get every indices class in a cluster
To get all indices in a particular Elasticsearch cluster, use get_alias. You’ll have a nested Python dictionary returned to you. The easiest way to get all indices is with the globbing marker (*).
1 2 3 4 5 | indices_dict = elastic.indices.get_alias("*") print ("\nindices_dict type:", type(indices_dict)) for index_name, value in indices_dict.items(): print ('index: ', value) |
Its good to know: To iterate Python dictionaries, the items() is the way to do it in Python 3. However, if you’re still using Pyton 2.x until it’s expires in 2020, use interitems().
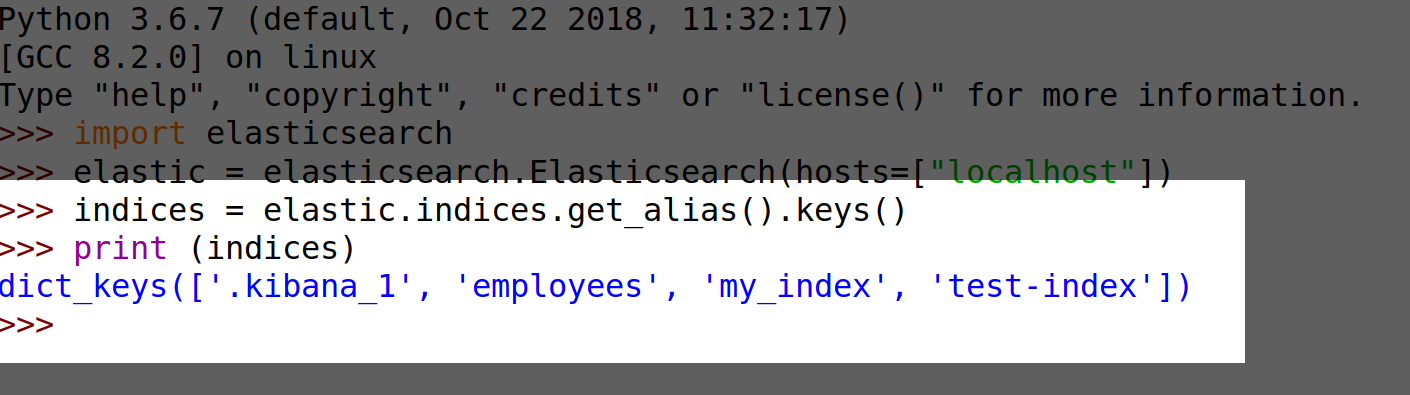
Use get_alias().keys() to get index names only. It will be Python keys with no additional information.
1 | elastic.indices.get_alias().keys() |
Just as you would do to iterate a regular list object, you can do the same for dict_keys.
Below is an example of the dict_keys method in action getting all indexes in Elasticsearch.
How to Troubleshoot API Calls
>It’s good to know: Use an ignore parameter with the one or more status codes you want to overlook when you want to avoid raising an exception.
Troubleshooting the “Connection Error” message
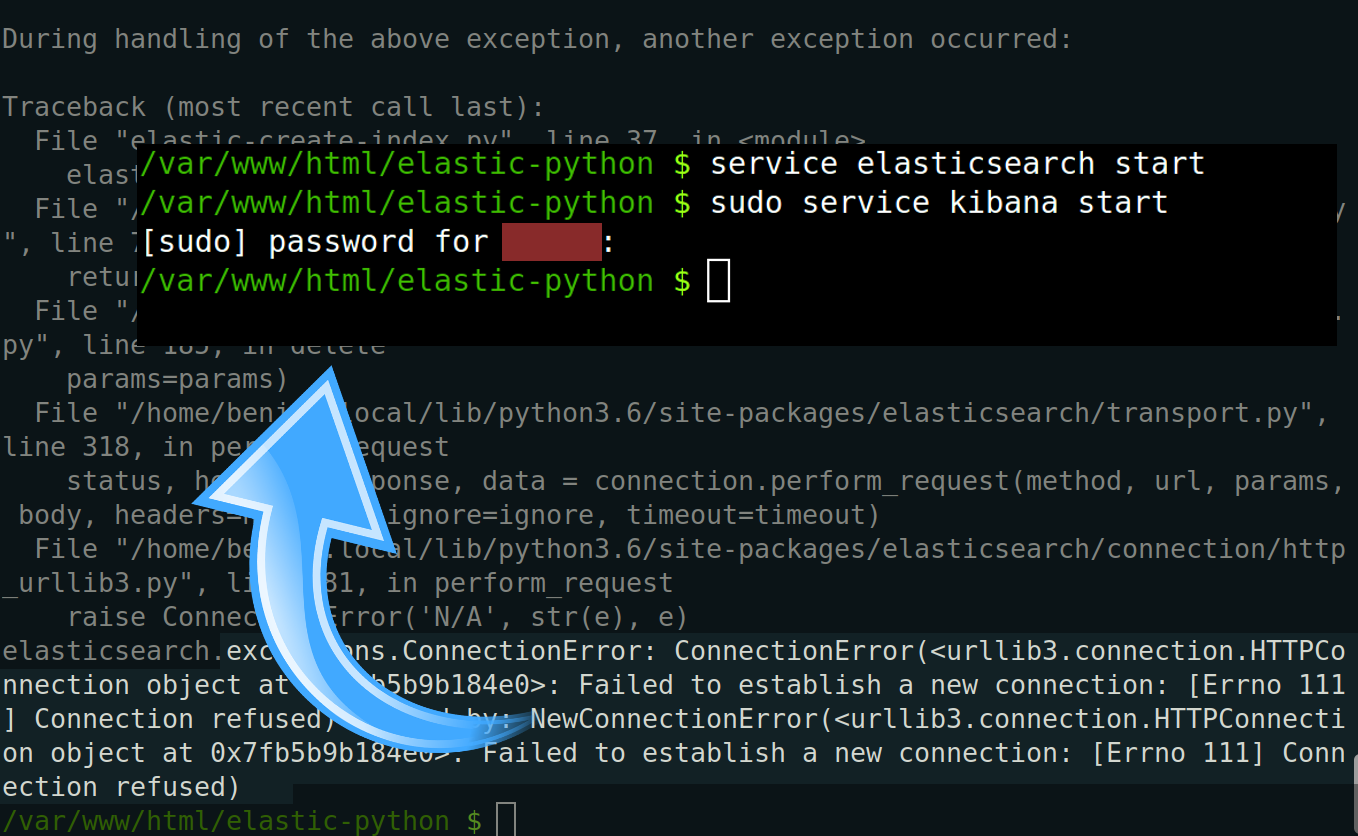
Watch for the elasticsearch.exceptions.ConnectionError. If this occurs, verify that your Elasticsearch is running. To start Elasticsearch in Linux or any other UNIX-like system, run service.
1 2 | service elasticsearch start service kibana start |
Wait a couple of minutes and then in go to your server’s port 9200 located in your browser. Optionally, verify if Elasticsearch has stopped running by the request: cURL URL GET
1 2 | curl -XGET http://localhost:9200/ # or try.. curl -XGET https://{YOUR_DOMAIN}:{YOUR_CUSTOM_PORT} |
This image shows an example of running the service command in a Linux Unix-like system to start Elasticsearch and Kibana.
Use the hosts parameter with your port, IP address or server name. This should correct any client instance issues.
1 2 | elastic = Elasticsearch(hosts=["localhost"]) # ..or: Elasticsearch([{'host': 'localhost', 'port': 9200}]) |
Another way to check the Elasticsearch service hasn’t stopped is to use Python’s requests library.
1 2 3 | import requests; res = requests.get('http://localhost:9200'); print(res.content) |
Troubleshooting the “Import Error” message
Verify that your Python version is compatible with your Elasticsearch client. That’s the only way the script will work correctly.
Install the correct Elasticsearch client module if you see the ImportError: No module named elasticsearch error message.
Check that you have the correct Python package pip installation version for the client library:
1 2 | pip install elasticsearch # Python 2 install pip3 install elasticsearch # Python 3 install |
It’s good to know: Python 2.x requires the installation command of either pip or python. The only way Python 3.x will work is if you use pip3 or Python3.
Deleting a non-existent Index – The “404 Not-Found Error” message
The 404 Not-Found Error message displays when you try to delete an index that isn’t there.
1 | elasticsearch.exceptions.NotFoundError: NotFoundError(404, 'index_not_found_exception', 'no such index') |
Set the value of the integer at 404 (without quotes) with the ignore option to workaround the error.
1 | elastic.indices.delete(index="does-not-exist", ignore=404) |
Troubleshooting the “400 Resource-Already-Exists” error message
If you try to create an index name (indices.create) that has already been created, the RequestError(400,'resource_already_exists_exception)' will appear.
Here’s the workaround is to pass an ignore option.
1 | elastic.indices.create(index='duplicate-index', ignore=400) |
>ALERT: The ignore erases existing data and replaces it with what you create.
Save Time and Catch Multiple Errors
You can save time in troubleshooting. Pass the integers list so that the API call will overlook many HTTP errors as opposed to overlooking a single integer for an HTTP error.
1 | elastic.indices.delete(index='test-index', ignore=[400, 404]) |
- Block errors and then catch them with the indentation block:
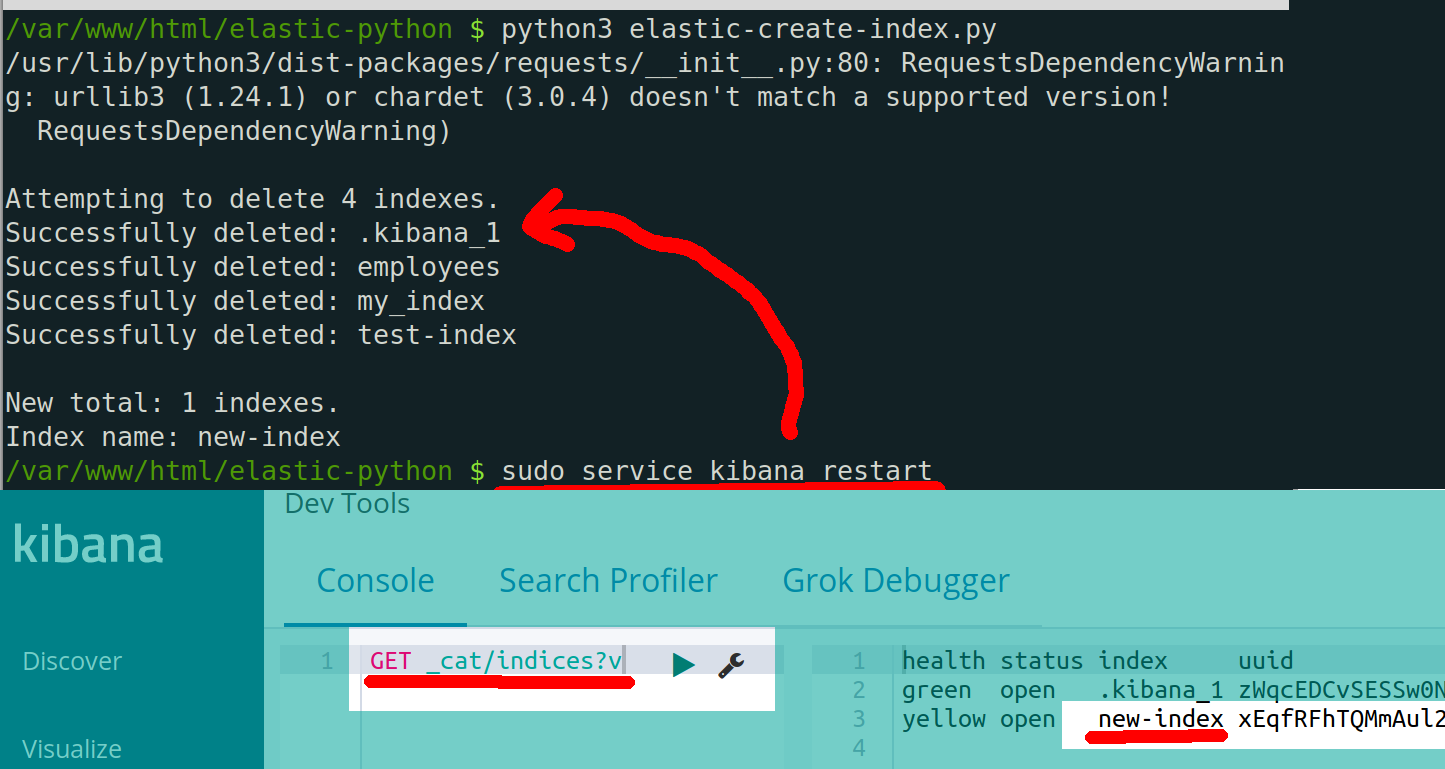
tryandcatch. It finds and deletes cluster index errors. New indexes are created afterward.
1 2 3 4 5 6 7 8 9 10 11 12 13 14 15 16 17 18 19 20 21 22 23 24 25 | # create a new instance of the Elasticsearch client class elastic = Elasticsearch() # get the names of the indexes all_indices = elastic.indices.get_alias().keys() print ("\nAttempting to delete", len(all_indices), "indexes.") # iterate the list of indexes for _index in all_indices: # attempt to delete ALL indices in a 'try' and 'catch block try: if "." not in _index: # avoid deleting indexes like `.kibana` elastic.indices.delete(index=_index) print ("Successfully deleted:", _index) except Exception as error: print ('indices.delete error:', error, 'for index:', _index) # now create a new index elastic.indices.create(index="new-index") # verify the new index was created final_indices = elastic.indices.get_alias().keys() print ("\nNew total:", len(final_indices), "indexes.") for _index in final_indices: print ("Index name:", _index) |
Check that the iteration was completed and the creation of a new index occured. Use the Elasticsearch’s Kibana Console to make the GET request.
1 | GET _cat/indices?v |
Here’s the GET request using cURL:
1 | curl -XGET localhost:9200/_cat/indices?v |
Conclusion
This tutorial showed you step-by-step how to create Elasticsearch index Python and delete Elasticsearch index Python. In addition, you learned about the various error messages that may appear, as well as the different ways to troubleshoot them, solve them and workaround them.
The troubleshooting, solving, and workaround examples shown in this tutorial are for instructional purposes only. It’s not recommended to delete clusters as a habit without giving it much thought prior to doing so. Keep in mind, once a cluster is deleted, that means that the existing data in that cluster is gone forever. Just be sure that the data you’re about to delete is something you don’t need.
Before we go, after we ran the code, indexes (user-created) and the .kibana index (hidden) were inadvertently deleted. Things like this can occur. We just restarted the Kibana service and all is well.
The image below shows restarting the Kibana service.
You can avoid deleting the kibana index with the following code:
1 2 3 4 5 6 7 8 9 10 11 12 13 14 15 16 17 18 19 20 21 22 23 24 25 | # create a new instance of the Elasticsearch client class elastic = Elasticsearch() # get the names of the indexes all_indices = elastic.indices.get_alias().keys() print ("\nAttempting to delete", len(all_indices), "indexes.") # iterate the list of indexes for _index in all_indices: # attempt to delete ALL indices in a 'try' and 'catch block try: if "." not in _index: # avoid deleting indexes like `.kibana` elastic.indices.delete(index=_index) print ("Successfully deleted:", _index) except Exception as error: print ('indices.delete error:', error, 'for index:', _index) # now create a new index elastic.indices.create(index="new-index") # verify the new index was created final_indices = elastic.indices.get_alias().keys() print ("\nNew total:", len(final_indices), "indexes.") for _index in final_indices: print ("Index name:", _index) |
Here’s the ending result showing a successful restart of the Kibana service.
1 2 3 | New total: 2 indexes. Index name: .kibana_1 Index name: new-index |

Pilot the ObjectRocket Platform Free!
Try Fully-Managed CockroachDB, Elasticsearch, MongoDB, PostgreSQL (Beta) or Redis.
Get Started