How to Configure the YAML File for Elasticsearch
Introduction
The Elasticsearch service is a powerful tool for collecting and monitoring data with its available plugin tools. The YAML file is used for the configuration of this service created by Elastic. By manipulating variables with this file it becomes possible to set certain parameters that are required for various tasks that may need modified terms. As the need for changes to the system arises, this file will make scaling the service up much more efficient.
For most use cases the default configuration should suffice, however Elasticsearch is designed to be horizontally scalable, and, as such, will occasionally need to be “tweaked” for better performance as the size of the database grows, and as users shard indexes and assign shards to nodes. Most websites, that expect only nominal to normal growth rate in web traffic, will probably not need to have the default configuration settings for Elasticsearch changed too much.
The main configuration file for Elasticsearch is the elasticsearch.yml file. Typically it’s located in the /etc/elasticsearch directory on Linux, but the method used to install it may affect the default installation location. For example, was the Elastic Stack installed on Linux using the apt-get or yum package manager? Are the Elastic services running as a service from a folder that was unzipped from an archive? The location for theses configuration files all depend on how the Elastic Stack services were installed and started.
Prerequisites
Elasticsearch is built using Java and requires at least JDK 8 in order to run (Only Elasticsearch 7.x and newer has complete support for JDK 9). The JDK can be downloaded from their website. For more about this, consult Oracle’s Installation Guide.
- To make sure Java is installed, and to see what version is running, run this command:
1 | java -version |
- If Java and JDK 8 are installed properly, the terminal should output a response that looks something like this:
1 2 3 | java version "11.0.2" 2019-01-15 LTS Java(TM) SE Runtime Environment 18.9 (build 11.0.2+9-LTS) Java HotSpot(TM) 64-Bit Server VM 18.9 (build 11.0.2+9-LTS, mixed mode) |
- For best results, install Java version 1.8.0 or a later version of the Java 8 series. All of the nodes and Elasticsearch clients should be running the same version of JVM, and the version of Java you decide to install should still have long-term support.
- Elasticsearch will not start if an incompatible Java version is installed and is set at the default Java runtime. If there are multiple versions of Java already installed on the machine, you can choose which one will run by default by setting pointing the
JAVA_HOMEenvironmental variable to the directory of that specific version.
Configuring the YAML file
The entire Elastic Stack can be configured using each product’s respective YAML Ain’t Markup Language file (Configuring the Elasticsearch logging requires you to make changes to the logging.yml file).
Elastic’s online documentation for the configuration file hasn’t changed much since version 2.x. If you have any questions, or things you’re unsure of, there is an online Elastic community that offers support and guidance as well as help with specific technical issues.
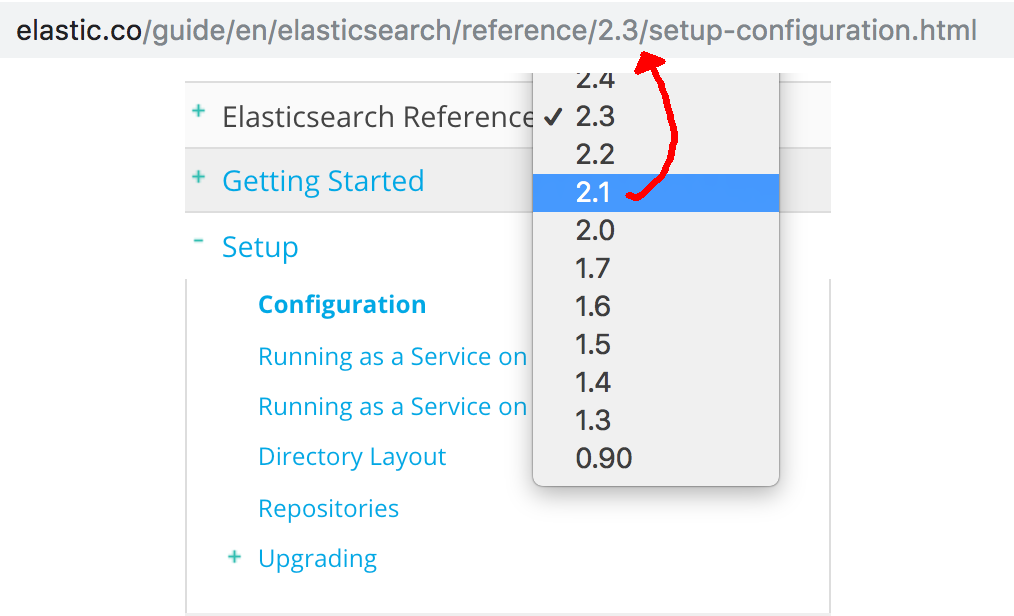 > NOTE: Make sure to select the correct reference version number for your installed version of Elasticsearch on the right-hand side when you’re looking at Elastic’s documentation website.
Editing the YAML File
For most users, and in most installation scenarios, the file will be in the default directory of Elasticsearch (
/etc/elasticsearch/elasticsearch.yml).If you’re editing the file on a Linux server via terminal access, then use a terminal-based editor like
nanoto edit the file:1sudo nano /etc/elasticsearch/elasticsearch.ymlOnce you’ve completed all the desired changes, you can save and exit the
nanoeditor by pressing CTRL + O and CTRL + X respectively.You can also edit the file locally, in a desktop editor, and, after saving the changes, push it to your server using an SSH key or FTP client.
It’s a good idea to keep backups of configuration files with their default settings before you make any changes. You can do this in a UNIX terminal by executing this command:
1 | sudo cp elasticsearch.yml elasticsearch.yml.bak |
Get a copy of the master configuration file in Elastic’s official git repository.
Changing the YAML settings
Most of the default YAML values can be changed by uncommenting the line (removing the hash “#”), and changing the default value, but some of the values will not be commented out beforehand.
Cluster and Node Names
You can set the cluster.name and node.name by removing the hash and modifying the values.
Modify where data is stored
Typically you shouldn’t have to change the path.data field. This is where all the indexes and their respective document are stored. The typical directory hierarchy will look something like this:
1 | /var/lib/elasticsearch/nodes/12/indices/some-index |
Bootstrap Memory
The bootstrap.memory_lock field is a sensitive value. Java and Elasticsearch can be very memory “hungry”, and Elastic recommends that you allocate at least half of your server or machine’s RAM to the the JVM’s heap size. There are other jvm.options, not found in this configuration file, that can tweak things like the min and max heap size. Take a look at Elastic’s documentation on heap size for more information.
Network Settings
Change the default IP and port address (9200) for the Elasticsearch service.
Discovery Module
Change the host for the discovery module. This feature of Elasticsearch helps the host to find nodes on a cluster. The default host IP address is your standard "127.0.0.1".
Gateway Module’s Node Recovery After Restart
The Gateway Module stores a cluster’s meta data on its indices their explicit mappings. This modules helps nodes communicate with each other, and the setting in this file allows you to select how many nodes have to start before a cluster recovery will initiate.
Require Explicit Naming Before Deleting an Index
The action.destructive_requires_name value is a boolean, set to true by default, that will restrict any non-explicit destruction of an index. It’s probably a good idea to leave this true so that no indices are unintentionally deleted during a “wildcard” iteration of the indices, or request with only a partial string match of the index name.
Here’s a complete default elasticsearch.yml file for Elasticsearch 6.x:
1 2 3 4 5 6 7 8 9 10 11 12 13 14 15 16 17 18 19 20 21 22 23 24 25 26 27 28 29 30 31 32 33 34 35 36 37 38 39 40 41 42 43 44 45 46 47 48 49 50 51 52 53 54 55 56 57 58 59 60 61 62 63 64 65 66 67 68 69 70 71 72 73 74 75 76 77 78 79 80 81 82 83 84 85 86 87 88 | # ======================== Elasticsearch Configuration ========================= # # NOTE: Elasticsearch comes with reasonable defaults for most settings. # Before you set out to tweak and tune the configuration, make sure you # understand what are you trying to accomplish and the consequences. # # The primary way of configuring a node is via this file. This template lists # the most important settings you may want to configure for a production cluster. # # Please consult the documentation for further information on configuration options: # https://www.elastic.co/guide/en/elasticsearch/reference/index.html # # ---------------------------------- Cluster ----------------------------------- # # Use a descriptive name for your cluster: # #cluster.name: my-application # # ------------------------------------ Node ------------------------------------ # # Use a descriptive name for the node: # #node.name: node-1 # # Add custom attributes to the node: # #node.attr.rack: r1 # # ----------------------------------- Paths ------------------------------------ # # Path to directory where to store the data (separate multiple locations by comma): # path.data: /var/lib/elasticsearch # # Path to log files: # path.logs: /var/log/elasticsearch # # ----------------------------------- Memory ----------------------------------- # # Lock the memory on startup: # #bootstrap.memory_lock: true # # Make sure that the heap size is set to about half the memory available # on the system and that the owner of the process is allowed to use this # limit. # # Elasticsearch performs poorly when the system is swapping the memory. # # ---------------------------------- Network ----------------------------------- # # Set the bind address to a specific IP (IPv4 or IPv6): # #network.host: 192.168.0.1 # # Set a custom port for HTTP: # #http.port: 9200 # # For more information, consult the network module documentation. # # --------------------------------- Discovery ---------------------------------- # # Pass an initial list of hosts to perform discovery when new node is started: # The default list of hosts is ["127.0.0.1", "[::1]"] # #discovery.zen.ping.unicast.hosts: ["host1", "host2"] # # Prevent the "split brain" by configuring the majority of nodes (total number of master-eligible nodes / 2 + 1): # #discovery.zen.minimum_master_nodes: # # For more information, consult the zen discovery module documentation. # # ---------------------------------- Gateway ----------------------------------- # # Block initial recovery after a full cluster restart until N nodes are started: # #gateway.recover_after_nodes: 3 # # For more information, consult the gateway module documentation. # # ---------------------------------- Various ----------------------------------- # # Require explicit names when deleting indices: # #action.destructive_requires_name: true |


Pilot the ObjectRocket Platform Free!
Try Fully-Managed CockroachDB, Elasticsearch, MongoDB, PostgreSQL (Beta) or Redis.
Get Started