Guide How To Add Documents To An Index In Elasticsearch
Introduction
Elasticsearch is a superb platform for searching and indexing large amounts of data in real time. Setting up the service and configuring compatible tools to enhance its function is a great way to get even more benefit from it. However, there may be a document that you wish to make a part of this searchable index. This tutorial shows how to add new documents to an index in the service with relative ease.
NOTE: Mapping Types are being depreciated and will be completely removed by Elastic Stack 8.0.
Either __use a custom _type field in your index, or have each document type have its own index__.
An example using “cars” would be to give each car “make” its own index (e.g. create an index called “toyota”, and another index for “porsche”, and so on).
To create your own custom
_typefield you can create a mapping that looks something like this:
1 2 3 4 5 6 7 8 9 10 11 12 13 14 15 16 17 18 19 20 | { "mappings":{ "car":{ "properties":{ "type":{ "type":"keyword" }, "make":{ "type":"text" }, "model":{ "type":"text" }, "year":{ "type":"integer" } } } } } |
>”mapping defines how a document is indexed and how its fields are indexed and stored”
Prerequisites
You need the Elastic Stack installed and running properly on your machine or server.
This article uses examples in Kibana’s UI console. The default port that Kibana runs on is
5601. Unless you’ve changed the default port in thekibana.ymlconfig file, just navigate tohttps://{YOUR_DOMAIN}:5601to open Kibana in your browser.You should have an index created already. If not, this article includes a basic example of how to create one and the mapping for it.
Make sure Elasticsearch has been correctly installed and navigate to this URL in your browser:
1 | http://localhost:9200/ |
Access Kibana’s Console
- If the Kibana UI won’t load, because
localhost:5601refuses to connect, you can try changing the port in thekibana.ymlfile.
- If there’s still a port conflict, or some other issue, even after changing your port and/or domain, and after restarting the Kibana service, you can also try changing your localhost configuration in the
/etc/hostfile.
You can navigate to
https://{YOUR_DOMAIN}:5601/app/kibana#/dev_tools/consoleYou can also access Kibana’s Console by clicking on Dev Tools on the left menu panel.
The Kibana Console interface is divided into two panels—the left pane is where the requests are written, and the right pane outputs the response of your requests.
Creating an Index
In this article we will be creating an index called car, mapping all the fields that best describe the car then ultimately creating a document.
- Use
PUTand the"mappings"field in Kibana’s console to create a new index with a custom field type:
1 2 3 4 5 6 7 8 9 10 11 12 13 | PUT car { "mappings":{ "_doc": { "properties": { "model" : { "type" : "text" }, "year": {"type" : "integer"}, "engine": {"type": "text"}, "star": {"type": "text"} } } } } |
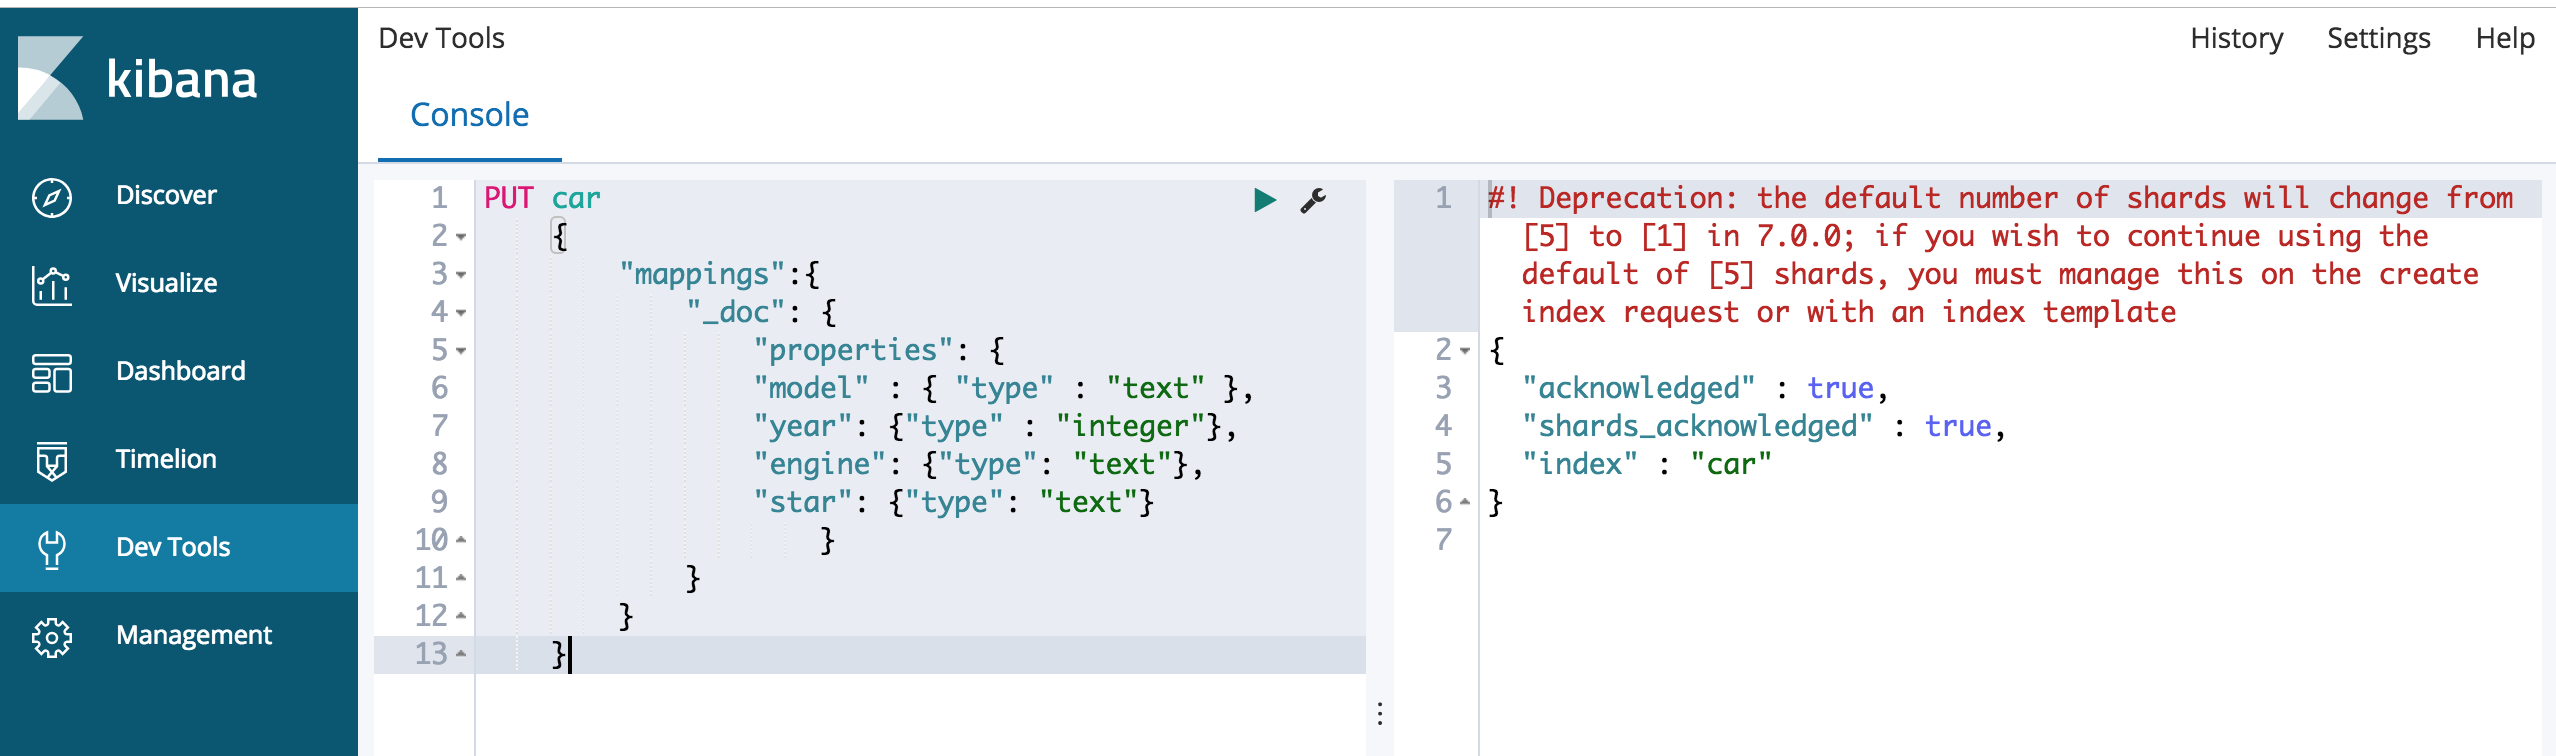 In the above you created an index called car and providing it with fields as mentioned before.
You can create an index by executing HTTP method
In the above you created an index called car and providing it with fields as mentioned before.
You can create an index by executing HTTP method PUT and pass the field "car" in Kibana’s console.
* Here is an example of how to structure a mapping for a new index:
`js
{
“mappings”:{
“_doc”:{
“properties”:{
fields for the index go here:
“make”:{ “type”:”text” }, “model”:{ “type”:”text” }, “year”:{ “type”:”integer” }, “created”:{ “type”:”date”, “format”:”strict_date_optional_time||epoch_millis”
..or “date_optional_time||epoch_millis”
}
}
}
}
}
`
epoch_millisis the number of milliseconds that have passed since the Unix Epoch time (00:00:00 UTC January 1 1970).- The two options for a
"date"field arestrict_date_optional_timeordate_optional_timeNote: Though mapping types will be removed in Elasticsearch 7.0, it is recommended to use it as to encapsulates all the fields that you want to create (e.g
_doc).
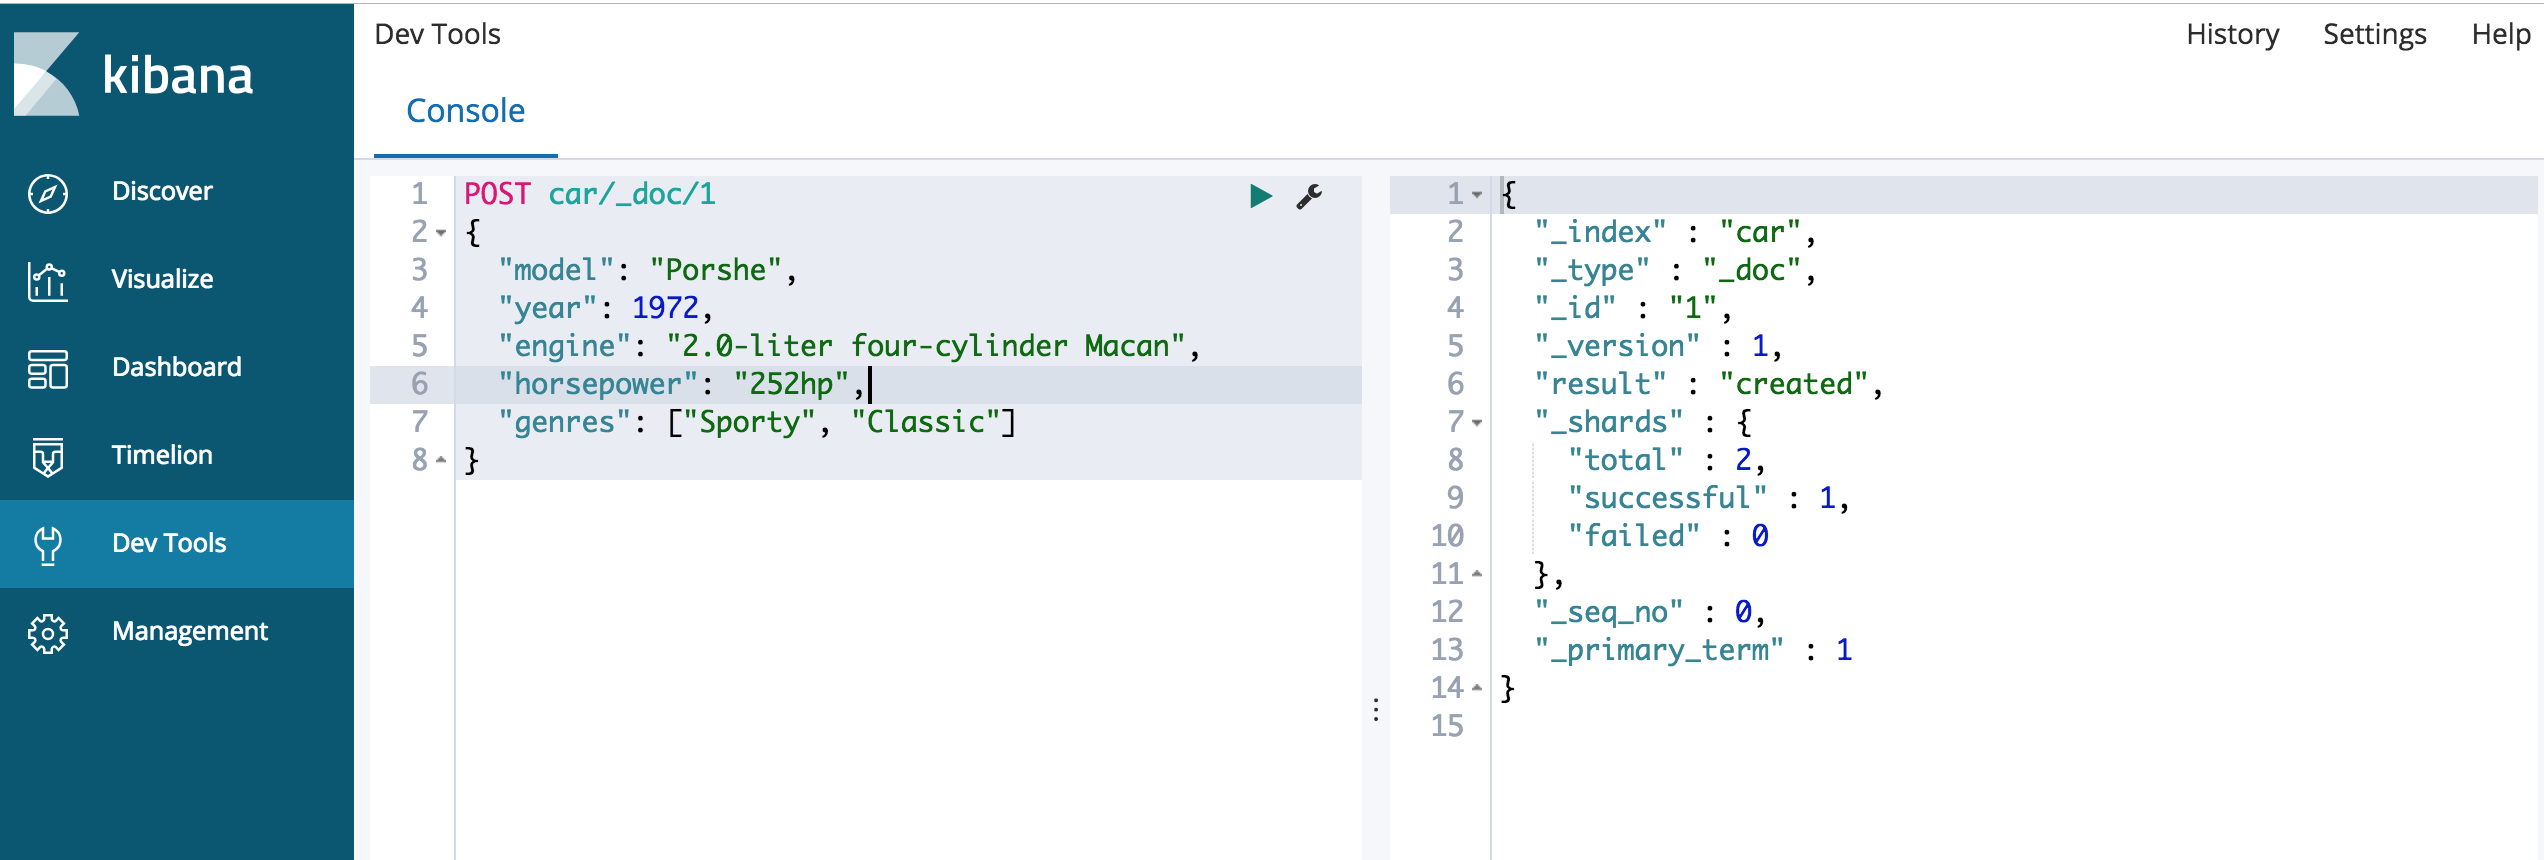
Creating a Document
Now that we have created an index of “car” correctly we will proceed with the creation of a document for this index. You can do this by making a
POSTpassing the documentJSONin the body of the request in a URL structured as: >index_name/mapping_type/document_id In this casecar/_doc/1*caris the index,_docis the document_typeand the document ID is number1
1 2 3 4 5 6 7 8 | POST car/_doc/1 { "model": "Porshe", "year": 1972, "engine": "2.0-liter four-cylinder Macan", "horsepower": "252hp", "genres": ["Sporty", "Classic"] } |
- You can also use cURL in terminal (following this format) to achieve the same result:
1 2 3 4 5 6 7 8 | curl -XPUT "Content-Type: application/json" 'localhost:9200/car/_doc/1?pretty' -d ' { "model": "Porshe", "year": 1972, "engine": "2.0-liter four-cylinder Macan", "horsepower": "252hp", "genres": ["Sporty", "Classic"] }' |
Verify Document Exists
Make a GET Request Using CURL
- Use cURL in your terminal to make a
GETrequest to retrieve the document just created. This example assumes you have Elasticsearch running on port9200:
1 | curl -X GET "Content-Type: application/json" '{YOUR_DOMAIN}:9200/car/_doc/1' |
Or if this is the localhost:
1 | curl -X GET "Content-Type: application/json" 'localhost:9200/car/_doc/1' |
- cURL’s
-doption does not alter or encode the data in any way, so you’ll need to carefully pass the data in a proper JSON format if you choose to use this flag.
Make a GET Request in Kibana’s Console
- Or use Kibana’s console to verify that the document was created.
1 | GET car/_doc/1 |
It should return a JSON object of the document that looks like this:
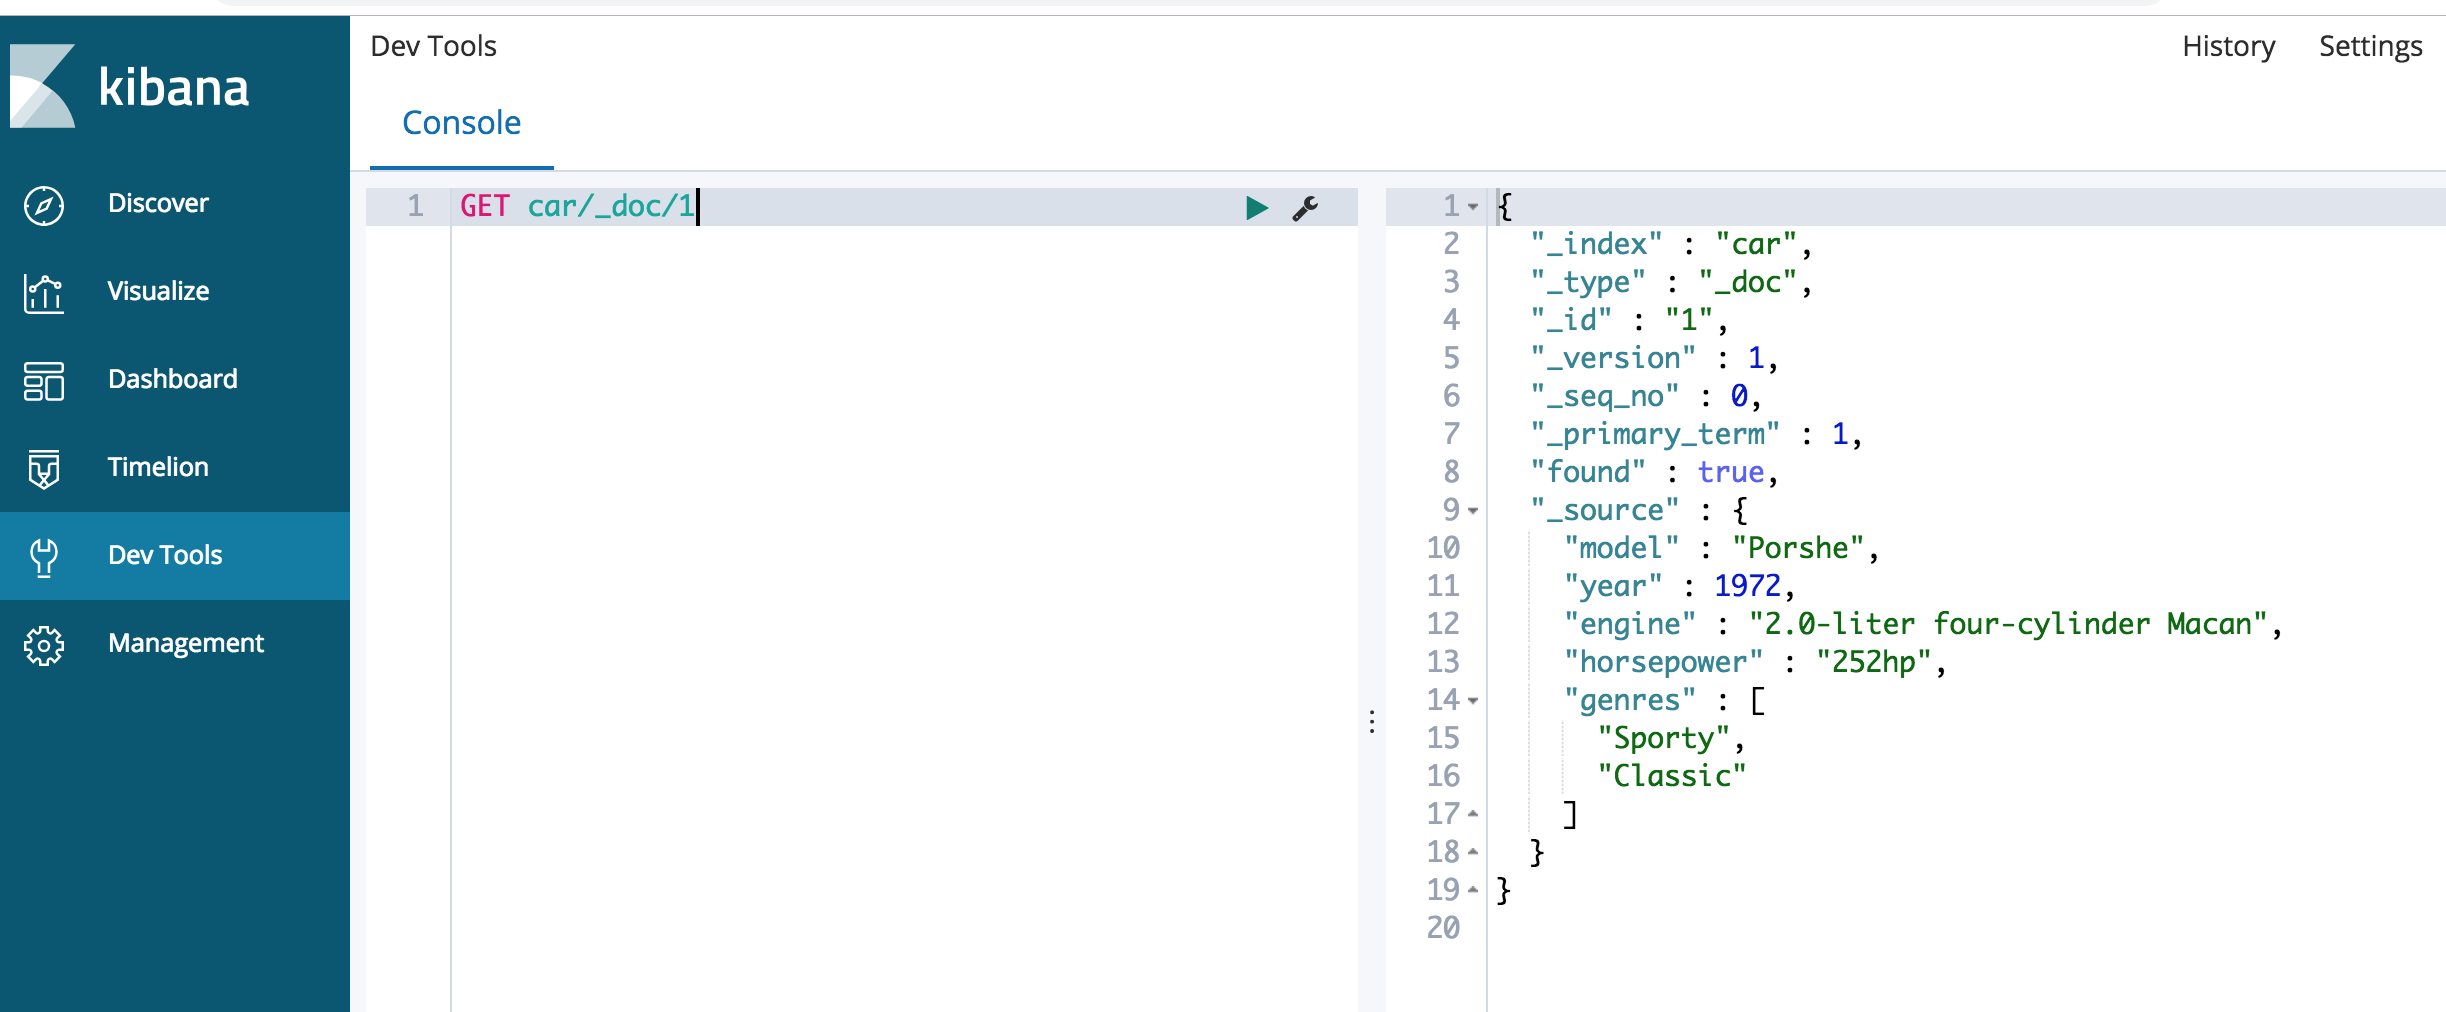
[comment]: < (=== Using GET request in Kibana’s console to have Elasticsearch return a document of an index using the index name, type, and doc ID number ===)
Conclusion
Adding documents to an index in the Elasticsearch service network is a fairly straightforward process as demonstrated here. Completing this procedure enables you to increase database volume as preferred. Once the steps above are complete, the index will be available to you for future additions. To address any questions or difficulties, please consult the various links for detailed coverage. As always, there are many more guides that can be perused to learn about compatible programs.


Pilot the ObjectRocket Platform Free!
Try Fully-Managed CockroachDB, Elasticsearch, MongoDB, PostgreSQL (Beta) or Redis.
Get Started