Elasticsearch Cheatsheet of the Most Important cURL Requests 252
Introduction
This article serves as a handy Elasticsearch cheatsheet for some of the most useful cURL requests you need for executing HTTP requests to an Elasticsearch cluster. cURL is a computer software program with a library and command-line tool designed for retrieving, transferring or sending data, including files, via various protocols using URL syntax.
The name cURL stands for “Client URL.” The command for the cURL library is simply: curl and all cURL requests must be prefaced with this command. The basic structure of the request header is just the curl command followed by a URL.
Installing cURL on Your Machine or Server
- Most newer versions of Linux come with cURL, however, cURL is fairly easy to install if you have an older Linux version.
- As with Ubuntu, you will need to use the Apt-based Debian repository on a Debian-based distribution of Linux to install cURL:
1 2 | sudo apt update sudo apt install curl |
- On Red Hat Linux distros, like CentOS or Fedora, you can use the YUM package manager to install the cURL library:
1 | yum install curl |
Structure of the cURL header:
- There are several request options you can use in your Elasticsearch requests. Your request option must immediately follow the
curlcommand and be preceded by a-hyphen. - If you are making these requests to an actual server with an internet domain, instead of making the requests to a localhost, you should replace
localhostin the header withhttps://{YOUR_DOMAIN}making sure to replace"{YOUR_DOMAIN}"with the domain name or IP address of the server.
cURL header options:
-X, --request — This request option indicates the HTTP verb used in the request.
-H, --header — The header option is critical, especially for any requests requiring more header information.
--silent, -s — The “silent” option will not display errors.
--verbose, -v— The verbose option will yield more information about the request.
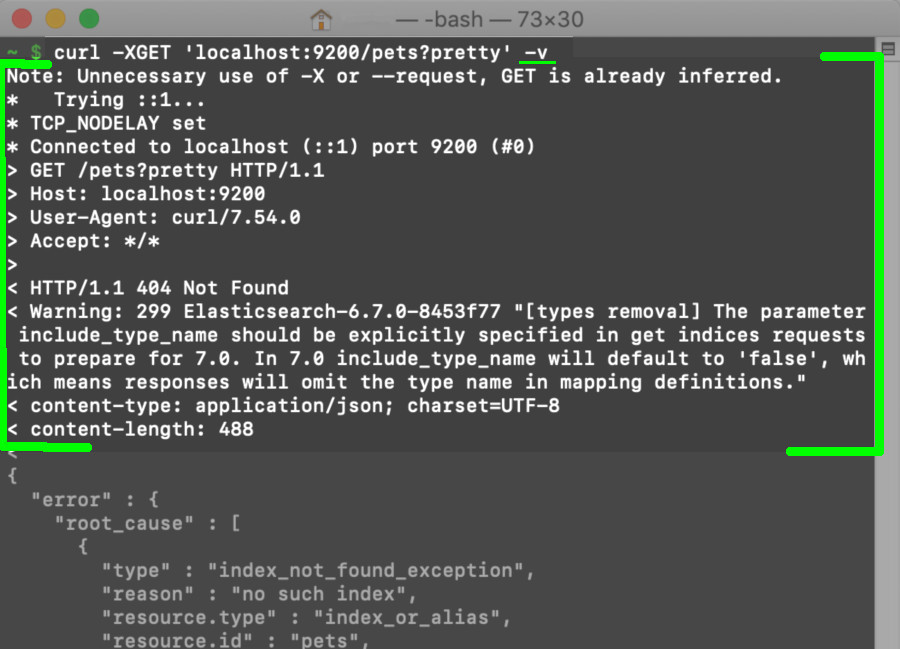
Here is an example using the --verbose or -v header option in a cURL request made to an Elasticsearch cluster:
Other header options:
The
-Xoption for the HTTP verb can either have a space after it, such as-X GET, or it can be written without the space, such as-XGETor-XPUT.While you can use single quotation marks, that are actually apostrophes, in the header with the domain name, the command line in Windows does not support single quotation marks, or apostrophes, in the header of a cURL request, such as
'localhost:9200/_bulk'. Therefore, it is best to use the actual double quotation marks.You can use the
?prettyoption at the end of the header to give the returned JSON response a more human-friendly, and readable, appearance.
Some Important Caveats About Using cURL with Elasticsearch
- Elasticsearch has made some important rule changes for executing its HTTP requests since the release of versions 6.0 and 7.0. For example, mapping types have been depreciated and now only one data type per index is allowed.
The “types removal” depreciation in Elasticsearch 7.0:
A "include_type_name" declaration must now be explicitly passed in the header as a boolean (e.g. "include_type_name=false") for many of Elasticsearch’s cURL requests. This new rule applies to all Elasticsearch HTTP requests, including any requests made in the Kibana Console.
As of version 7.0, this include_type_name header declaration will be required when passing an index’s document type along with the mapping body.
According to Elastic’s documentation, starting with Elasticsearch version 8.x, requests will no longer support specifying the document types and the entire include_type_name parameter will be completely removed, not just depreciated. However, be aware, as of April 2019 there are still some bugs associated with the include_type_name=true feature.
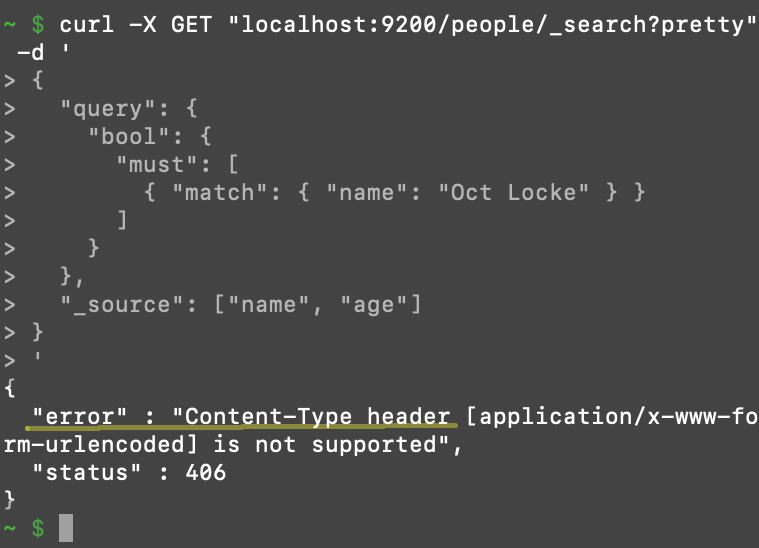
406 Content-Type Header Error
Beginning with version 6.0, Elasticsearch made a change to require all cURL requests, with a content body, to have the content type explicitly declared in the header. Failure to properly execute this request will result in a 406 status Content-Type HTTP error.
You must simply include -H 'Content-Type: application/json' somewhere in the request header to avoid this error.
Getting a 406 Content-Type Header Error After Making a cURL Request to Elasticsearch:
 Refer to the
 curl --help command to get more information.
Using a cURL Requests to Get Elasticsearch _Cluster Information:
- Get the
_clusterstate:
1 | curl -XGET "http://localhost:9200/_cluster/state?pretty" |
- Get the health of the cluster:
1 | curl -X GET 'localhost:9200/_cluster/health?pretty' |
Making GET Requests to an Elasticsearch Cluster Using cURL:
- The HTTP
GETverb, as per the functionality of “GET”, will not change the state of the Elasticsearch cluster. - Elastic’s Get API is used to obtain, or “get” information about the cluster and its indices.
Using GET to return information about the Elasticsearch cluster running on a specific port:
1 | curl GET -v 'localhost:9200' |
The JSON response should return fields with the "cluster_uuid” and "cluster_name" information, assuming that Elasticsearch is running on the default port of 9200. Note that the port can be changed in the elasticsearch.yml file.
GET Data About an Index
You can use the following request to return the mappings, shards and replica data and other information about this particular index on the cluster:
1 2 3 4 5 6 7 8 9 | curl -v -XGET 'localhost:9200/some_index?include_type_name=false' # ..or: curl GET 'localhost:9200/some_index?pretty' # ..or: curl -v GET "https://{DOMAIN_NAME}:9200/some_index?pretty" |
You will notice that the -X option for the curl command is only needed for some of the cURL requests.
Create an Elasticsearch Index Using cURL:
Here is a command you can use to create an index with some settings specifying the "number_of_shards" and "number_of_replicas" for the index:
1 2 3 4 5 6 7 8 | curl -v -XPUT "localhost:9200/some_index" -H 'Content-Type: application/json' -d ' { "settings" : { "number_of_shards" : 3, "number_of_replicas" : 1 } } ' |
Create an index’s"_mapping":
Here is a request you can use to create an index using PUT, as well as a document type in the header (depreciated since version 6.0).
This request will also create a "mappings" schema for the index with text, integer, boolean and date field types:
FOR ELASTICSEARCH v6.0 AND OLDER:
1 2 3 4 5 6 7 8 9 10 11 12 13 | curl -v -XPUT "localhost:9200/some_index/_mapping/doc_type?pretty" -H 'Content-Type: application/json' -d ' { "properties": { "field_1": { "type" : "text" }, "field_2": { "type" : "integer" }, "field_3": { "type" : "boolean" }, "created": { "type" : "date", "format" : "epoch_second" } } } ' |
FOR ELASTICSEARCH v7.0 AND NEWER:
curl -v -XPUT “http://localhost:9200/some_index?pretty” -H ‘Content-Type: application/json’ -d ‘ { “mappings”: {
2
3
4
5
6
7
8
9
10
11
"properties": {
"field_1": { "type" : "text" },
"field_2": { "type" : "integer" },
"field_3": { "type" : "boolean" },
"created": {
"type" : "date",
"format" : "epoch_second"
}
}
}
}
}
‘
`
NOTE: With Elasticsearch Version 7.0 and newer, the mapping requests using PUT will not accept the type name in the header.
You can also specify the "_mapping" and "settings" while using an HTTP request to create an index.
Here is an example showing you how to create an index with the shard and replica "settings." This command will also give the index a "mappings" schema:
1 2 3 4 5 6 7 8 9 10 11 12 13 14 15 16 17 18 19 | curl -v -XPUT "localhost:9200/some_index?include_type_name=false" -H 'Content-Type: application/json' -d ' { "settings" : { "number_of_shards" : 3, "number_of_replicas" : 1 }, "mappings": { "properties": { "field_1": { "type" : "text" }, "field_2": { "type" : "integer" }, "field_3": { "type" : "boolean" }, "created": { "type" : "date", "format" : "epoch_second" } } } } ' |
You can use a cURL request to return all of the indices in an Elasticsearch cluster:
If you are unsure of what indexes you’ve created on a cluster, you can use this command to return a complete list of indexes, including hidden Kibana indexes, as well as their respective UUIDs:
1 2 3 | curl -v -GET localhost:9200/_cat/indices?pretty # ..or: curl -v -GET "https://{YOUR_DOMAIN}:9200/_cat/indices?pretty" |
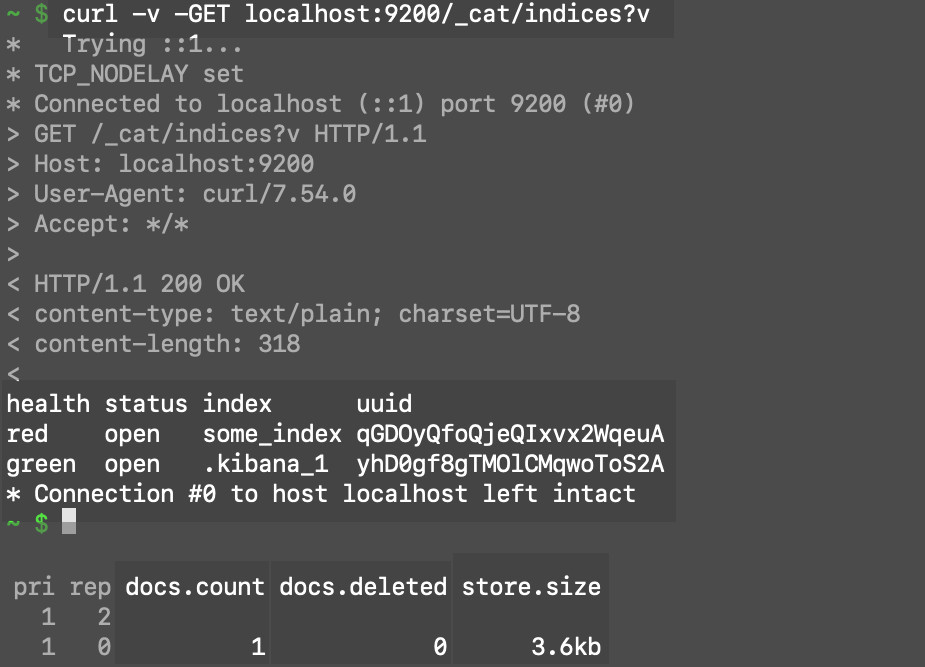 * Note that the index
 some_index, created earlier, has a UUID of qGDOyQfoQjeQIxvx2WqeuA.
Deleting Data in an Elasticsearch Index
Be especially careful whenever you perform these types of requests as it is very easy to accidentally delete indexes, documents or data that you didn’t intend to.
Delete an Entire Index in Elasticsearch:
WARNING: This action will delete the entire index and it should return a formatted JSON response with a "result" field indicating the request was successful:
1 2 3 | curl -v -XDELETE "localhost:9200/some_index?pretty" # ..or: curl -X DELETE localhost:9200/some_index/ |
You can also obtain the same results by just deleting the index’s document type:
1 | curl -XDELETE "http://localhost:9200/some_index/_doc" |
Deleting a document in an index:
1 2 3 | curl -v -XDELETE "localhost:9200/some_index/_doc/42" # ..or: curl -X DELETE localhost:9200/some_index/some_type/someId1234 |
Using the _delete_by_query API to delete documents:
The _delete_by_query API can be used to target and delete specific documents in an index.
WARNING: The following request will delete ALL of your documents in the index:
1 2 3 4 5 6 | curl -XPOST 'localhost:9200/some_index/_doc/_delete_by_query?pretty' -H 'Content-Type: application/json' -d ' { "query": { "match_all": {} } }' |
Creating and Indexing Documents in Elasticsearch
You can also use cURL requests with the Index API to create, update and index documents. Just pass the document’s data into the body of the request, making sure the data maps conforms precisely to the mapping outlined for the index.
Updating and Indexing Elasticsearch Documents:
Here is an example of a simple POST request you can use to index a document. However, in this example, the document ID of 42 has already been indexed, so this request will merely update the document:
1 2 3 4 5 6 7 8 9 10 11 12 13 | # generate a time stamp in seconds since epoch # works in macOS and Linux terminals: date "+%s" # make a PUT request to index, or update, document #42 curl -XPUT "localhost:9200/some_index/_doc/42?pretty" -H 'Content-Type: application/json' -d' { "field_1": "I am a *text* field type, formerly called *string*!", "field_2": 777, "field_3": false, "created": "1556191252" } ' |
NOTE: If the index request fails and returns an error message with the "reason" being Rejecting mapping update to [some_index] as the final mapping would have more than 1 type probably means you passed the wrong document type in the header. With Elasticsearch Versions 7.0 and up to, but not including, version 8.0 you will probably just have to pass _doc as the document type in the header.
Making a cURL PUT request that returns a JSON response from Elasticsearch with a "result" of "updated":
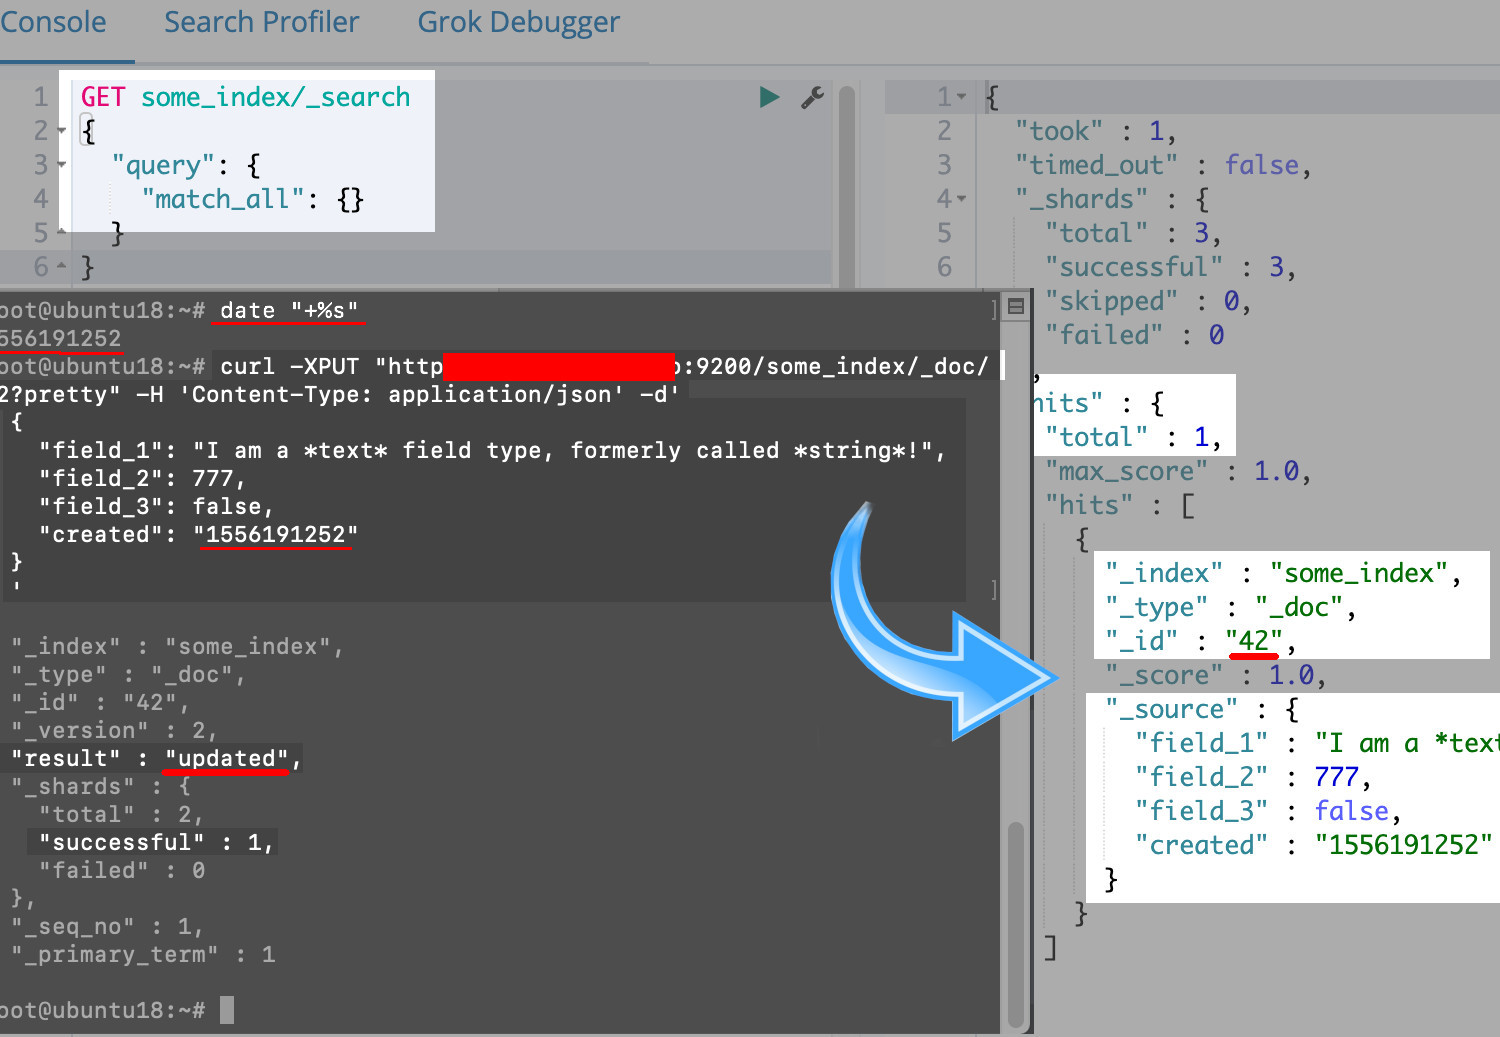
As the above screenshot shows, you can use the
date "+%s"command in terminal to generate a time-since-epoch timestamp, in seconds, and paste that into the cURL request’s body under the"created"field.Integer and boolean data types can be passed in
PUTrequest’s JSON body without quotation marks, such asfalse,instead of"false."
Index an Elasticsearch document with an autogenerated, dynamically-created ID:
If you change the HTTP verb to POST, instead of using PUT, and remove the explicit ID that is in the header after the document type, it will then create, or index, a document. Elasticsearch will then dynamically generate an alpha-numeric ID for the document:
1 2 3 4 5 6 7 8 9 | # use `POST` instead of `PUT`, and omit the ID: curl -XPOST "localhost:9200/some_index/_doc?pretty" -H 'Content-Type: application/json' -d' { "field_1": "I wonder what my ID will be?!?!?!", "field_2": 5678, "field_3": true, "created": "1556193846" } ' |
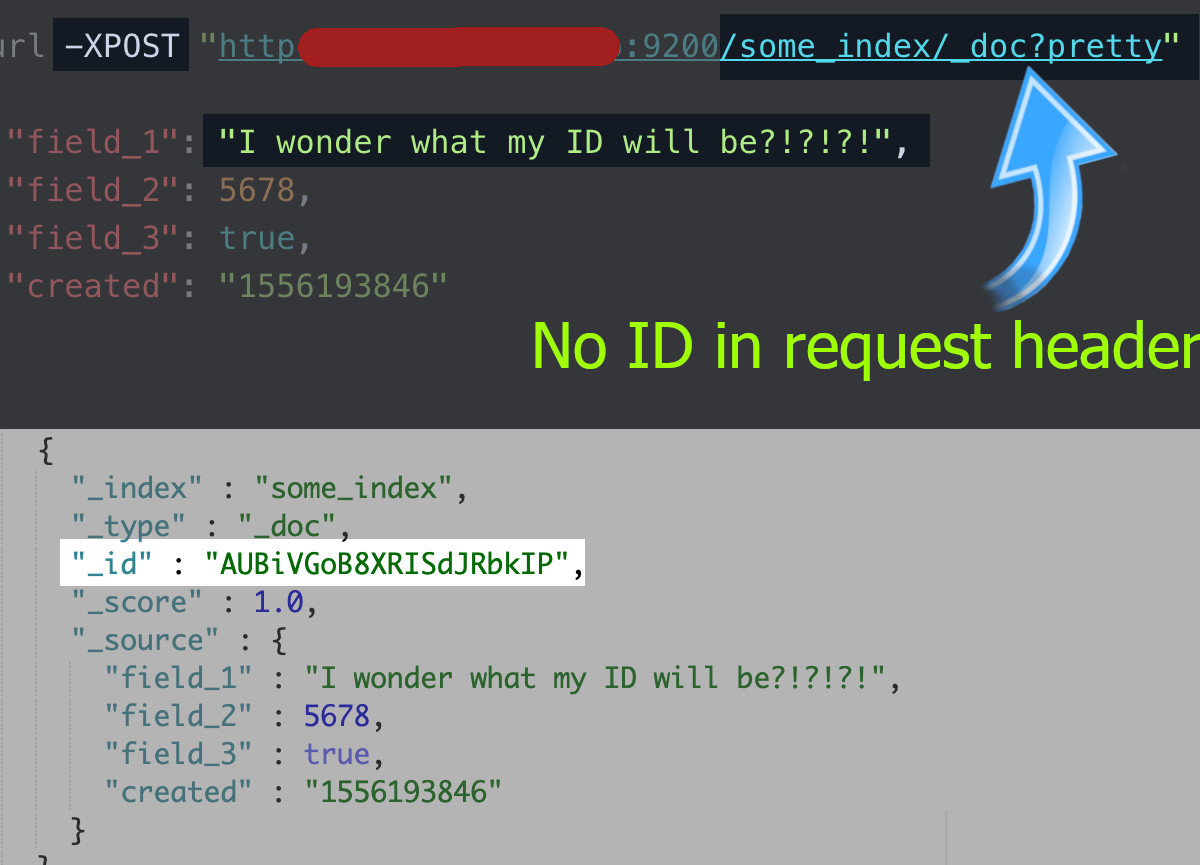 * In this example, the response should have a
 "result" field with a value of "created." In this instance Elasticsearch assigned the document an ID of AUBiVGoB8XRISdJRbkIP.
Using the _bulk API to index documents to Elasticsearch:
You can use the _bulk option at the end of the header and include a JSON object with the "_id" declared for each document in a nested "index" field:
1 2 3 4 5 6 7 8 | curl -v -XPOST "http://localhost:9200/some_index/_doc/_bulk?pretty" -H 'Content-Type: application/json' -d ' { "index": { "_id" : 1234 }} { "field_1": "SOME TEXT, YO!!!", "field_2": 34, "field_3": true, "created" : "1556195768" } { "index": { "_id" : 4321 }} { "field_1": "MORE TEXT, YO!!!", "field_2": 575, "field_3": false, "created" : "1556195768" } { "index": { "_id" : 3456 }} { "field_1": "LAST TEXT, YO!!!", "field_2": 123890, "field_3": true, "created" : "1556195773" } ' |
- Be sure you check that there is a return space between each document, and not commas, as the new line character is what acts as the delimiter.
Bulk upload an entire JSON file of Elasticsearch documents using cURL:
The JSON file needs to follow a similar JSON format as the previous _bulk API example. You can specify the "_index" name and _type" at the head of each document.
This example neglects to declare the IDs so Elasticsearch can dynamically generate alpha-numeric ones for each document:
1 2 3 4 | {"index":{"_index":"some_index","_type":"_doc"}} {"field_1": "SOME DATA!", "field_2": 1234, "field_3": true, "created": "1556196123"} {"index":{"_index":"some_index","_type":"_doc"}} {"field_1": "SOME DATA!", "field_2": 1234, "field_3": true, "created": "1556196123"} |
Simply enter that data into a text editor and save the file as data.json. Make sure to cd into the same directory as the file and then make the request to upload the JSON file into your Elasticsearch cluster:
1 | curl -v -XPUT 'http://localhost:9200/some_index/_doc/_bulk?pretty' -H 'Content-Type: application/json' --data-binary @data.json |
Elasticsearch "Query" Requests Using the Search API:
You can use the _search header option to perform query requests that will only return certain documents that match specific criteria.
Basic "query" request:
- All
"query"requests will have one or more fields used as the search parameters. Here is an example of a simple query used to match all documents that contain the string"forty-two“:1
2
3
4
5
6
7
8
9curl -X GET "localhost:9200/_search?pretty" -H 'Content-Type: application/json' -d'
{
"query": {
"match": {
"_all": "forty-two"
}
}
}
'
Use the _source option to limit the fields returned by the query:
1 2 3 4 5 6 7 8 9 10 11 12 | curl -X GET "localhost:9200/people1/_search?pretty" -H 'Content-Type: application/json' -d ' { "query": { "bool": { "must": [ { "match": { "name": "John Smith" } } ] } }, "_source": ["name", "age"] } ' |
NOTE: It is critical to not forget to add the brackets “[]” in the “_source" field whenever querying the field and value, or you will receive a java.lang.IllegalArgumentException error.
You can query people who fall into certain age ranges by using these commands: gte = greater than or equal to; lte = less than or equal to:
1 2 3 4 5 6 7 8 9 10 11 12 | curl -X GET "localhost:9200/people/_search?pretty" -H 'Content-Type: application/json' -d ' { "query": { "range" : { "age" : { "gte" : 20, "lte" : 40 } } } } ' |
Here is an example of a query request that indicates a certain field must match:
1 2 3 4 5 6 7 8 9 10 11 | curl -X GET "localhost:9200/people1/_search?pretty" -H 'Content-Type: application/json' -d ' { "query": { "bool": { "must": [ { "match": { "name": "Oct Locke" } } ] } } } ' |
Conclusion
In this tutorial you learned how to execute several of the most commonly utilized commands for executing HTTP requests to an Elasticsearch cluster using cURL. Most newer versions of Linux come with cURL preloaded. However, if you do not have it, cURL is fairly easy to install.
When using this cheatsheet, bear in mind that different versions of Elasticsearch will have somewhat differ command-line requirements. Failure to execute the commands as instructed in this article for the specified Elasticsearch version will result in errors, such as passing the wrong document type in the header and 406 status Content-Type HTTP errors.


Pilot the ObjectRocket Platform Free!
Try Fully-Managed CockroachDB, Elasticsearch, MongoDB, PostgreSQL (Beta) or Redis.
Get Started