How to Create a Web Scraper with Mongoose, NodeJS, Axios, and Cheerio - Part 1
Introduction
In this multi-part series we will create a web scraper from scratch. It will store the data it has scraped using MongoDB. The backend will be written in Javascript running on NodeJS. There are several libraries we will use on the backend to make our lives easier including Express, Axios, and Cheerio. On the front-end we will use Bootstrap for styling and JQuery to send requests to the backend. Finally we will deploy the site using Heroku. In this first part of the series we will get a basic version of our backend running.
Prerequisites
- You should have MongoDB installed.
- Some command line, Javascript, and npm experience is recommended.
Step 1 Create a starter NodeJS app
We are starting from scratch so we will begin with creating a simple NodeJS app and confirm that it’s running. We will add functionality and a front-end as we progress but it’s better to approach a bigger project like this step by step.
- First create a directory using the terminal or through your Operating System’s user interface. We’ll show how to do it with the command line:
1 | mkdir webscraper |
- Now we will initialize this project folder using npm so we can keep track of it’s depenedencies because we will be using a fair amount of libraries. To do this run the npm init command:
1 | npm init |
You can accept all the defaults except we’ve chosen to use app.js as our entry point:
1 | entry point: (index.js) app.js |
- Next we will create the javascript file that will receive and respond to requests. We’ll call it
app.js. Create this file using your OS or through the terminal like this:
1 | touch app.js |
- Now we’ll create a basic app and make sure that we can get it running. We start with this:
1 2 3 4 5 6 7 8 9 10 11 12 13 14 15 16 17 18 19 | var express = require("express"); var PORT = process.env.PORT || 3000; // Initialize Express var app = express(); // Configure middleware // Parse request body as JSON app.use(express.urlencoded({ extended: true })); app.use(express.json()); // Make public a static folder app.use(express.static("public")); // Start the server app.listen(PORT, function() { console.log("App listening on port " + PORT); }); |
This is a very basic express app and since we require the express library we’ll need to install it with npm:
1 | npm install express |
Let’s verify that we can run our NodeJS app and that we see our console message that it is listening on port 3000:
1 2 | $node app.js App listening on port 3000 |
Step 2 Add Axios and Cheerio for the web-scraping functionality
Next we’ll be installing two libraries from npm that will help us with the web-scraping functionality. Axios allows you to make requests to a webpage and return the html and Cheerio is a subset of jquery that allow us to parse through the scraped html page for the components we are looking for.
1 | npm install axios cheerio |
Step 3 Add our first route
Now we will use express for what it does best, creating routes. Our first route will be to the homepage so that when a browser makes a request to our homepage it will return an index.html page that we will create shortly. Let’s create the route first:
This is how we add a new route to a index.html file in our public folder:
1 2 3 4 | // Simple index route app.get("/", function(req, res) { res.sendFile(path.join(__dirname + "./public/index.html")); }); |
So our app.js file is now:
1 2 3 4 5 6 7 8 9 10 11 12 13 14 15 16 17 18 19 20 21 22 23 24 | var express = require("express"); var PORT = process.env.PORT || 3000; // Initialize Express var app = express(); // Configure middleware // Parse request body as JSON app.use(express.urlencoded({ extended: true })); app.use(express.json()); // Make public a static folder app.use(express.static("public")); // Simple index route app.get("/", function(req, res) { res.sendFile(path.join(__dirname + "./public/index.html")); }); // Start the server app.listen(PORT, function() { console.log("App listening on port " + PORT); }); |
Now let’s create the index.html file for our homepage. First we’ll need the public directory:
1 | mkdir public |
Then we’ll need to change directories (cd) into it:
1 | cd public |
Then we’ll need to create the index.html file:
1 | touch index.html |
Finally use your favorite IDE (integrated development environment) to put this html into that file:
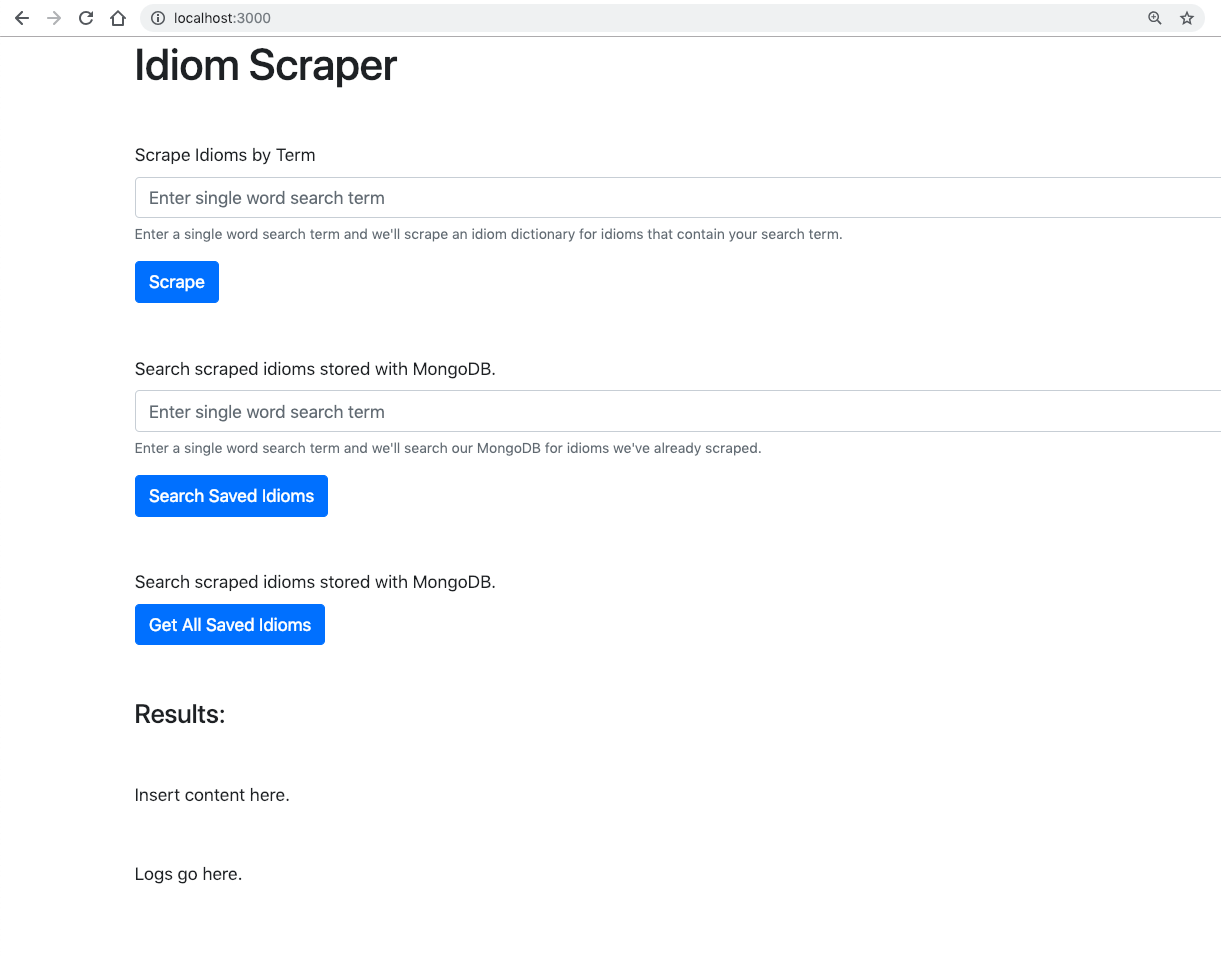
1 2 3 4 5 6 7 8 9 10 11 12 13 14 15 16 17 18 19 20 21 22 23 24 25 26 27 28 29 30 31 32 33 34 35 36 37 38 39 40 41 42 43 44 45 46 47 48 49 50 51 52 53 54 55 56 57 58 59 60 61 62 63 64 65 66 67 68 69 70 71 72 73 74 75 76 77 | <!doctype html> <html lang="en"> <head> <!-- Required meta tags --> <meta charset="utf-8"> <meta name="viewport" content="width=device-width, initial-scale=1, shrink-to-fit=no"> <!-- Bootstrap CSS --> <link rel="stylesheet" href="https://stackpath.bootstrapcdn.com/bootstrap/4.3.1/css/bootstrap.min.css" integrity="sha384-ggOyR0iXCbMQv3Xipma34MD+dH/1fQ784/j6cY/iJTQUOhcWr7x9JvoRxT2MZw1T" crossorigin="anonymous"> <title>Idiom Scraper</title> </head> <body> <div class="container"> <h1>Idiom Scraper</h1> <div class="row mt-5"> <div class="col"> <form> <div class="form-group"> <label for="scrapeTerm">Scrape Idioms by Term</label> <input type="text" class="form-control" id="scrapeTerm" aria-describedby="scrapeHelp" placeholder="Enter single word search term"> <small id="scrapeHelp" class="form-text text-muted">Enter a single word search term and we'll scrape an idiom dictionary for idioms that contain your search term.</small> </div> <button type="submit" class="btn btn-primary" id="scrapeButton">Scrape</button> </form> </div> </div> <div class="row mt-5"> <div class="col"> <div class="form-group"> <label for="searchTerm">Search scraped idioms stored with MongoDB.</label> <input type="text" class="form-control" id="searchTerm" aria-describedby="searchHelp" placeholder="Enter single word search term"> <small id="searchHelp" class="form-text text-muted">Enter a single word search term and we'll search our MongoDB for idioms we've already scraped.</small> </div> <button type="submit" class="btn btn-primary" id="searchButton">Search Saved Idioms</button> </div> </div> <div class="row mt-5"> <div class="col"> <label for="searchTerm">Search scraped idioms stored with MongoDB.</label> </br> <button type="submit" class="btn btn-primary" id="getAllButton">Get All Saved Idioms</button> </div> </div> <h4 class="mt-5">Results:</h4> <div class="mt-5" id="tableDiv"> Insert content here. </div> <div class="mt-5" id="log"> Logs go here. </div> </div> <!-- Scripts --> <script src="https://code.jquery.com/jquery-3.4.0.min.js" integrity="sha256-BJeo0qm959uMBGb65z40ejJYGSgR7REI4+CW1fNKwOg=" crossorigin="anonymous"></script> <script src="https://cdnjs.cloudflare.com/ajax/libs/popper.js/1.14.7/umd/popper.min.js" integrity="sha384-UO2eT0CpHqdSJQ6hJty5KVphtPhzWj9WO1clHTMGa3JDZwrnQq4sF86dIHNDz0W1" crossorigin="anonymous"></script> <script src="https://stackpath.bootstrapcdn.com/bootstrap/4.3.1/js/bootstrap.min.js" integrity="sha384-JjSmVgyd0p3pXB1rRibZUAYoIIy6OrQ6VrjIEaFf/nJGzIxFDsf4x0xIM+B07jRM" crossorigin="anonymous"></script> <script src="index.js"></script> </body> </html> |
As you can see there is a lot of functionality we are not using in our html but at least you can see where we are headed.
Now that we have a get route for home that serves index.html we should be able to hit http://localhost:3000/ and see our page that was built with boostrap.
Conclusion of Part 1
In this first part of the tutorial we built the basis for our webscraper app. We have an application that serves a homepage and we have all the libraries we need to finish this project. So please proceed to Part 2 of this tutorial where we build the backend functionality to scrape a web page. In Part 3 we’ll tie all the front-end and back-end together with express routes.

Pilot the ObjectRocket Platform Free!
Try Fully-Managed CockroachDB, Elasticsearch, MongoDB, PostgreSQL (Beta) or Redis.
Get Started