Build a Simple App with GraphQL, NodeJS, Express, and MongoDB - Part 4
Introduction
In the previous section of this tutorial, Part 3, we showed setup a more realistic GraphQL API using custom a custom Blog type we defined. We were able to both create and retrieve blog entities but they were stored in a global variable and not actually saved in a database. In this Part 4 of this series we’ll fix that by hooking up MongoDB to our application.
Note: You could use any database of your choosing. The functionality GraphQL provides has no preference in which database technology you use, but for this tutorial we chose MongoDB.
Setup MongoDB with Atlas
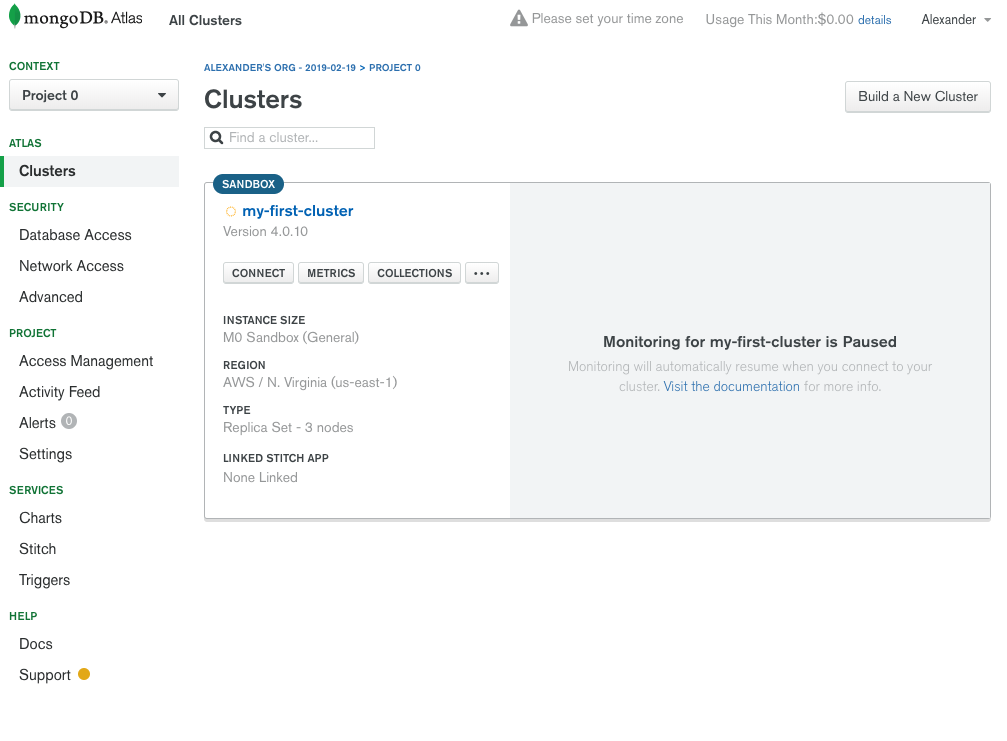
For this tutorial we used MongoDB Atlas because it’s an easy way to setup a MongoDB cluster. If you go to MongoDB Atlas you can register for a free account and use the free tier options to setup your first cluster. Once you’re done signing up you should end up at a screen similar to this that shows your first cluster:
Verify you have a user with sufficient permissions
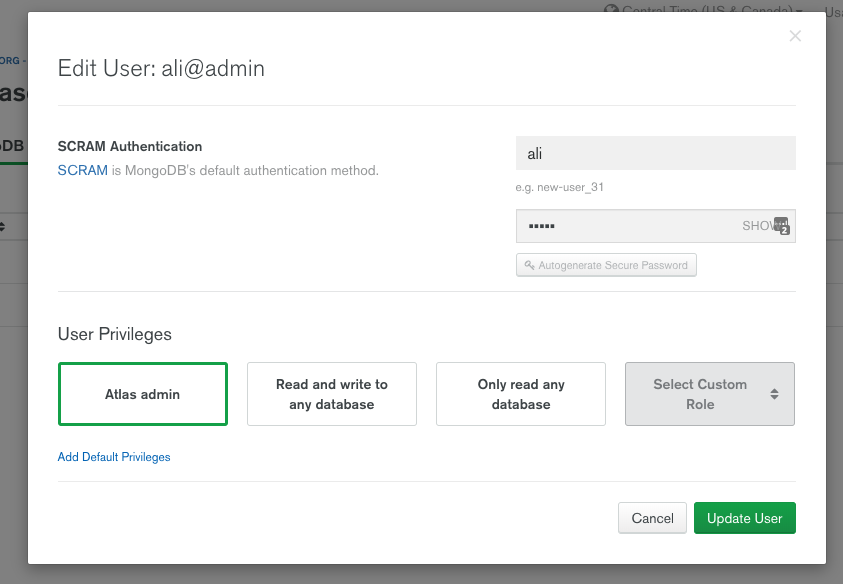
First you’ll want to go to the Security->Database Access page for your cluster and verify that you have a user with either Atlas admin Role or Read and Write to any database Role. In our case we will be using the ‘ali’ user.

If you don’t know the password click edit on the user, then a modal will pop-up where you can set the password. Make sure to click “Update User” if you’ve changed the password:
Whitelist your IP Address
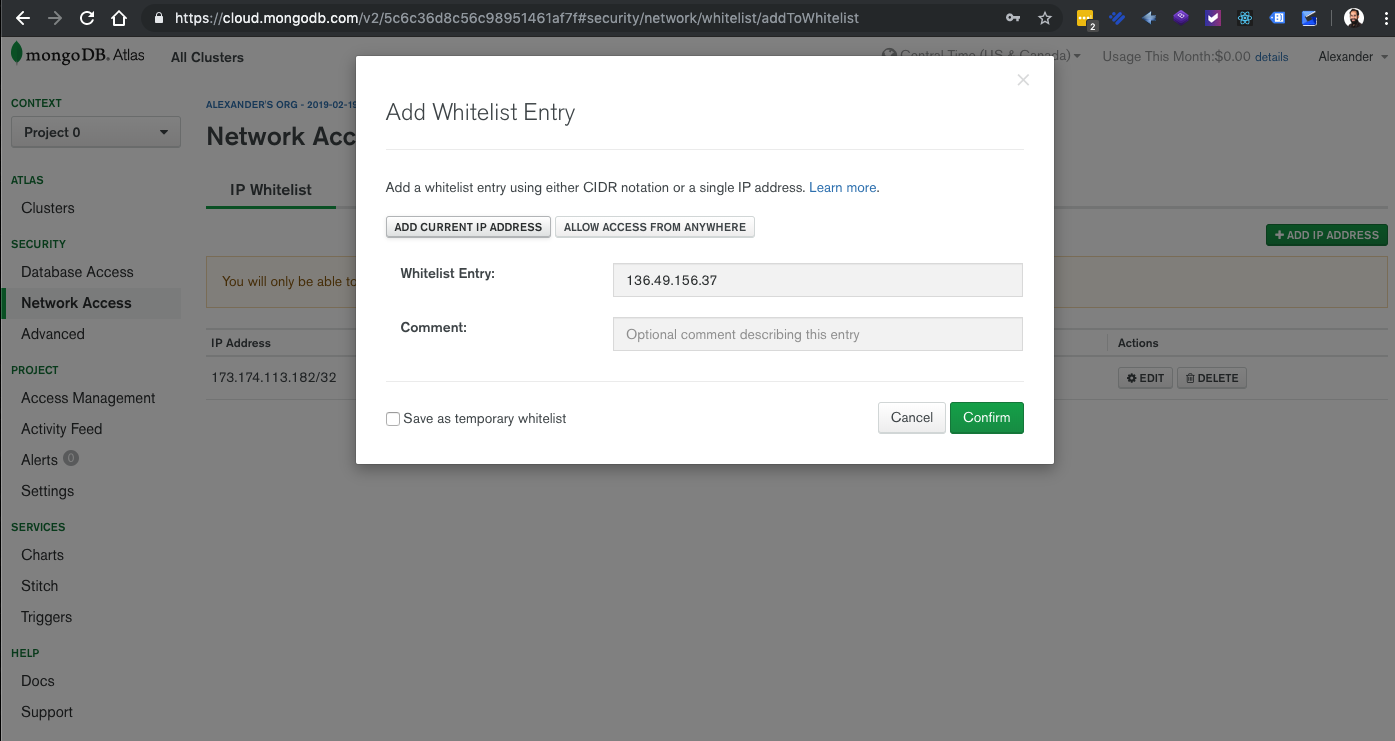
We’ve just setup a user that we can log into our MongoDB server with but now we need to tell Atlas to allow connections from our current IP address. To do that under Security->Network Access click “Add IP Address” then click “Add Current IP Address” then click Confirm:
Now we have everything setup to access our MongoDB cluster from our application.
Install MongoDB Drivers – Mongoose
Now we need to install some drivers so that our application can interact with MongoDB. There are several choices out there including one from MongoDB themselves, but for this tutorial we’re opting for a third-party driver called Mongoose. Mongoose operates quite differently than the other drivers in that you create Models and Schemas to save data. It’s easy to work with and fits quite nicely with the Blog entity we are building so this is our choice for this tutorial.
Install Mongoose with npm like so:
1 | npm install --save mongoose |
We used the --save flag because this is a library that we want in our production application.
Configure Nodemon
We’ve been running our server using nodemon and now is a great time to add some configuration parameters to nodemon. This is a great place to put our MongoDB username and password. To configure nodemon we create a file called nodemon.json.
1 | touch nodemon.json |
In this file we put our login credentials for Atlas that we setup earlier. We also put the database name that we’d like to work with. It will create the database if doesn’t already exist. We put them into an “env” object that we can grab in our application. Here’s what our nodemon.json file looks like ( use your own credentials ):
1 2 3 4 5 6 7 | { "env": { "MONGO_USER": "ali", "MONGO_PASSWORD": "atlas!LKJ33", "MONGO_DB": "graphql-demo" } } |
Use Mongoose to Interact with MongoDB
Now we go back to our app.js file and include the library of drivers
Setup the Mongoose Model
Now how Mongoose works we need to setup a model that corresponds to the data we’ll store. First create a directory to put the model files in:
1 | mkdir models |
Now create the model file for the blogs, blog.js:
1 | touch blog.js |
Here is the model we’ve defined in blog.js:
1 2 3 4 5 6 7 8 9 10 11 12 13 14 15 16 17 18 19 20 21 22 23 24 25 26 27 | const mongoose = require('mongoose') // import mongoose const Schema = mongoose.Schema // Create the Schema for Mongoose that corresponds to that type we set in GraphQL const blogSchema = new Schema({ title: { type: String, required: true }, text: { type: String, required: true }, description: { type: String, required: true }, date: { type: Date, required: true } }) module.exports = mongoose.model('Blog', blogSchema) // create and export the model |
Notice that this mimics the entity we’ve setup in GraphQL. Mongoose uses different syntax but you can see their documentation if you need more complex schemas. Here we have just defined our fields and dictated that they are all required.
From our schema we create a model which will then actually create and store the entities in the database. We export this model so we can use it in our app.js file.
Modify app.js to use Mongoose
Let’s take a look at our new app.js file and then go over the changes that were made:
File: app.js
1 2 3 4 5 6 7 8 9 10 11 12 13 14 15 16 17 18 19 20 21 22 23 24 25 26 27 28 29 30 31 32 33 34 35 36 37 38 39 40 41 42 43 44 45 46 47 48 49 50 51 52 53 54 55 56 57 58 59 60 61 62 63 64 65 66 67 68 69 70 71 72 73 74 75 76 77 78 79 80 81 82 83 84 | const express = require('express') // import express const bodyParser = require('body-parser') // import body-parser const graphqlHttp = require('express-graphql') // import graphql to use as middleware const { buildSchema } = require('graphql') // import the function to build our schema const mongoose = require('mongoose') // impor the mongoose drivers const Blog = require('./models/blog') const app = express() // create express server app.use(bodyParser.json()) // use body-parser middleware to parse incoming json app.use('/graphql', graphqlHttp({ // set up our graphql endpoint with the express-graphql middleware // build a graphql schema schema: buildSchema(` type Blog { _id: ID! title: String! text: String! description: String! date: String } input BlogInput { title: String! text: String! description: String! date: String } type blogQuery { blogs: [Blog!]! } type blogMutation { createBlog(blogInput: BlogInput): Blog } schema { query: blogQuery mutation: blogMutation } `), rootValue: { blogs: () => { // return all the blogs unfiltered using Model return Blog.find().then(blogs => { return blogs }).catch(err => { throw err }) }, createBlog: (args) => { const blog = new Blog({ title: args.blogInput.title, text: args.blogInput.text, description: args.blogInput.description, date: new Date() }) // save new blog using model which will save in MongoDB return blog.save().then(result => { console.log(result) return result }).catch(err => { console.log(err) throw err }) } }, // an object with resolver functions graphiql: true // enable the graphiql interface to test our queries })) // connect to our MongoDB server. mongoose.connect(`mongodb+srv://${process.env.MONGO_USER}:${process.env.MONGO_PASSWORD}@my-first-cluster-hr6uj.mongodb.net/${process.env.MONGO_DB}?retryWrites=true&w=majority` ).then(() => { app.listen(5000) // setup server to run on port 5000 }).catch(err => { console.log(err) }) |
- We imported mongoose and the blog model we created using mongoose
- In the responders we used the model to query and save data in the database:
Blog.find()andblog.save()
We used
mongoose.connectwith a url which we got from Atlas and replaced parameters with the variables we set in our nodemon env variable. * To get the url from Atlas to your cluster go to your cluster on Atlas and click “Connect” and then “Connect Your Application” and it will provide you with a url that you can copy and paste into this connect function. We replace these parameters with variables in ournodemon.json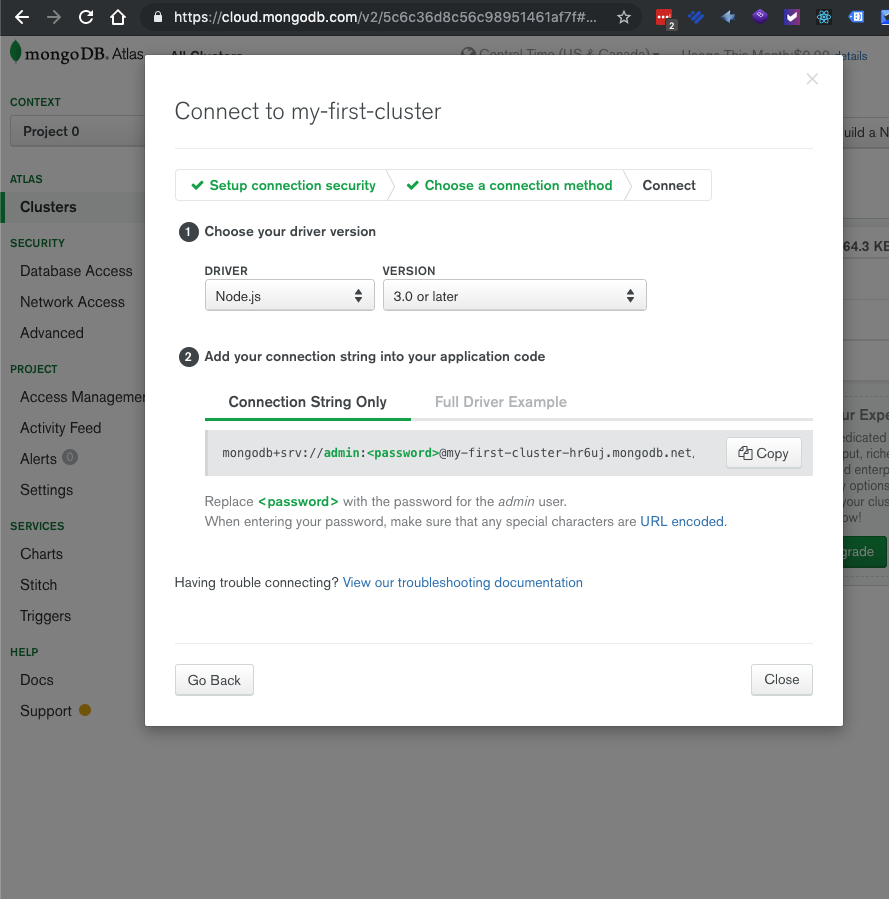
Verify the API is Storing Data in MongoDB
We’ve made changes in our nodemon configuration so let’s restart our server by hitting Ctrl + C, stopping the server, then restarting it again with:
1 | nodemon app.js |
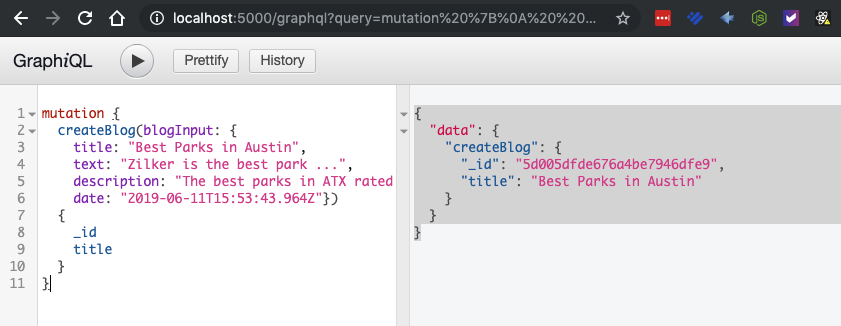
Then go to the GraphiQL interface at http://localhost:5000/graphql and try hitting sending a mutation request to create a blog:
1 2 3 4 5 6 7 8 9 10 11 | mutation { createBlog(blogInput: { title: "Best Parks in Austin", text: "Zilker is the best park ...", description: "The best parks in ATX rated by yours truly!" date: "2019-06-11T15:53:43.964Z"}) { _id title } } |
You should get this response:
1 2 3 4 5 6 7 8 | { "data": { "createBlog": { "_id": "5d005dfde676a4be7946dfe9", "title": "Best Parks in Austin" } } } |
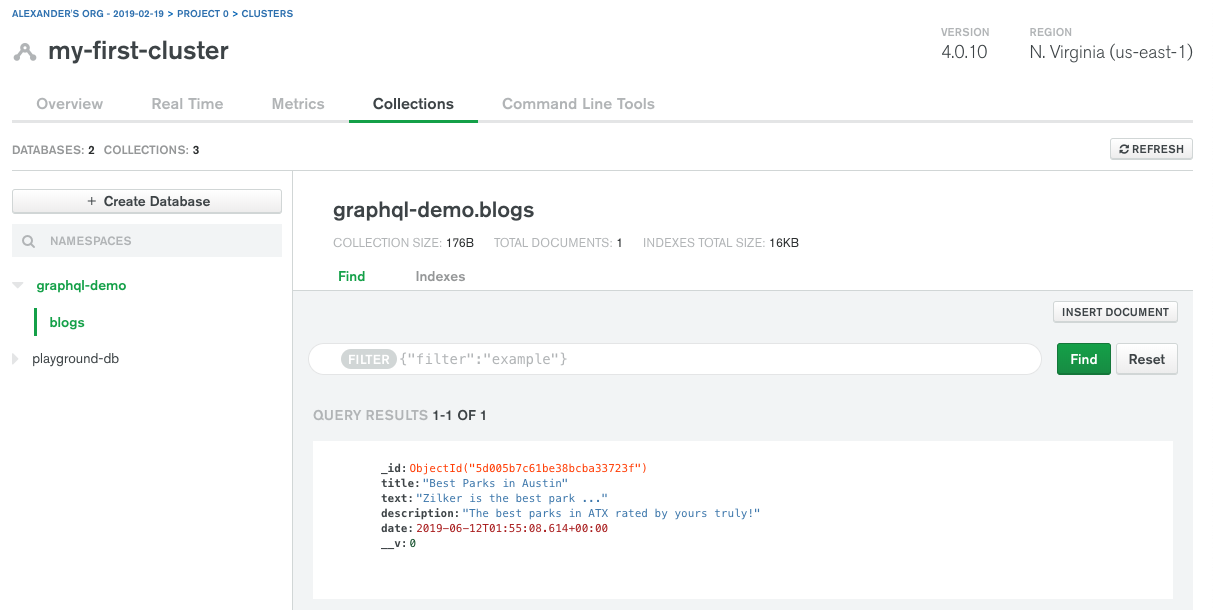
Then go to Atlas and click on “Collections” and you should see your new database with a collection for your blogs and a new document with the blog you just created. Ours looks like this:
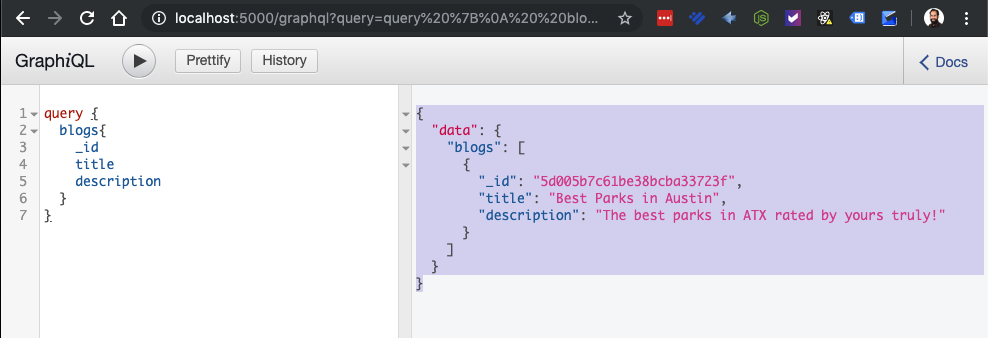
Now let’s try a query for the blogs:
1 2 3 4 5 6 7 | query { blogs{ _id title description } } |
Our response looks like this:
1 2 3 4 5 6 7 8 9 10 11 | { "data": { "blogs": [ { "_id": "5d005b7c61be38bcba33723f", "title": "Best Parks in Austin", "description": "The best parks in ATX rated by yours truly!" } ] } } |
Conclusion
We finally have a GraphQL that interacts with a MongoDB database. We can store data and retrieve it in a structured way. We hope you found this tutorial helpful and you can apply what you’ve learned to your specific application. We encourage you to take this application further and create more models for User etc and a front-end for the application.
If managing your database is becoming a headache and you’d like your data to be in hands you can trust, please don’t hesitate to reach out to us at ObjectRocket.
Build a Simple App with GraphQL, NodeJS, Express, React, and MongoDB – Part 1
Build a Simple App with GraphQL, NodeJS, Express, React, and MongoDB – Part 2
Build a Simple App with GraphQL, NodeJS, Express, React, and MongoDB – Part 3
Build a Simple App with GraphGL, NodeJS, Express, React, and MongoDB – Part 4

Pilot the ObjectRocket Platform Free!
Try Fully-Managed CockroachDB, Elasticsearch, MongoDB, PostgreSQL (Beta) or Redis.
Get Started