NodeJs with Redis Web App Part 2
Introduction
If you’re interested in building a web application that uses both NodeJs and Redis, this tutorial will provide all the information you need to get started. This second installment in our multi-part tutorial series picks up where the first article left off. We’ll continue our project, showing you how to configure the view of our NodeJs Redis web app.
Prerequisites
Before you proceed with the instructions in this tutorial, make sure you’ve completed the steps in the first article of the series. Any prerequisites listed in the first installment of this tutorial will also apply for this article.
Configuring the Application Layout
In this section, we’ll be creating the main layout that our user will utilize to interact with our application. The following steps are involved:
- First, we’ll create a folder named layout within our project directory.
- Next, we’ll create a new file named main.handlebars inside that folder.
- Finally, we’ll use the HTML shown below for our main.handlebars.
1 2 3 4 5 6 7 8 9 10 11 12 13 14 15 16 17 18 19 20 21 22 23 24 25 26 27 28 29 30 31 32 33 34 35 36 37 38 39 40 41 42 43 44 45 46 47 | <!DOCTYPE html> <html lang="en"> <head> <meta charset="UTF-8" /> <meta name="viewport" content="width=device-width, initial-scale=1.0" /> <meta http-equiv="X-UA-Compatible" content="ie=edge" /> <title>User Management</title> <link href="https://stackpath.bootstrapcdn.com/bootswatch/4.3.1/slate/bootstrap.min.css" rel="stylesheet" integrity="sha384-FBPbZPVh+7ks5JJ70RJmIaqyGnvMbeJ5JQfEbW0Ac6ErfvEg9yG56JQJuMNptWsH" crossorigin="anonymous" /> </head> <body> <nav class="navbar navbar-expand-sm navbar-dark bg-primary mb-4"> <a class="navbar-brand" href="/">User Information Management</a> <button class="navbar-toggler" type="button" data-toggle="collapse" data-target="#navbarNav" aria-controls="navbarNav" aria-expanded="false" aria-label="Toggle navigation" > <span class="navbar-toggler-icon"></span> </button> <div class="collapse navbar-collapse" id="navbarNav"> <ul class="navbar-nav ml-auto"> <li class="nav-item active"> <a class="nav-link" href="/" >Home <span class="sr-only">(current)</span></a > </li> <li class="nav-item"> <a class="nav-link" href="/user/add">Add User</a> </li> </ul> </div> </nav> <div class="container"> {{{body}}} </div> </body> </html> |
Creating the view for Searching Users
Next, we’ll look at the code that creates the form used to search for users.
We’ll need to create a new folder and name it views; then, we’ll create a new file named searchuser.handlebars.
1 2 3 4 5 6 7 8 9 10 11 12 |
If we tested the layout shown above, we’d see something like this in our browser:
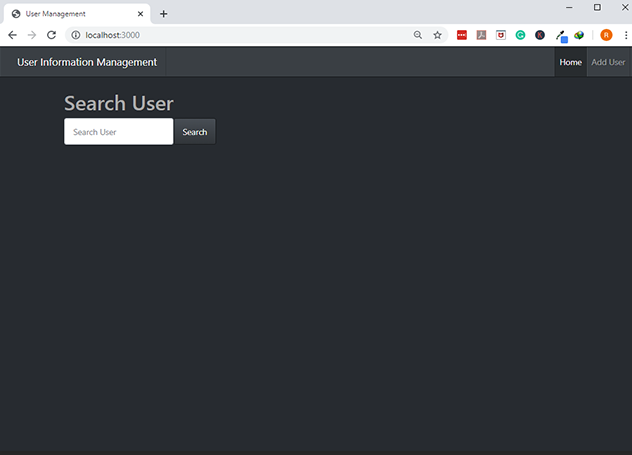
Note that the the search form is in the middle of our application. This position is due to this tag {{{body}}} from the main.handlebars file, which will load all the views as configured.
Configuring the Search User Function
In the previous section, we showed what our web application would look like in the browser. Although our form is meant to be used for user searches, it’s not actually functional at the moment. That’s why we’ll be focusing on building that functionality in this section. To do this, we’re going to update our app.js file and modify the code that processes our RETRIEVE operation.
1 2 3 4 5 6 7 8 9 10 11 12 13 14 15 16 17 18 19 20 21 22 23 24 25 26 27 | app.post("/user/search", function(request, response, next) { let id = request.body.id; // As we run this function, we will be using a Redis command which is HGETALL function // that allows us to return the hash that was stored in a certain key or an id. // This function will search records/data matching the id parameter and it will return an error or an object (obj) rclient.hgetall(id, function(err, obj) { // This code simply checks if the object is not in there if (!obj) { // then we just re-render our page response.render("searchuser", { // and then pass an error with the following strings error: "Sorry that user does not exist" }); } else { // if there is a user // we will be taking the object and assign an id property to id obj.id = id; // then we render another page named 'details' where we will see the user's information response.render("details", { user: obj }); } }); }); |
To display the error with the message error: 'Sorry that user does not exist' in our page, we’ll need to update our searchuser.handlebars page as follows:
1 2 3 4 5 6 7 8 9 10 11 12 13 14 15 | <h1>Search User</h1> {{!-- if there's an error display the text with bootstrap formatting as shown below --}} {{#if error}} <span class="badge badge-warning mb-2">{{error}}</span>{{/if}} <form class="form-inline" method="POST" action="/user/search"> <div class="form-group"> <input type="text" name="id" class="form-control" placeholder="Search User" /> </div> <input type="submit" class="btn btn-primary" value="Search" /> </form> |
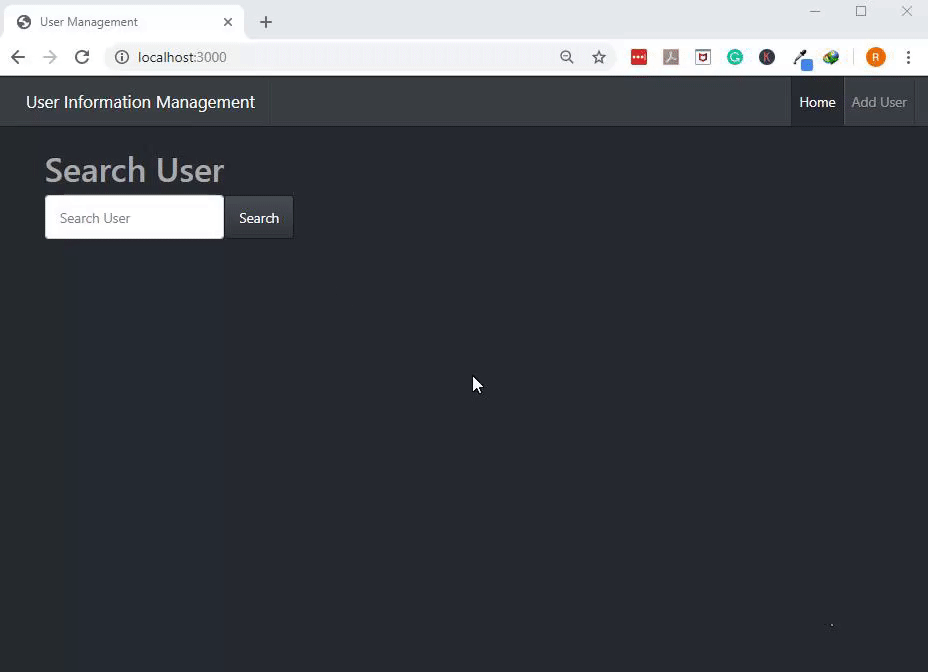
The above snippet of code will be triggered if no user is found, which is the case at the moment. Let’s test out this part of our NodeJs Redis web app by using the following URL: localhost:3000 in our browser:
Conclusion
In this article, we continued our work on a NodeJs Redis web app. We showed you how to configure the project and how to connect to a Redis server using NodeJs. With our example to use as a guide, you’ll be able to follow along and build your own web application using both NodeJs and Redis.
The Code
We looked at quite a bit of HTML and Javascript throughout this tutorial. Shown below is all the code we reviewed in this article:
Main.handlebars
1 2 3 4 5 6 7 8 9 10 11 12 13 14 15 16 17 18 19 20 21 22 23 24 25 26 27 28 29 30 31 32 | <!DOCTYPE html> <html lang="en"> <head> <meta charset="UTF-8"> <meta name="viewport" content="width=device-width, initial-scale=1.0"> <meta http-equiv="X-UA-Compatible" content="ie=edge"> <title>User Management</title> <link href="https://stackpath.bootstrapcdn.com/bootswatch/4.3.1/slate/bootstrap.min.css" rel="stylesheet" integrity="sha384-FBPbZPVh+7ks5JJ70RJmIaqyGnvMbeJ5JQfEbW0Ac6ErfvEg9yG56JQJuMNptWsH" crossorigin="anonymous"> </head> <body> <nav class="navbar navbar-expand-sm navbar-dark bg-primary mb-4"> <a class="navbar-brand" href="/">User Information Management</a> <button class="navbar-toggler" type="button" data-toggle="collapse" data-target="#navbarNav" aria-controls="navbarNav" aria-expanded="false" aria-label="Toggle navigation"> <span class="navbar-toggler-icon"></span> </button> <div class="collapse navbar-collapse" id="navbarNav"> <ul class="navbar-nav ml-auto" > <li class="nav-item active"> <a class="nav-link" href="/">Home <span class="sr-only">(current)</span></a> </li> <li class="nav-item"> <a class="nav-link" href="/user/add">Add User</a> </li> </ul> </div> </nav> <div class="container"> {{{body}}} </div> </body> </html> |
App.js
1 2 3 4 5 6 7 8 9 10 11 12 13 14 15 | app.post("/user/search", function(request, response, next) { let id = request.body.id; rclient.hgetall(id, function(err, obj) { if (!obj) { response.render("searchuser", { error: "Sorry that user does not exist" }); } else { obj.id = id; response.render("details", { user: obj }); } }); }); |
searchuser.handlebars
1 2 3 4 5 6 7 8 9 10 11 12 13 14 | <h1>Search User</h1> {{#if error}} <span class="badge badge-warning mb-2">{{error}}</span>{{/if}} <form class="form-inline" method="POST" action="/user/search"> <div class="form-group"> <input type="text" name="id" class="form-control" placeholder="Search User" /> </div> <input type="submit" class="btn btn-primary" value="Search" /> </form> |

Pilot the ObjectRocket Platform Free!
Try Fully-Managed CockroachDB, Elasticsearch, MongoDB, PostgreSQL (Beta) or Redis.
Get Started