How to Set-up Replication in Redis
Introduction
This tutorial will explain how to perform the Redis set-up replication. Redis is an open-source data structure store designed to complete most requests in under a millisecond. This permits just one server to handle millions of simultaneous requests each second. Redis employs RAM for data storage to deliver nonpareil performance. However, RAM is volatile and contents are often lost in cases of system failure. To allow the recovery of data after a failure, Redis uses persistent storage that survives an outage.
Prerequisites for Redis set-up replication
- Redis must be properly installed and configured. Check for the Redis installation by executing the
redis-cli --versioncommand. If properly installed, the result should resemble the following:
1 | redis-cli 4.0.9 |
Replication
Replication in Redis involves the Redis slave server becoming exact copies of the master servers.
The Importance of Redis Replication
Important facts about the Redis application include:
- The Redis master servers can have multiple slaves.
- In addition to the master servers having connections in multiple slaves, the slaves can also independently accept connections from other slaves and be connected in a graph-like structure.
- Redis replication can be utilized for redundancy and scalability.
- The master server has the ability to handle queries from even multiple slaves performing the initial synchronization, or the “non-blocking” on the master side.
- Redis replication eliminates the need for writing when the master writes the full dataset to disk. This is achieved by commenting all of the “save” directives within the redis.conf file and connecting a slave that is configure to save on a pre-configured frequency.
- Redis employs asynchronous replication. Starting with Redis version 2.8, slaves are set to periodically recognize the information processed from the replication flow.
How to Set Up Redis Replication
Most configurations will be done through the redis.conf file. First, navigate to the Redis installation directory and then locate the redis.conf file with the following command:
1 | whereis redis |
The output should resemble the following:
redis: /etc/redis .
Now navigate to the directory and make a copy of the redis.conf file. Rename it into “redisRep.conf” by executing the following command:
NOTE: Use sudo to avoid permission related restrictions.
1 | sudo cp /etc/redis/redis.conf /etc/redis/redisRep.conf |
Now open this file using the built-in editor, that is in this case “nano”, with the following command:
1 | sudo nano /etc/redis/redisRep.conf |
Because both servers cannot use the same port, the port number of the other server must be changed.
Hold down the Ctrl+W keys while typing in “port”. The results should resemble the following:

By default the port number is set to “6579”. Change it to “6380” and then save it.
The next step is changing the “slaveof”. Hold down the Ctrl+W keys while typing in “slaveof”. The results should resemble the following:
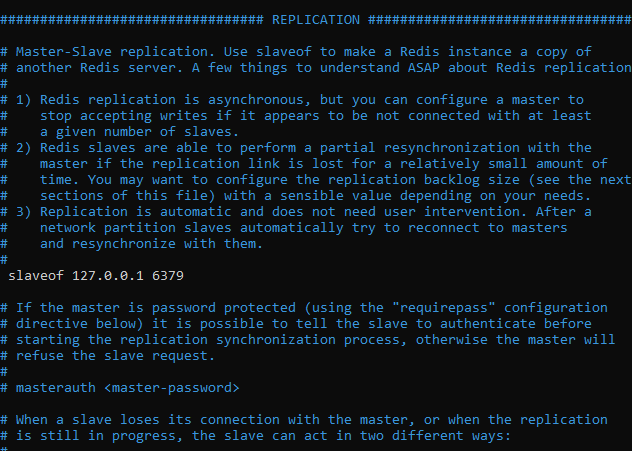
Now change the ”
<masterip>” by127.0.0.1and the ”<masterport>” by 6379 as this is the port of the master server.Save the file by pressing the Ctrl+O keys and then exit the editor by pressing Ctrl+X.
NOTE: The main sever is running on the same localhost ip “127.0.0.1”, but within port 6379.
Perform the following procedure to connect the master and slave servers:
Open a terminal for the main server and then use the
redis-servercommand.Open another terminal then execute the following command:
1 | redis-server /etc/redis/redisRep.conf |
The above code uses the config file that was created earlier, so the path to that file must be supplied. The result should resemble the following:
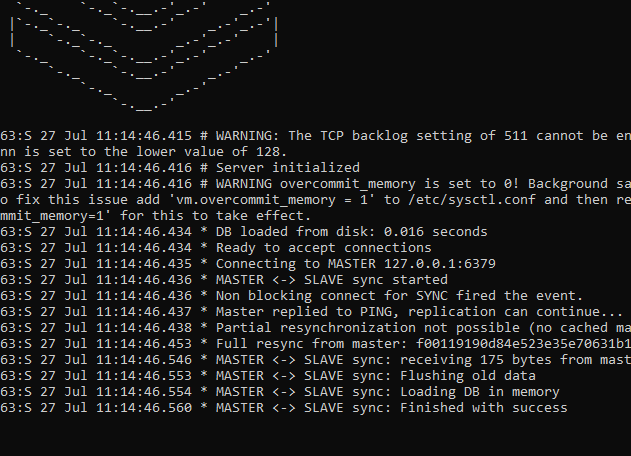
Redis will start the server and establish the connection between the master once the slave has been started. Notice the “MASTER <-> SLAVE sync started” in the remarks. This server is the slave running in port “6380”. To verify this, look at the terminal of the main server as shown here:
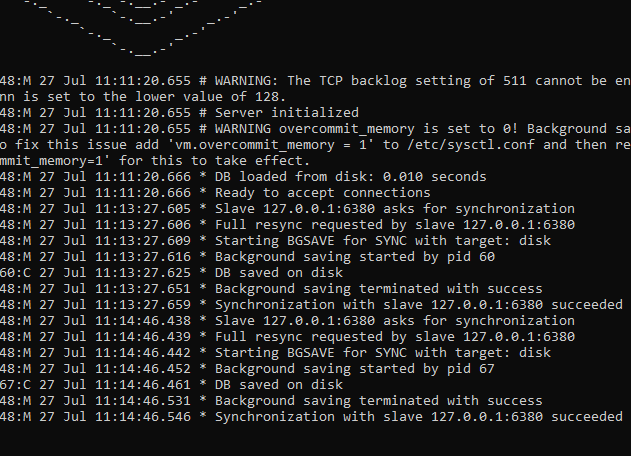
Notice the remarks “Slave 127.0.0.1:6380 asks for synchronization” in the above image. Here the slave has started the syncing process.
To confirm the replication process is functioning properly, open another terminal and connect to the server using the server-cli command. Now execute the following commands in sequence:
1 2 3 4 | 127.0.0.1:6379> set country Philippines Ok 127.0.0.1:6379> get country "Philippines" |
To verify the success of the operation, go to the main server and look for the remarks Synchronization with slave 127.0.0.1:6380 succeeded .
Conclusion
This tutorial explained how to perform Redis set-up Replication. The article explained the importance of Redis replication, how replication in Redis involves the Redis slave server becoming exact copies of the master servers and how to establish a connection between the master and slave servers. Remember that most configurations are executed through the redis.conf file and that both the master and slave servers cannot use the same port.

Pilot the ObjectRocket Platform Free!
Try Fully-Managed CockroachDB, Elasticsearch, MongoDB, PostgreSQL (Beta) or Redis.
Get Started