How to Setup a MERN App Locally - MongoDB, Express, React, NodeJS - Part 2
Introduction
In this multi-part tutorial we’re showing you how to setup a basic MERN application locally. In this second part of the tutorial we will focus on creating a GET and POST route using Express that will create and retrieve data from the MongoDB database respectively. At this point in the tutorial we have a server that runs and is connected to the database but there are no routes and there is no way to create or retrieve data in the database.
Prerequisites
- You should have followed Part 1 of this tutorial.
Setup the Schema with Mongoose
There are several drivers to help you interact with MongoDB. Mongoose operates a little different than the rest in that it requires you create a schema for the data you are putting in the database. So our first step is to create a schema/model that we’ll create data with. First let’s create a model directory to put the model file in:
1 | mkdir models |
Next we’ll navigate into that folder and create a file that defines the schema for our record. We’ll be using the example of a schema for a grocery store product with an id, title, and price.
1 2 | cd models touch Product.js |
Now use your favorite IDE to add this to the Product.js file:
1 2 3 4 5 6 7 8 9 10 11 12 13 14 15 16 17 | const mongoose = require("mongoose"); const Schema = mongoose.Schema; // Create Product Schema const ProductSchema = new Schema({ name: { type: String, required: true }, price: { type: Number, required: true }, }); // Export the Schema module.exports = Product = mongoose.model("Products", ProductSchema); |
Now let’s import this model into our server.js file by adding this line:
1 2 | // Load Product model const Product = require("./models/Product"); |
Create the Routes
We’ve created the schema but we really only want to create data on a POST, and we only want retrieve data on a GET request so let’s create these routes.
The Post Product Route
1 2 3 4 5 6 7 8 9 10 11 12 13 14 15 16 17 18 19 20 | app.post("/product", (req, res) => { const newProduct = new Product({ name: req.body.name, price: req.body.price }); // Create a new Product Product.create(newProduct) .then(function(dbProduct) { // View the added result in the console console.log(dbProduct); res.json(dbProduct); }) .catch(function(err) { // If an error occurred, log it console.log(err); res.json(err); }); }); |
We define the route as a POST. It creates a new Product object from the request. Then it uses the Product model to call the create function which returns a promise so you can execute the then portion if it succeeds and the catch portion of the code if there is a failure. In the case of a success it responds with the json that Mongo returned.
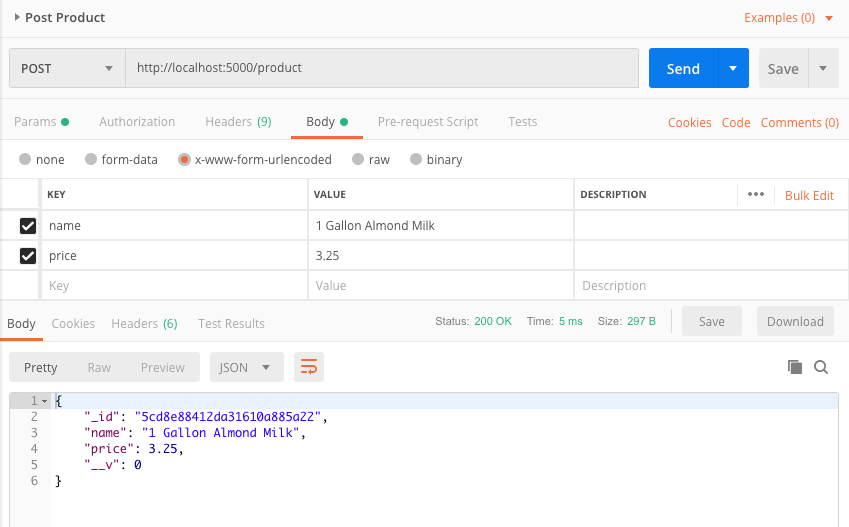
We used Postman to check that the route is functioning product. We posted a new Product.
The Get Product Route
Now we do a similar process with the GET route. This time the route will take in a Product Id and we will search MongoDB for that Product and return it if found.
1 2 3 4 5 6 7 8 9 10 11 12 | app.get("/product/:id", (req, res) => { // Use Mongoose to get the Product by the id Product.findOne({ _id: req.params.id }) .then(function(dbProduct) { res.json(dbProduct); }) .catch(function(err) { console.log(err); res.json(err); }); }); |
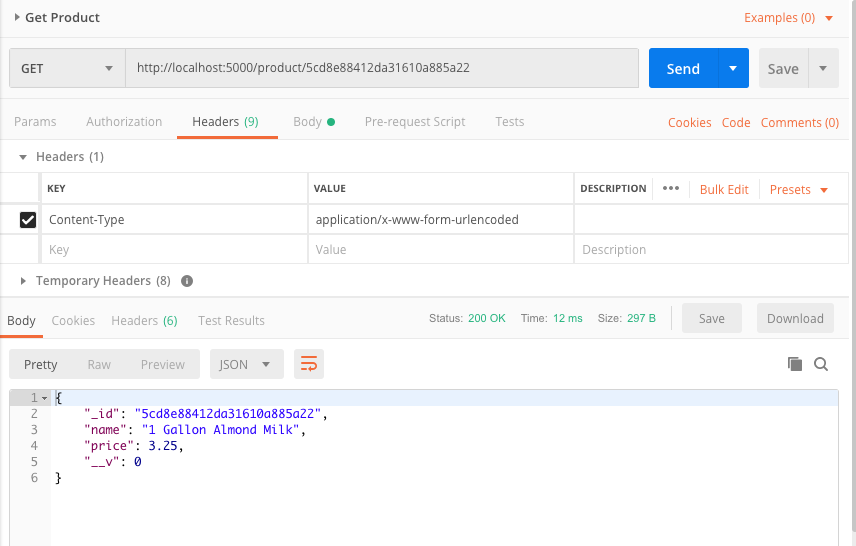
Again we test if the route works by using Postman with a GET route and use the _id that we got from the Product we just posted in the previous step:
Conclusion
We have setup two routes using Express, one POST and one GET, that create and retrieve data from MongoDB using the Mongoose library. We used Postman to verify that the routes function properly. The only thing left is to replace Postman with a real front-end that makes the requests. We’ll be creating the front-end in React. If you’re not familiar with React what we will show in Part 3 of this tutorial is very basic and easy to follow. We hope you’ll continue following this tutorial on creating a basic MERN application locally. Thanks for sticking with it and please don’t hesitate to reach out to us for any assistance.


Pilot the ObjectRocket Platform Free!
Try Fully-Managed CockroachDB, Elasticsearch, MongoDB, PostgreSQL (Beta) or Redis.
Get Started