Postgres ALTER TABLE ADD COLUMN
Introduction
When you’re working with PostgreSQL, you’ll find that you may need to add a column or two to an existing table. This task is made simple with the help of the Postgres ALTER TABLE and ADD COLUMN statements. In this article, we’ll explain how to use these statements to add multiple columns to a PostgreSQL table.
Prerequisites
Let’s take a moment to go over a few prerequisites that need to be in place in order to follow along with the examples shown in this tutorial:
- First, you’ll need to ensure that PostgreSQL server is properly installed and configured. The service must be running in the background.
If you’re working on Linux and Windows systems, you can download PostgreSQL here
- You can start PostgreSQL server in a Linux environment with the command shown below:
1 | sudo service postgresql start |
- If you’re not sure whether PostgreSQL is running, you can check using the following command:
1 | service postgresql status |
- The output of this command will look like the following:
1 2 3 4 5 6 7 8 9 | â— postgresql.service - PostgreSQL RDBMS Loaded: loaded (/lib/systemd/system/postgresql.service; enabled; vendor prese Active: active (exited) since Thu 2019-08-01 14:51:20 PST; 36min ago Process: 1230 ExecStart=/bin/true (code=exited, status=0/SUCCESS) Main PID: 1230 (code=exited, status=0/SUCCESS) Aug 01 14:51:20 user-UX330UAK systemd[1]: Starting PostgreSQL RDBMS... Aug 01 14:51:20 user-UX330UAK systemd[1]: Started PostgreSQL RDBMS. lines 1-8/8 (END) |
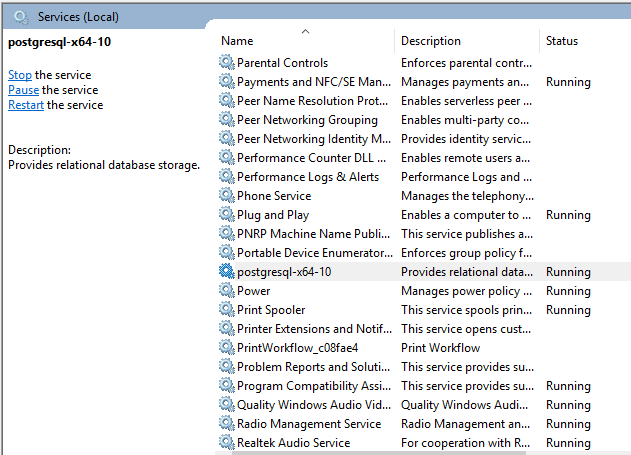
- To start, stop and restart PostgreSQL server on a Windows machine, you’ll need to perform the following steps:
- First, open Control Panel
- Next, open Administrative Tools
- Open Services
- Find the PostgreSQL Server service
- Finally, stop, start or restart the service
What is the PostgreSQL ‘ALTER TABLE’ statement?
The PostgreSQL ALTER TABLE statement allows you to change the initial definition of a table. The need to modify a table’s definition tends to come up as requirements change during the software development process.
Shown below is the syntax for the PostgreSQL ALTER TABLE statement:
1 | ALTER TABLE your_table_name action; |
As you can see, this statement’s syntax is fairly straightforward; however, the action part of the statement allows for a variety of options:
ADD COLUMN— This allows us to add a new table column. This can be used in much the same way as the PostgreSQLCREATE TABLEsyntax.RENAME— This will change the name of the target column without affecting the data already stored in it.DROP COLUMN— This option allows us to remove a single column or multiple columns within the specified table.SET DATA TYPE— As the name implies, this option allows us to modify the table column’s data type.
PostgreSQL ‘ADD COLUMN’ Statement
In the previous section, we discussed the PostgreSQL ALTER TABLE statement and looked at the different actions you can take within this statement. Now, we’ll focus our discussion on the ADD COLUMN action.
We can use the ALTER TABLE ADD COLUMN statement to add a new column to the specified table. The syntax for this statement is shown below:
1 2 | ALTER TABLE name_of_target_table ADD COLUMN desired_new_column_name data_type; |
Let’s look at the above statement and discuss each component of it:
- First, we specify the name of the table that we want to modify after the clause
ALTER TABLE. - We then indicate the name of the column and its planned attributes: the desired value, the data type to be used and more. These attributes are defined right after the clause
ADD COLUMN.
All newly added columns will be placed at the end of the target table by PostgreSQL, When you make design changes to your database tables, keep in mind that PostgreSQL doesn’t allow you to specify the position of the new column within the target table.
The example shown below depicts a real-life example of adding a column to an existing table.
In our example, we have a table named customer_info, which contains a few records as shown below:
1 2 3 4 5 6 7 | testdatabase=# SELECT * FROM customer_info; customer_id | firstname | lastname | email -------------+-----------+----------+----------------------- 1 | Raymond | Elizario | relizario@example.com 2 | Vera | Dadula | vdadual@example.com 3 | Raymond | Escalona | rescalona@example.com (3 ROWS) |
Let’s say we want to add a column named age with a datatype of INT. To do this, we’ll use the following statement.
1 | ALTER TABLE customer_info ADD COLUMN age INT; |
Now we can perform a SELECT statement to see if we successfully added the age column to the customer_info table.
The output should look like the following:
1 2 3 4 5 6 7 | testdatabase=# SELECT * FROM customer_info; customer_id | firstname | lastname | email | age -------------+-----------+----------+-----------------------+----- 1 | Raymond | Elizario | relizario@example.com | 2 | Vera | Dadula | vdadual@example.com | 3 | Raymond | Escalona | rescalona@example.com | (3 ROWS) |
We can see that PostgreSQL was able to execute the ADD COLUMN statement without affecting the existing data in the table in any way. This SELECT statement confirms that we have successfully added the age column to our customer_info table.
PostgreSQL ‘ADD_COLUMN’ Statement to Add Multiple Columns
Now that we know how to add a single column to an existing table, we can try adding multiple columns.
To do this, we use the following statement:
1 2 | ALTER TABLE customer_info ADD COLUMN phone INT; ALTER TABLE customer_info ADD COLUMN alias VARCHAR(8); |
Let’s see if the above statement successfully altered the table customer_info by using the SELECT statement:
1 2 3 4 5 6 7 | testdatabase=# SELECT * FROM customer_info; customer_id | firstname | lastname | email | age | phone | alias -------------+-----------+----------+-----------------------+-----+-------+------- 1 | Raymond | Elizario | relizario@example.com | | | 2 | Vera | Dadula | vdadual@example.com | | | 3 | Raymond | Escalona | rescalona@example.com | | | (3 ROWS) |
We can see that our addition of multiple columns was executed correctly. Alternatively, we can use the \d command against our target table to get the same results. You can see how this works in the example shown below:
1 2 3 4 5 6 7 8 9 10 11 12 13 | testdatabase=# \d customer_info; TABLE "public.customer_info" COLUMN | TYPE | Collation | NULLABLE | DEFAULT -------------+----------------------+-----------+----------+--------- customer_id | INTEGER | | NOT NULL | firstname | text | | NOT NULL | lastname | text | | NOT NULL | email | text | | NOT NULL | age | INTEGER | | | phone | INTEGER | | | alias | CHARACTER VARYING(8) | | | Indexes: "customer_info_pkey" PRIMARY KEY, btree (customer_id) |
Conclusion
Adding columns to an existing table is a common part of database administration. Some situations may require you to add only one column, but others might require the addition of multiple columns. In this tutorial, we showed how to use the Postgres ALTER TABLE and ADD COLUMN statements to add multiple columns to an existing table. You can use the examples provided in this article as a guide when you add new columns to your own database tables.

Pilot the ObjectRocket Platform Free!
Try Fully-Managed CockroachDB, Elasticsearch, MongoDB, PostgreSQL (Beta) or Redis.
Get Started