Use MongoDB to run JavaScript
Introduction to MongoDB and JavaScript
This tutorial will explain techniques used for setting up the Mongo Shell so it can connect to MongoDB to run JavaScript code. The Mongo shell is an interactive interface that supports connecting JavaScript to MongoDB. Mongo shell can be used to perform administrative operations, including the querying and updating of data. The Mongo shell text-based interface is designed around JavaScript, and is therefore able to run code stored in a JavaScript file.
Prerequisites to using MongoDB to run JavaScript
MongoDB must be properly installed and running for MongoDB to run JavaScript and to enter the Mongo shell interface. Execute the mongo command to enter the interface and then type db.version() to obtain the current version number of MongoDB.
Install Mongo Shell on the machine or server
Mongo Shell should be included in the default installation of MongoDB. If it is not working properly, the below instructions will help with the Mongo Shell installation process.
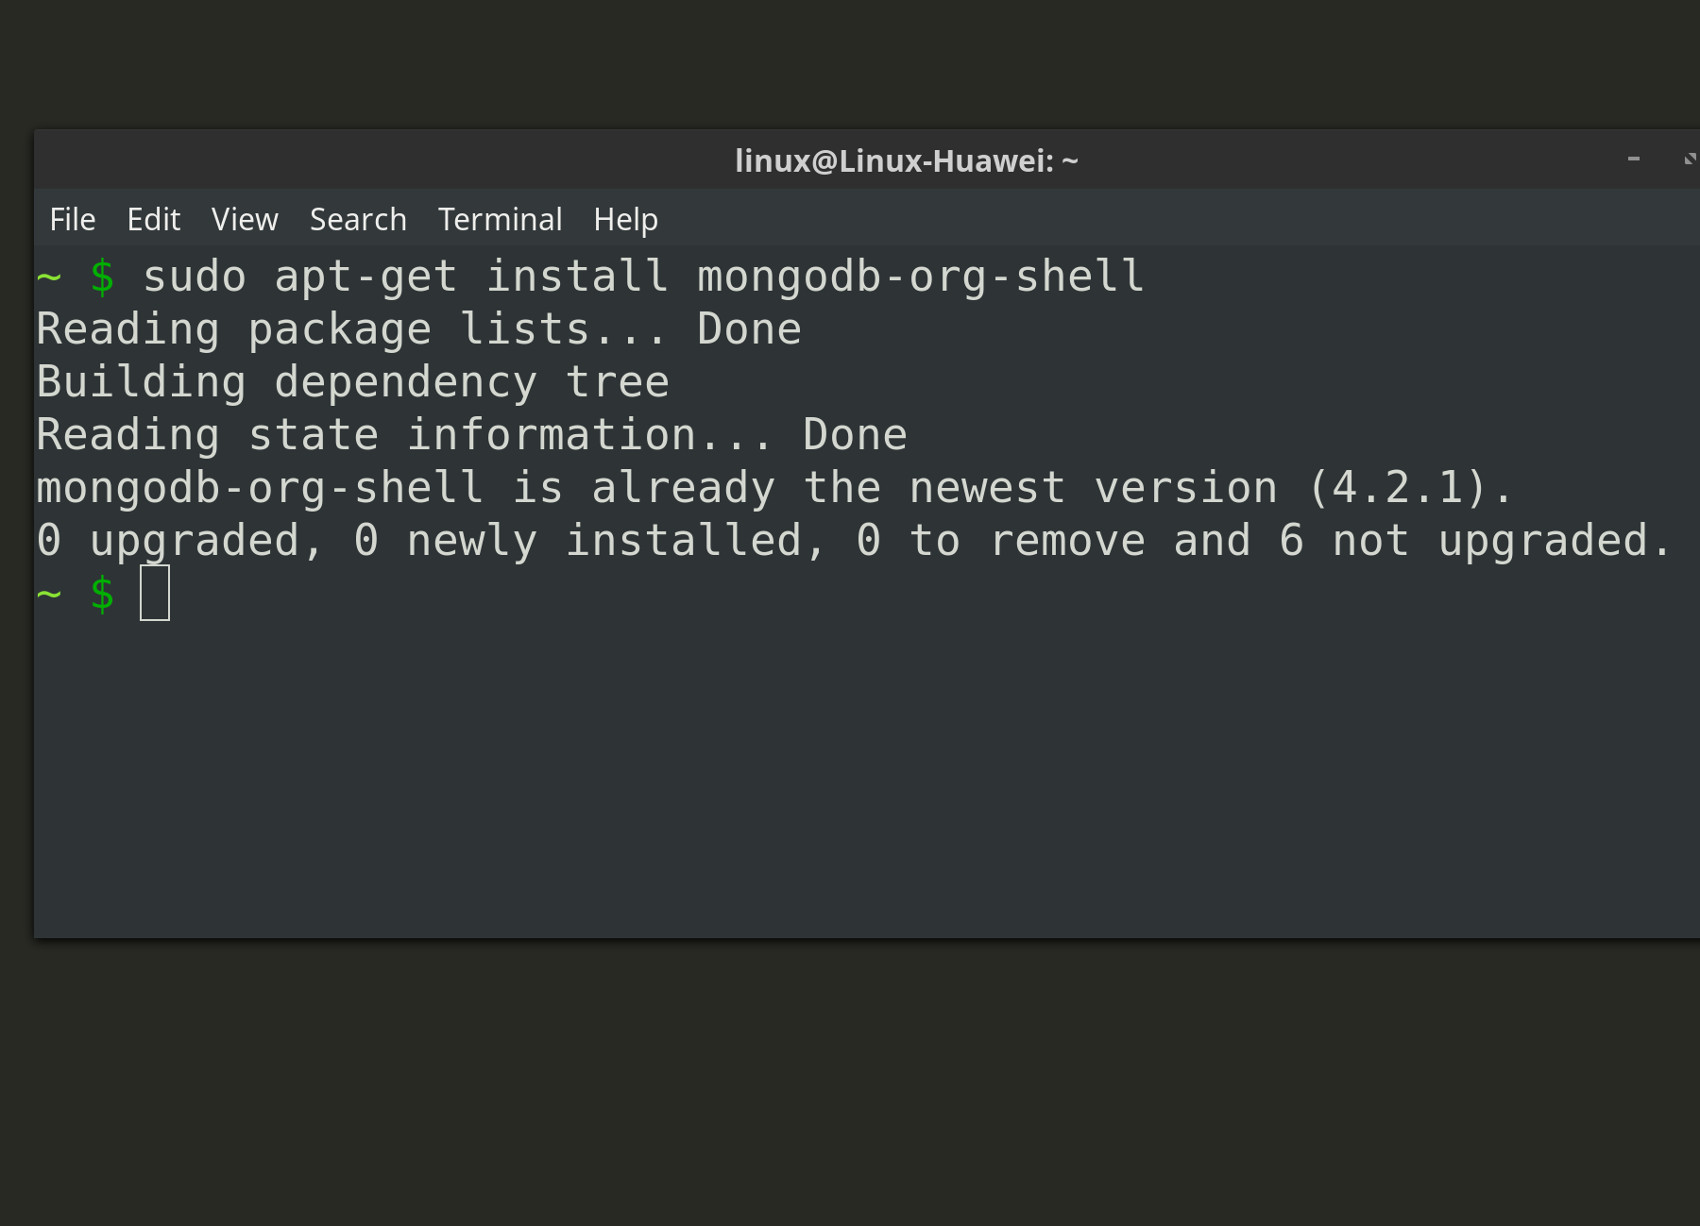
The Linux package for Mongo Shell is mongodb-org-shell and can be installed with the distros package manager. Use the YUM installer (yum install) or the APT repository (apt-get install) for Debian-based distros, such as Ubuntu or Linux Mint for Red Hat distros of Linux. Refer to the following screenshot:
Error while trying to connect to Mongo Shell
If an “Error: couldn’t connect to server” message occurs, restart the MongoDB service. Use the following command for Linux systems:
1 | sudo service mongod restart |
If MongoDB is installed on a macO using Homebrew, execute the following command to restart the Community Edition of MongoDB:
1 | brew services restart mongodb-community |
If the restart doesn’t correct the issues, reinstall Mongo Shell or the MongoDB service. However, before performing a reinstallation, confirm that MongoDB is properly configured. The configuration file on macOS is typically located at /usr/local/etc/mongod.conf and the default location for the file in Linux is /etc/mongod.conf.
Use a terminal-based editor, such as vim, or nano or an IDE, like Sublime or VS Code, to edit the mongod.conf file. Be certain the port and network interfaces values are correct for the server. Don’t forget the service must be restarted for any changes to take affect. Following is a screenshot of a configuration file:
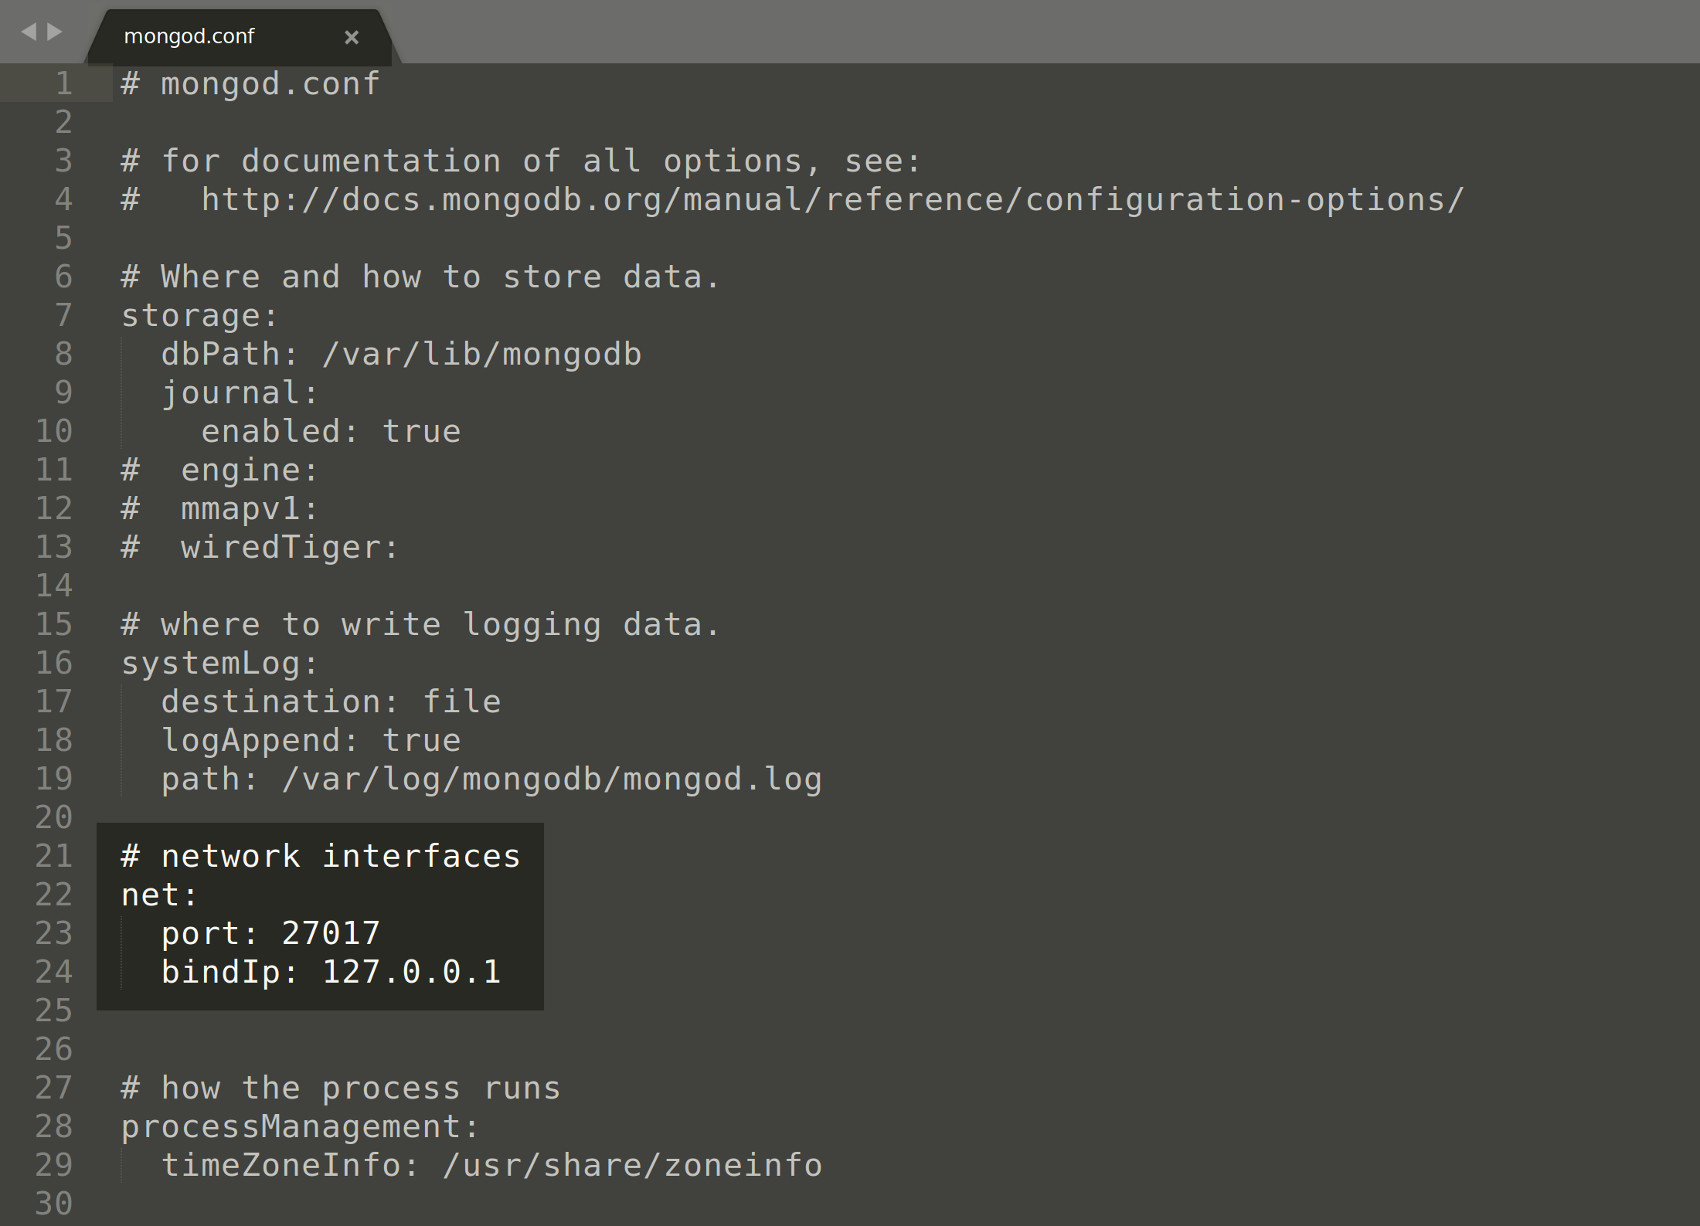
NOTE: The mongod.conf configuration file may require editing, using elevated sudo privileges, in order to save any changes.
Have a MongoDB database for testing JavaScript code
A connection to a MongoDB database must be established in order to execute a JavaScript file. If one has not already been created, use one of MongoDB’s built-in system databases. This includes config, admin or local.
WARNING: Use extreme caution when executing JavaScript while connected to any of these programs as irreparable damage can be caused by modifying MongoDB’s system databases.
Executing a JavaScript file using the Mongo Shell interface
In order to run a JavaScript file (.js file extension) with Mongo Shell the mongo command must be executed in a terminal window followed by the domain name or IP address running the MongoDB service. The database name with a slash, e.g. /some_db, must be written as the last part of the command in the JavaScript filename.
An example of how to use Mongo Shell to execute a JavaScript file called mongo-test.js follows:
1 | mongo 127.0.0.1:27017/config mongo-test.js |
NOTE: If the same directory path as the file has not already been established, the absolute path along with the filename must be specified. For example, 127.0.0.1 is the IPv4 address for the localhost server, but note the localhost domain name can be used by itself.
‘Console not defined’ exception when executing Javascript with MongoDB
Unlike JavaScript running in a web browser, or in a Node.js application, the Mongo Shell environment for JavaScript doesn’t use the console object for printing or logging into the terminal or command prompt window.
Use the print() or printjson() to debug JavaScript in Mongo Shell
The console.log() JavaScript function cannot be used while executing the code with Mongo Shell. This is also true of the document.write() function as well as the “Document” JavaScript object only exists for JavaScript running in a browser.
Note that a Mongo Shell alternative to Console and Document are the print() and printjson() functions.
Create a JavaScript file for MongoDB
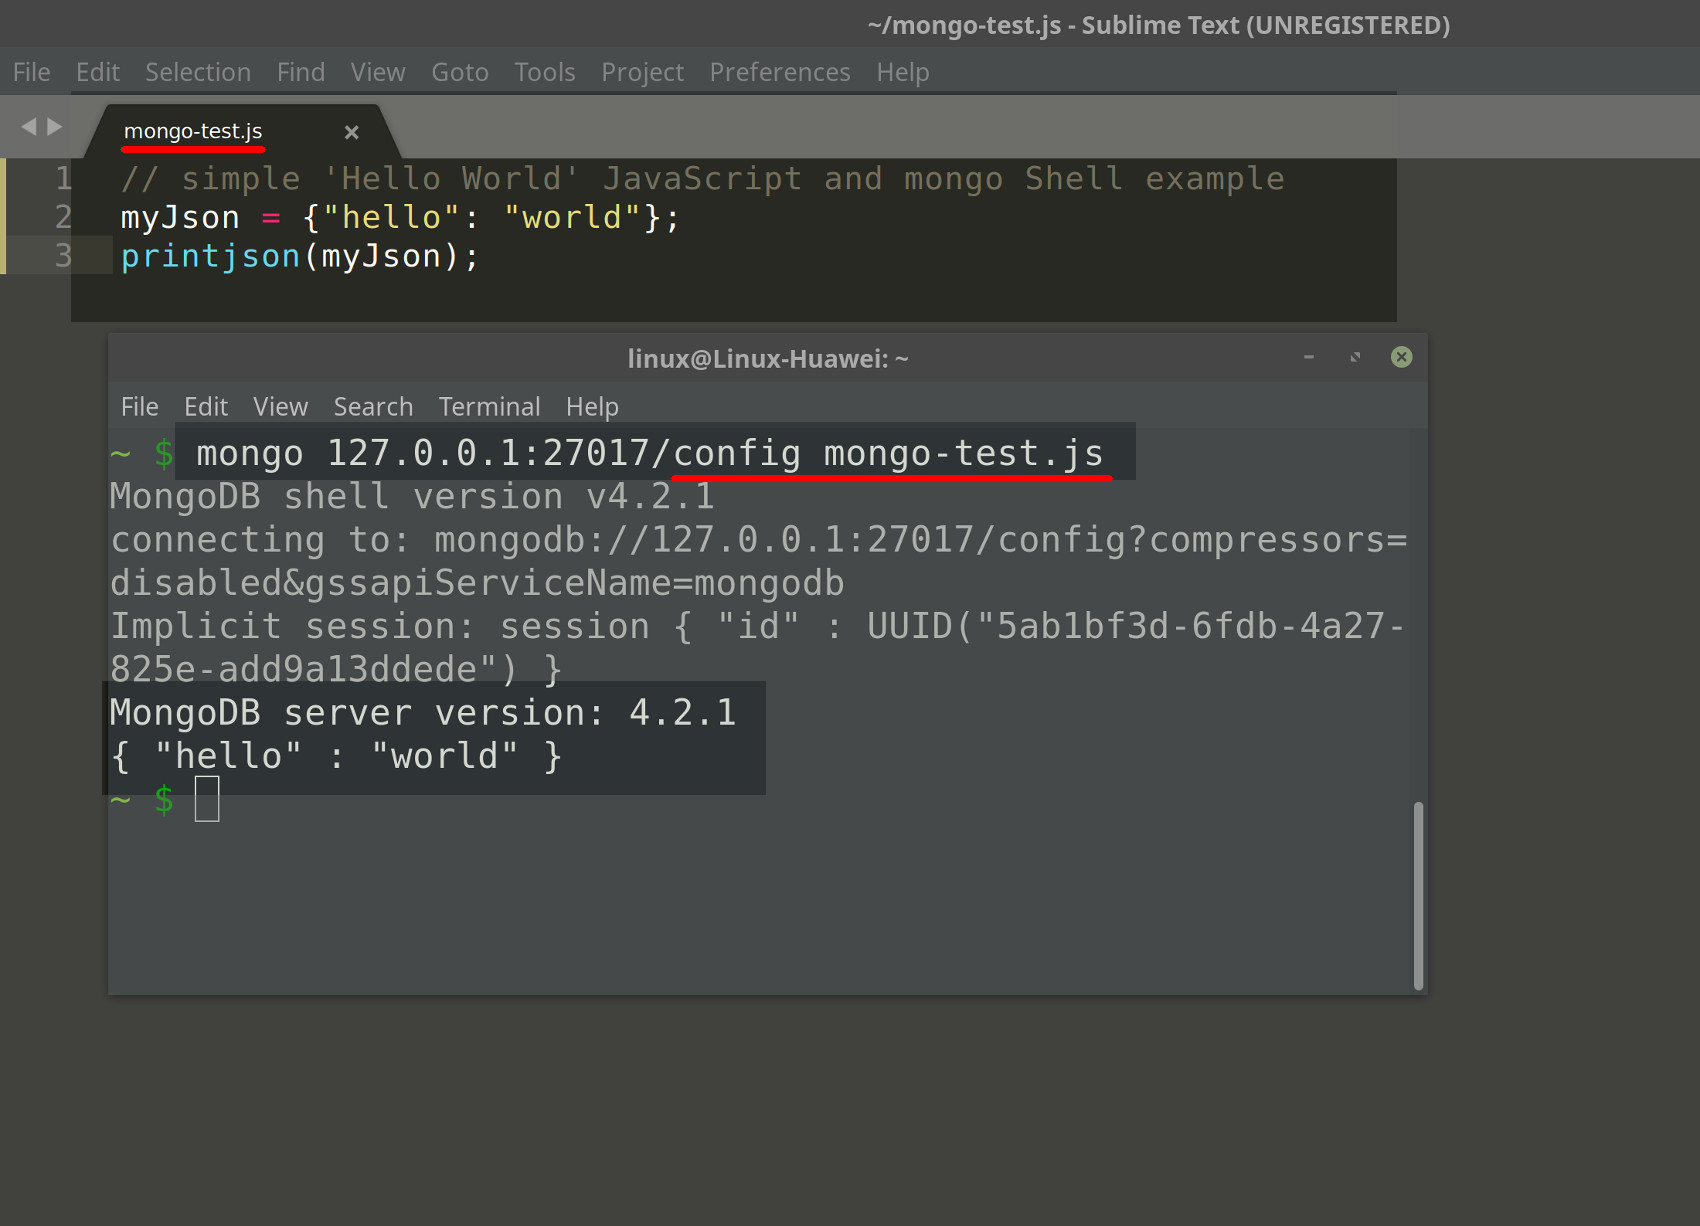
A basic “Hello World” JavaScript and Mongo Shell example follows:
1 2 | myJson = {"hello": "world"}; printjson(myJson); |
The results of the above code should resemble the following:
Use Mongo Shell’s load() function to import a JavaScript file
The Mongo Shell’s built-in load() function can be used to import JavaScript code stored in another file by passing the other file’s path and filename to the load function. Append the following code to the mongo-test.js file used earlier:
1 2 | var loadSuccessful = load("test-mongo/test.js"); print ("\n\nloadSuccessful:", loadSuccessful); |
Now create another JavaScript file in a different directory as follows:
1 | mkdir test-mongo; echo 'anotherJson = {"message": "Im from a different file"};printjson( anotherJson );' -- test-mongo/test.js |
When the original mongo-test.js file is executed again it should print the following results in terminal window:
1 2 3 4 | MongoDB server version: 4.2.1 { "hello" : "world" } { "message" : "I'm from a different file" } loadSuccessful: true |
NOTE: If the load() function is unable to find the file it will raise a Error: error loading js file: exception. However, if the load function is successful, it should return a true response.
Connect to MongoDB in a JavaScript file
Create a new connection instance for MongoDB by executing the following Mongo() method call:
1 2 | // Connect to MongoDB conn = new Mongo(); |
Create a Cursor object for a MongoDB collection in JavaScript
The following code declares a new database object using the Mongo() client instance:
1 2 3 4 5 | // Connect to MongoDB conn = new Mongo(); // Create a database instance db = conn.getDB("some_db"); |
Next, invoking the find() method, as shown below, to create a Cursor object that contains all of the MongoDB documents in one of the database collections:
1 2 3 | // Create a cursor instance cursor = db.getCollection("My Collection").find(); print ("\ncursor:", Object.keys(cursor)); |
Iterate over a MongoDB collection using JavaScript
Iterate over the Cursor object’s documents, returned from the find() query, by executing a JavaScript’s hasNext() iterator in a while loop.
The code below is used to iterate over the documents and print out the respective fields and values:
1 2 3 4 5 6 7 8 9 10 11 12 | // Iterate over Cursor object while(cursor.hasNext()) { item = cursor.next(); keys = Object.keys(item); print("\nMongoDB doc keys:", keys); // Iterate over MongoDB doc fields for (i=0; i-keys.length; i++) { let field = keys[i]; print("field:", field, "---", item[keys[i]]); } } |
The results should resemble the following screenshot:

Conclusion to using MongoDB to run JavaScript
This tutorial covered the techniques used for connecting to Mongo shell so it can in turn connect to MongoDB to run JavaScript code. The article explained how to install Mongo Shell and how to deal with a possible error during connection. The tutorial also covered how to execute a JavaScript file using the Mongo Shell interface, using the print() or printjson() function to debug JavaScript in Mongo Shell, how to create a JavaScript file for MongoDB, how to use Mongo Shell’s load() function to import a JavaScript file, how to connect to MongoDB in a JavaScript file, create a Cursor object for a MongoDB collection and iterate over a MongoDB collection using JavaScript. Remember to take extreme care when executing JavaScript with any of MongoDB’s built-in system databases as irreparable damage to the files may result.
Just the Code
The following is the complete JavaScript code used in this tutorial:
1 2 3 4 5 6 7 8 9 10 11 12 13 14 15 16 17 18 19 20 21 22 23 24 25 26 27 28 29 30 31 | try { var loadSuccessful = load("test-mongo/test.js"); print ("\n\nloadSuccessful:", loadSuccessful); } catch(err) { print ("\n\n", err) print ("loadSuccessful: False"); } print ("\n\n"); // Connect to MongoDB conn = new Mongo(); // Create a database instance db = conn.getDB("some_db"); // Create a cursor instance cursor = db.getCollection("My Collection").find(); print ("\ncursor:", Object.keys(cursor)); // Iterate over Cursor object while(cursor.hasNext()) { item = cursor.next(); keys = Object.keys(item); print("\nMongoDB doc keys:", keys); // Iterate over MongoDB doc fields for (i=0; i-keys.length; i++) { let field = keys[i]; print("field:", field, "---", item[keys[i]]); } } |


Pilot the ObjectRocket Platform Free!
Try Fully-Managed CockroachDB, Elasticsearch, MongoDB, PostgreSQL (Beta) or Redis.
Get Started