Use Docker and Python for a MongoDB Application
Introduction
Docker is an open source platform designed principally for Windows and Linux systems. A Docker image file is used to execute code in a Docker container created from the executable version of an application. The image becomes one, or multiple, instances of that container when a user runs an image. This tutorial will cover how to use Docker and Python for a MongoDB containerized web application, specifically how to create a simple Docker container able to run a MongoDB, Python and PyMongo driver web application.
Prerequisites
Docker and Docker Compose must be installed on the machine or server with elevated admin privileges in order to use Docker and Python for a MongoDB containerized web application.
Installing Docker
Both MacOS and Windows should have interactive installers from Docker’s downloads page. Confirm whether the OS has a 32-bit or 64-bit architecture and make sure to download the correct version for the corresponding system.
Use the APT-GET repository to install Docker on Debian Linux
The following commands will install the Docker engine on a Debian-based distro of Linux that uses the APT-GET repository:
1 2 | sudo apt-get update sudo apt-get install docker-engine |
Execute the following service docker start command to initialize the Docker engine:
1 | sudo service docker start |
Verify that Docker is installed
Use the docker version and docker-compose version commands to confirm Docker was correctly installed.
Docker Compose File
A Docker Compose YAML file must be created to handle the services running on the Docker container. To make this as simple as possible, the example will use just one container, called py-mongo. This container will use Dockerfile commands to install Python, the PIP package manager for Python modules and the PyMongo client library for MongoDB.
Name the file docker-compose.yml or docker-compose.yaml and place it somewhere inside the project directory.
Set the version number for Docker Compose
Depending on the version of the Docker engine being used, downgrading the version string to 2.x may be required. The most stable and currently recommended version is 3.x, however, some older versions of Docker may not be compatible.
Execute the following code to place the Docker Compose version at the top of the YAML file:
1 | version: "3.2" |
Create a container for Python and MongoDB
The services key is a top-level key used in the construction of the Docker containers. When executing this command, make certain to indent the name of the container one level below services, as shown here:
1 2 | services: py-mongo: |
The build and context keys are required for the Dockerfile that will now be created.
Make sure to pass the relative path for the Dockerfile location. Alternatively, the . or ${PWD} (present working directory path name) commands can be used provided it is in the same directory as the following docker-compose file:
1 2 3 | # build the image from Dockerfile build: context: ${PWD} |
Mount volumes for the MongoDB database data
A volume can be mounted into multiple containers. For the volumes used in this tutorial, have Docker create and bind mount the mongo-app and mongo-data folders on the local machine for the respective Python app and MongoDB database directories as follows:
1 2 3 4 | # bind mount volume for MongoDB documents volumes: - $PWD/mongo-data:/data/db - $PWD/mongo-app:/var/www/html |
Open a port for MongoDB
The following key and indentation will bind mount and open MongoDB’s default port of 27017 to the host machine:
1 2 | ports: - "27017:27017" |
MongoDB environmental variables
Execute the following commands to pass the username and password to the Docker Compose file’s environment key:
1 2 3 4 | # configure the Docker entrypoint for MongoDB environment: - MONGO_INITDB_ROOT_USERNAME=root - MONGO_INITDB_ROOT_PASSWORD=1234 |
These files will be used later in the Python script when connecting to MongoDB. Make certain to save the file and then create another file called Dockerfile, without a file extension, and then edit the new file.
MongoDB Dockerfile
Put the following commands in the Dockerfile, making sure to save the file in the relative path specified in the above docker-compose file:
1 2 3 4 5 6 7 8 | FROM mongo:latest # install Python 3 RUN apt-get update && apt-get install -y python3 python3-pip RUN apt-get -y install python3.7-dev RUN pip3 install pymongo EXPOSE 27017 |
Note that the above Dockerfile commands should pull the latest MongoDB image and install Python and its PyMongo library for MongoDB.
Build the Docker container
Save the Dockerfile changes. Next, navigate to the terminal and execute the following command in the same directory where the docker-compose file is located:
1 | docker-compose up --build |
Note that the above command will spin up the Docker container after it is created.
Python script for MongoDB
Typing ls in the project directory should now bring up the mongo-app/ folder for the Python application. Navigate into that directory and create a Python script for the PyMongo application.
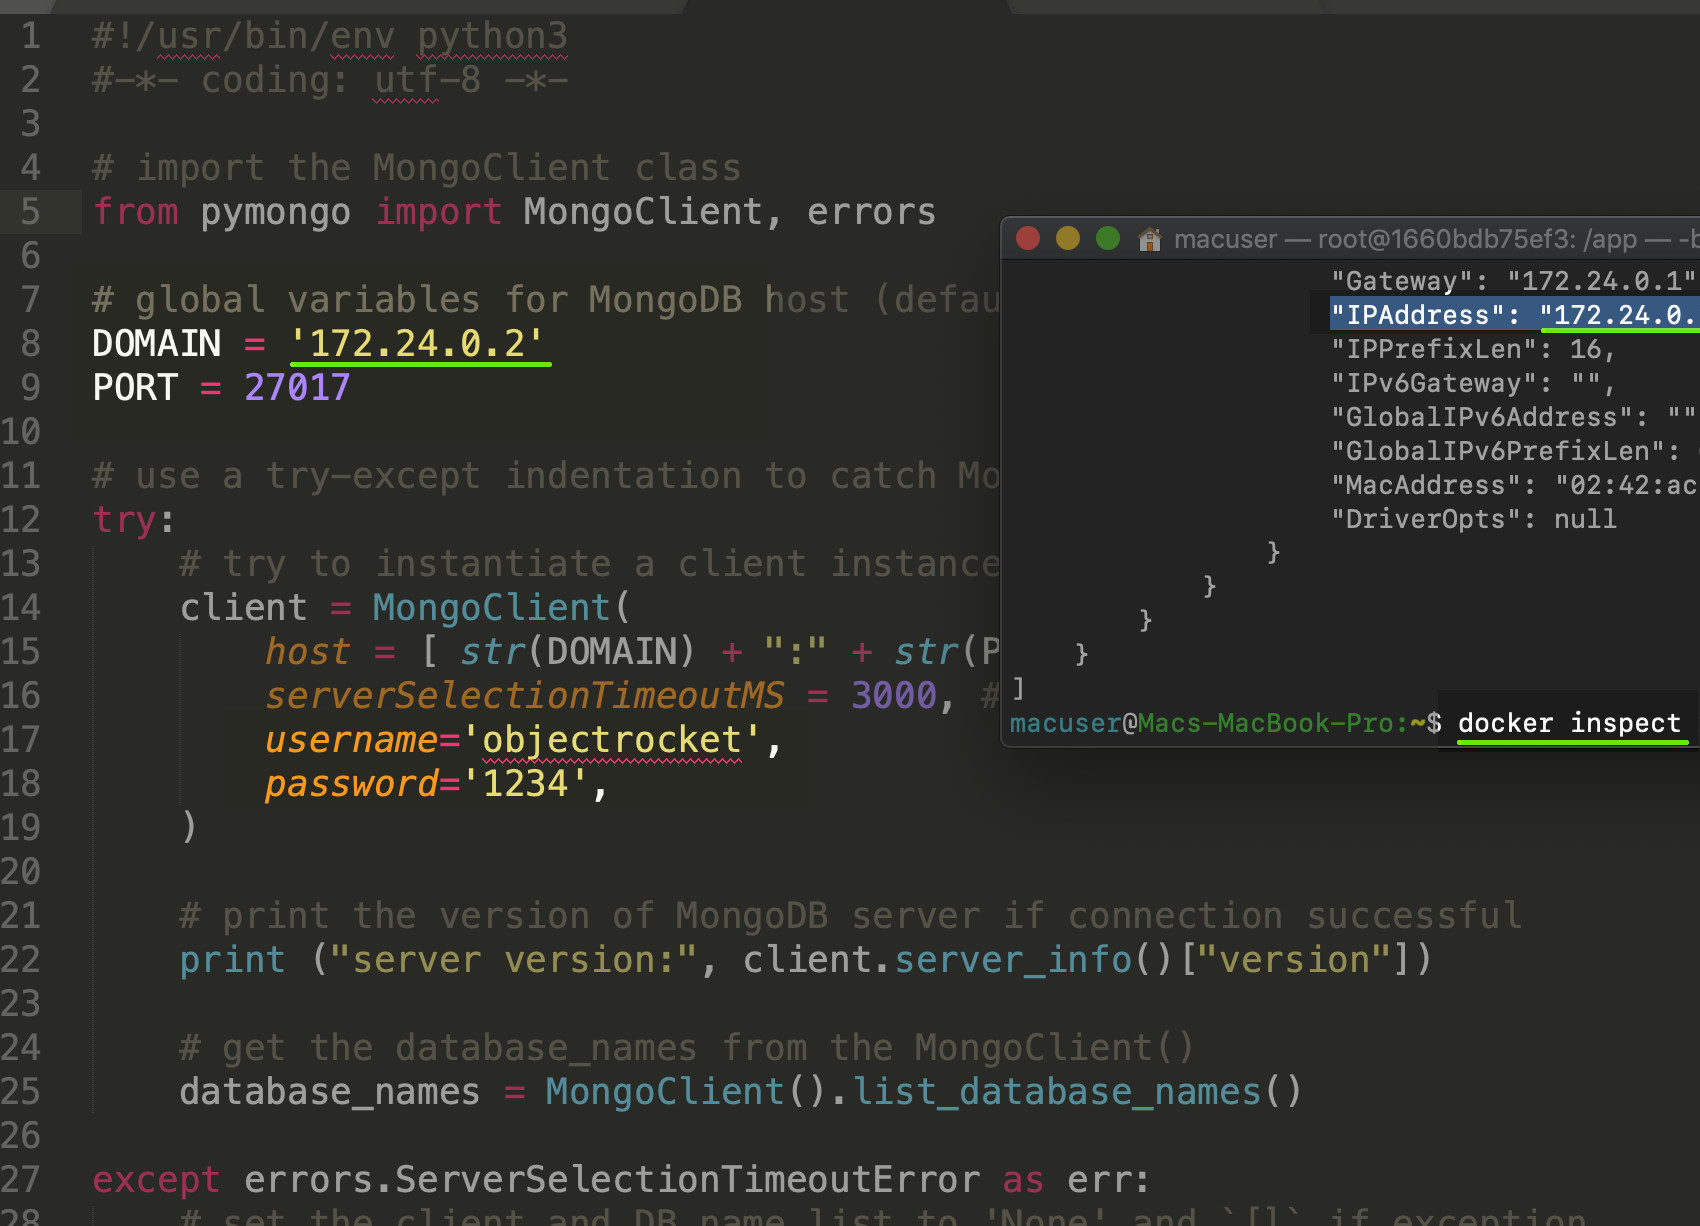
Get the container’s IP address
Use docker ps to get the ID of the running container and then use the docker inspect {CONTAINER_ID} command to obtain the IP address the container is using. This is displayed in the folloing screenshot:
Connect Docker and Python to MongoDB
Put the following code into the Python file and make certain to change the IP address and MongoDB user credentials before running the script:
1 2 3 4 5 6 7 8 9 10 11 12 13 14 15 16 17 18 19 20 21 22 23 24 25 26 27 28 29 30 31 32 33 34 35 | #!/usr/bin/env python3 #-*- coding: utf-8 -*- # import the MongoClient class from pymongo import MongoClient, errors # global variables for MongoDB host (default port is 27017) DOMAIN = '{IP_ADDRESS_HERE}' PORT = 27017 # use a try-except indentation to catch MongoClient() errors try: # try to instantiate a client instance client = MongoClient( host = [ str(DOMAIN) + ":" + str(PORT) ], serverSelectionTimeoutMS = 3000, # 3 second timeout username = "objectrocket", password = "1234", ) # print the version of MongoDB server if connection successful print ("server version:", client.server_info()["version"]) # get the database_names from the MongoClient() database_names = client.list_database_names() except errors.ServerSelectionTimeoutError as err: # set the client and DB name list to 'None' and `[]` if exception client = None database_names = [] # catch pymongo.errors.ServerSelectionTimeoutError print ("pymongo ERROR:", err) print ("\ndatabases:", database_names) |
The above code should return all of the database names for the MongoDB server.
NOTE: Make absolutely certain to change the "objectrocket" username and password so it matches the container’s MONGO_INITDB_ROOT environment as specified in the docker-compose.yml file.
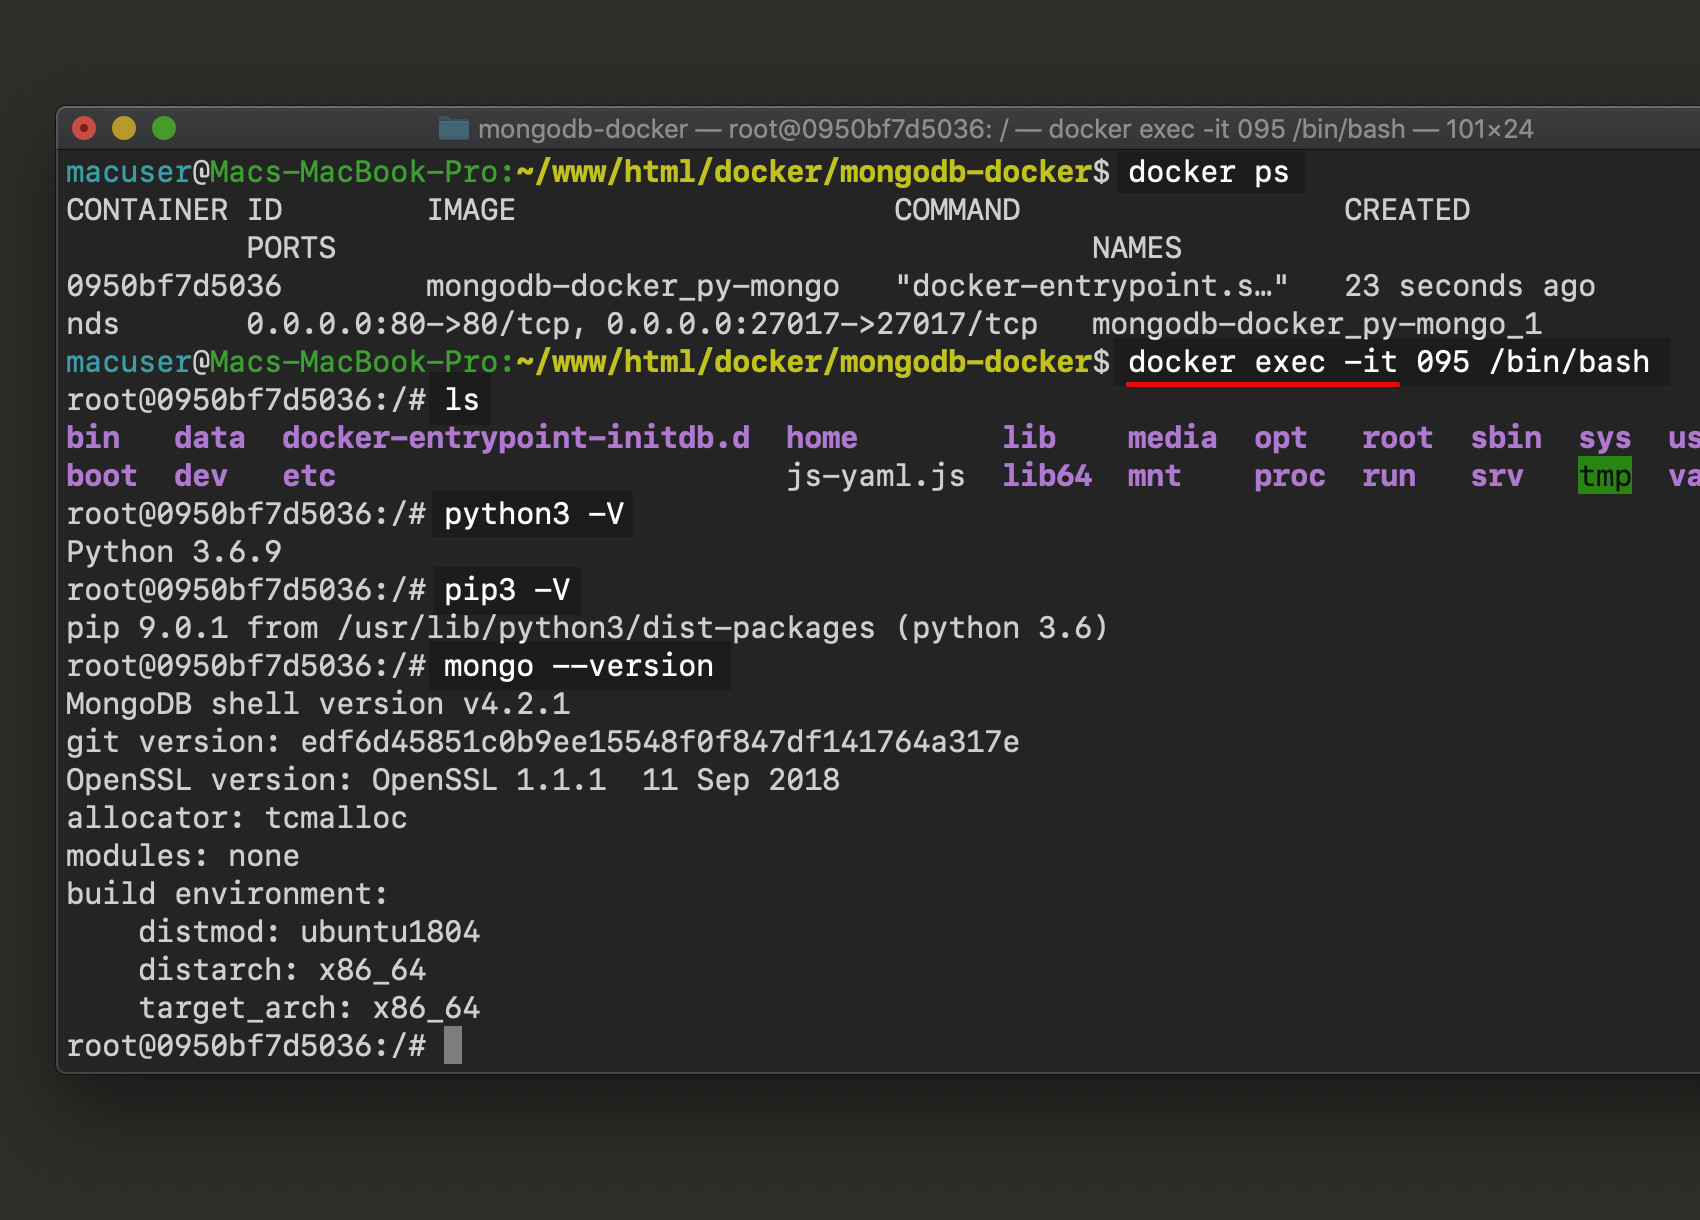
Docker container’s interactive shell
The docker exec command allows for executing terminal commands inside of the container and the -it options allows for interaction with the container itself.
The following example shows how to interactively connect to a Docker container with an ID of 0950bf7d5036:
1 | docker exec -it 095 /bin/bash |
Execute the Python script inside of the Docker container
Use cd /var/www/html to navigate to the directory storing the Python script once inside of the Docker container. Because this directory was bind mounted to the mongo-app directory, the Python script should be stored in that directory as persistent data.
Use the python3 command followed by the script name to execute the script and have MongoDB return the names of the database. Since the 27017 port was opened on the host machine, the script should be able to be executed from outside of the container. This action just requires replacing the Docker container’s IP address with localhost for the MongoClient’s host parameter. This is shown in the following screenshot:

Make sure to type exit to leave the container’s interactive terminal. Use the docker-compose down command in the project directory to have Docker Compose delete the container.
Conclusion
This tutorial explained how to use Docker and Python for a MongoDB containerized web application. The article specifically covered how to use Docker to create and pull MongoDB and Python images for use with the PyMongo driver using Python programming language. The tutorial also explained how to install Docker and verify the installation was successful, how to create a container for Python and MongoDB and mount volumes for the MongoDB database. The MongoDB environmental variables, the Docker container’s interactive shell and how to execute the Python script inside of the Docker container were also covered. Remember to use the docker-compose down command in the project directory to remover the container.


Pilot the ObjectRocket Platform Free!
Try Fully-Managed CockroachDB, Elasticsearch, MongoDB, PostgreSQL (Beta) or Redis.
Get Started