Update MongoDB Document using Kotlin
Introduction
MongoDB is a general-purpose database that supports JavaScript functions and queries that can return particular fields of specific documents. Kotlin is a programming language designed to operate with Java, but using a much more succinct syntax that is able to handle operations where Java may not be best suited. Kotlin can be used for creating applications with either android and iOS and permits developers to easily switch between either of the two platforms. This tutorial will explain how to use the two programs together to update a MongoDB document with Kotlin.
Prerequisite
- The MongoDB server must be properly installed and configured on the system to update a MongoDB document with Kotlin.
- The ECLIPSE application must also be properly installed and configured.
Installing Kotlin in Eclipse
First, the Kotlin plugin must be installed in ECLIPSE by following the below steps in sequence:
Start the ECLIPSE IDE application.
Click the Help button on the menu bar and then locate Eclipse Marketplace by typing kotlin in the search box. The result should resemble the following:
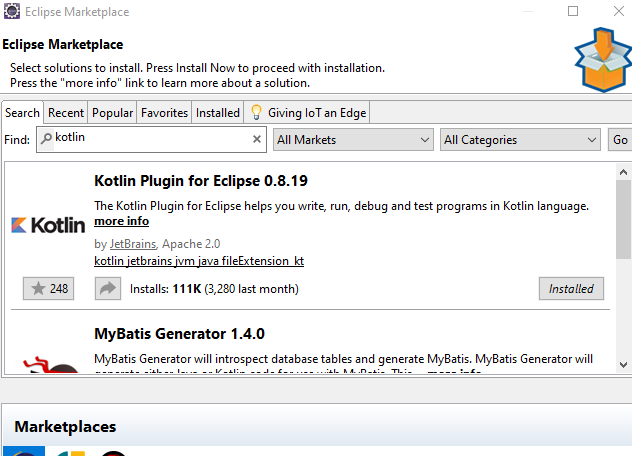
Again, using the search box and keyboard, type in Kotlin and then press Enter.
Now select the ‘Kotlin Plugin for Eclipse 0.8.19’.
Finally, click on the Install Now - button to install the plugin.
Downloading MongoDB Java Driver
The MongoDB Java driver must be downloaded to enable Kotlin to interact with the target MongoDB server.
Follow this link to download the official MongoDB Java driver; the page should look like the following:
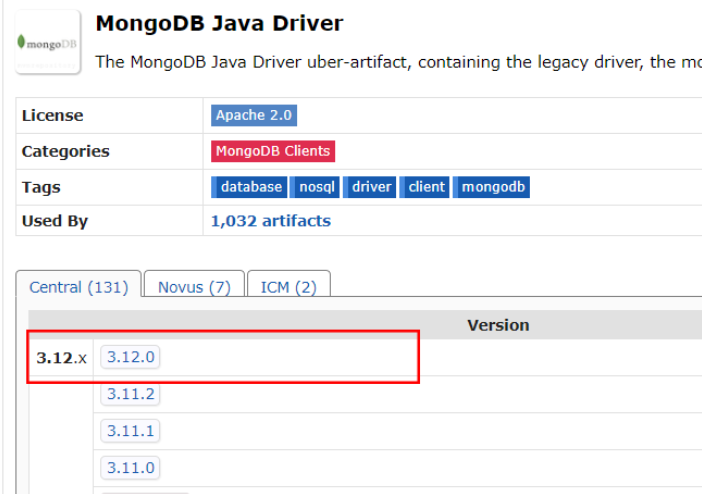
Now execute the following steps in sequence:
- Select the version number 3.12.0 .
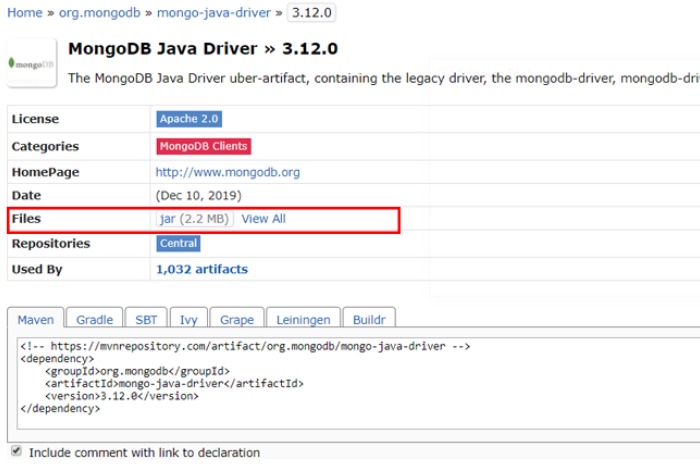
- When redirected to the page that resembles the below image, download the JAR file.
NOTE: The latest MongoDB Java Driver version is 3.12.
Adding JAR file to ECLIPSE build path
This section will explain how to add the JAR file, downloaded in the previous section, to the ECLIPSE application.
Execute the follow the steps in the given sequence:
- Click the Project button.
- Then click the Properties button.
- Click on the Java Build Path button.
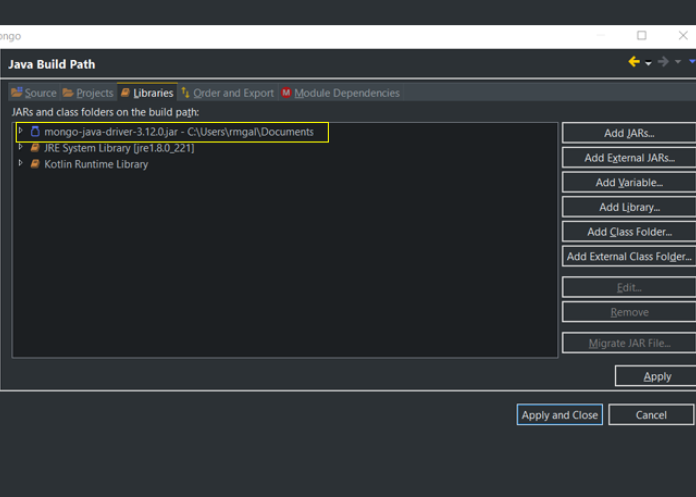
- Click the Libraries tab.
- Click the Add External JAR... button.
- Locate the downloaded JAR file.
- Finally, click the Apply and Close button.
The JAR files should be listed on the left as shown in the following image:
Create a MongoDB sample dataset
Execute the following command in the MongoDB shell to create a sample dataset that will be used for this tutorial:
1 2 3 4 5 6 7 8 9 10 11 12 13 14 15 16 | > use ProductDb switched to db ProductDb > db.product.insert([{sku: "1234567", name:"Motorolla", description:"The sharpest mobile"},{sku: "7654321", name:"Nokia", description:"Fastest Mobile"}]) BulkWriteResult({ "writeErrors" : [ ], "writeConcernErrors" : [ ], "nInserted" : 2, "nUpserted" : 0, "nMatched" : 0, "nModified" : 0, "nRemoved" : 0, "upserted" : [ ] }) > db.product.find() { "_id" : ObjectId("5e0c63dce99bc25022493682"), "sku" : "1234567", "name" : "Motorolla", "description" : "The sharpest mobile" } { "_id" : ObjectId("5e0c63dce99bc25022493683"), "sku" : "7654321", "name" : "Nokia", "description" : "Fastest Mobile" } |
Creating a Kotlin Project
Execute the following steps in sequence to create a Kotlin project in ECLIPSE:
- First, click on the File button in the menu bar.
- Select the New menu bar tab.
- Then click on the Kotlin Project buttom.
- Finally, the project must be given a meaningful name. For the purpose of this tutorial the project will be named kotlinmongo.
Creating a Kotlin Object File
With a Kotlin project created, now a Kotlin object file must be set up where the Kotlin codes will be written.
Execute the following steps in sequence to create the Kotlin object file:
- Right click on the Kotlin project (kotlinmongo) and then select the New button.
- Select New again.
- Now select Kotlin Object in the menu.
- Provide a meaningful name for the object. For this tutorial the object will be named KotlinMongoUpdate.
Coding the Kotlin MongoDB Retrieve Operation
This section will explain how to code the new KotlinMongoUpdate.kt file.
Open up the file created in the previous section and append the following code:
1 2 3 4 5 6 7 8 9 10 11 12 13 14 15 16 17 18 19 20 21 22 23 24 25 26 27 28 29 30 31 32 33 34 35 36 37 38 39 40 41 | import com.mongodb.BasicDBObject import com.mongodb.MongoClient import com.mongodb.MongoException object KotlinMongoUpdate { @JvmStatic fun main(args: Array<String>){ var mongoClient: MongoClient? = null try { // mongodb connection mongoClient = MongoClient("127.0.0.1", 27017) var db = mongoClient.getDatabase("EcommerceDb") var tbl = db.getCollection("product") // this creates the query criteria as to which document to update val query = BasicDBObject() query.put("sku", "1234567") // creates the new value for the document to be updated. val newValDoc = BasicDBObject() newValDoc.put("name", "John") val updateObject = BasicDBObject() updateObject.put("\$set", newValDoc) // preforms the update tbl.updateOne(query, updateObject) } catch (e: MongoException) { e.printStackTrace() } finally { mongoClient!!.close() } } data class User(val name: String, val lastname: String) } |
Now verify the operation was successful using the following code in the MongoDB shell:
1 2 3 4 5 6 7 8 9 10 11 12 13 | > db.product.find().pretty() { "_id" : ObjectId("5e0c63dce99bc25022493682"), "sku" : "1234567", "name" : "John", "description" : "The sharpest mobile" } { "_id" : ObjectId("5e0c63dce99bc25022493683"), "sku" : "7654321", "name" : "Nokia", "description" : "Fastest Mobile" } |
Conclusion
This tutorial explained how to update a MongoDB document with Kotlin to a MongoDB collection. The article specifically covered the prerequisites to update a MongoDB document with Kotlin and how to install Kotlin in Eclipse. The article also explained how to start the Eclipse IDE application, download the MongoDB Java driver, add a JAR file, create a MongoDB sample dataset, a Kotlin project and a Kotlin object file. Finally, the tutorial covered how to code the Kotlin-MongoDB retrieve operation and verify the operation was successful using the MongoDB shell. Remember that the MongoDB Java driver must be downloaded in order for Kotlin to be able to interact with the MongoDB server.
The Code
Below is the full Kotlin code used in this tutorial.
The KotlinMongoRetrieve.kt
1 2 3 4 5 6 7 8 9 10 11 12 13 14 15 16 17 18 19 20 21 22 23 24 25 26 27 28 29 30 31 32 33 34 35 36 37 38 39 40 41 | import com.mongodb.BasicDBObject import com.mongodb.MongoClient import com.mongodb.MongoException object KotlinMongoUpdate { @JvmStatic fun main(args: Array<String>){ var mongoClient: MongoClient? = null try { // mongodb connection mongoClient = MongoClient("127.0.0.1", 27017) var db = mongoClient.getDatabase("EcommerceDb") var tbl = db.getCollection("product") // this creates the query criteria as to which document to update val query = BasicDBObject() query.put("sku", "1234567") // creates the new value for the document to be updated. val newValDoc = BasicDBObject() newValDoc.put("name", "John") val updateObject = BasicDBObject() updateObject.put("\$set", newValDoc) // preforms the update tbl.updateOne(query, updateObject) } catch (e: MongoException) { e.printStackTrace() } finally { mongoClient!!.close() } } data class User(val name: String, val lastname: String) } |


Pilot the ObjectRocket Platform Free!
Try Fully-Managed CockroachDB, Elasticsearch, MongoDB, PostgreSQL (Beta) or Redis.
Get Started