Simple mongoose and node js Example
In this article, we will create a simple mongoose and Node Js example with step by step instructions. Please review the prerequisites below.
Prerequisites –
- NodeJs and MongoDB installed.
- Knowledge of javascript.
- Nodemon installed.
So let’s start.
Install express with npm
First of all, we need a package.json file to start with. Create a new folder and name it anything you like. I will name it “newApp”. Open a terminal and go to this folder. Then, run the following command. (You can omit -y for providing details in the package.json file)
1 | npm init -y |
This will create a package.json file. Now, we need the express. Express is a web framework for NodeJs. We will use the express to create a server and API. Run the following command to install express.
1 | npm install express |
Create express server
Now we can create a server. In the same folder, create a new file and name it “server.js” and paste the following code in it.
1 2 3 4 5 6 7 8 | const express = require("express"); const app = express(); const port = 4000; app.listen(port, function() { console.log("Server is running on Port: " + port); }); |
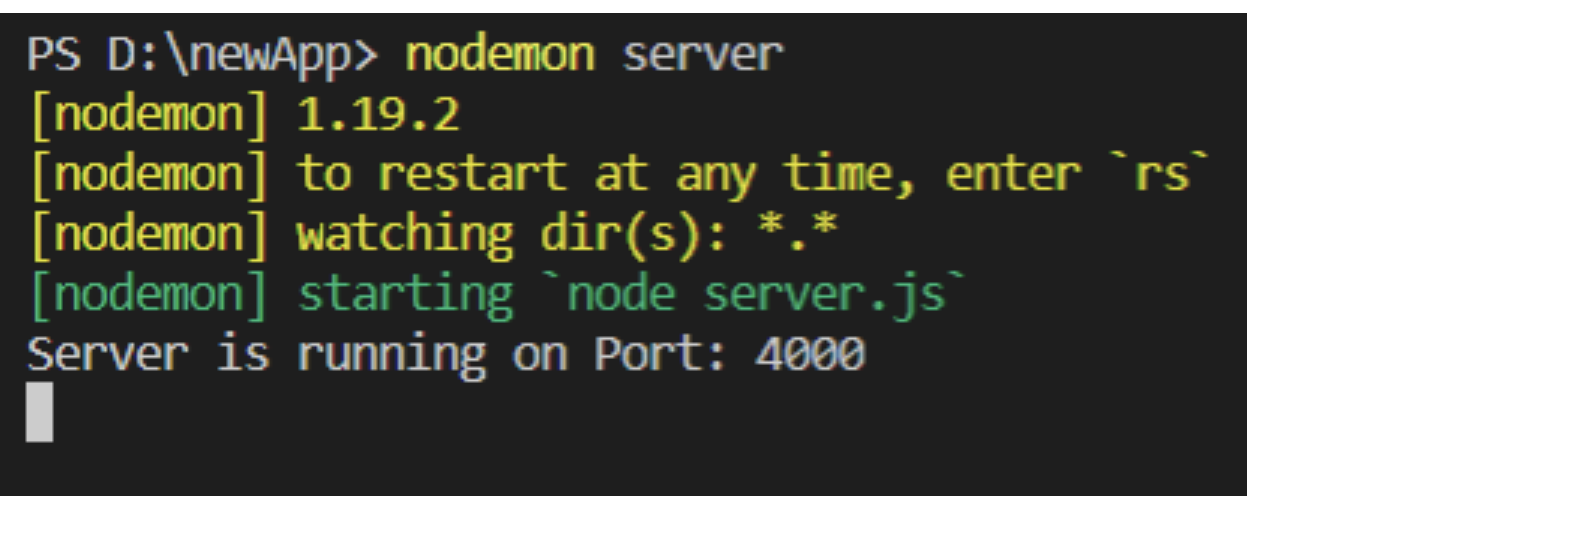
In the above code, we imported express and used it to create a server. Let’s run it using nodemon.
Install mongoose
We have a server now. Now, we can connect MongoDB with it. We will create to APIs – One will insert the data and the other will retrieve it. But first, we need a connection with MongoDB. To establish a connection, install the mongoose ODM.
1 | npm install mongoose |
Establish connection
Now we can use mongoose to establish a connection with MongoDB. Insert the following code into the server.js file.
1 2 3 4 5 6 7 8 9 10 11 | const mongoose = require("mongoose"); var uri = "mongodb://localhost:27017/details"; mongoose.connect(uri, { useUnifiedTopology: true, useNewUrlParser: true }); const connection = mongoose.connection; connection.once("open", function() { console.log("MongoDB database connection established successfully"); }); |
In the above code, we imported mongoose and then create a URI. Observe the URI.
1 | var uri = 'mongodb://localhost:27017/details' |
“details” is the name of the database that we are connecting to. Then we used the connect() method for the connection. Let’s run it and see if the connection is successful or not.
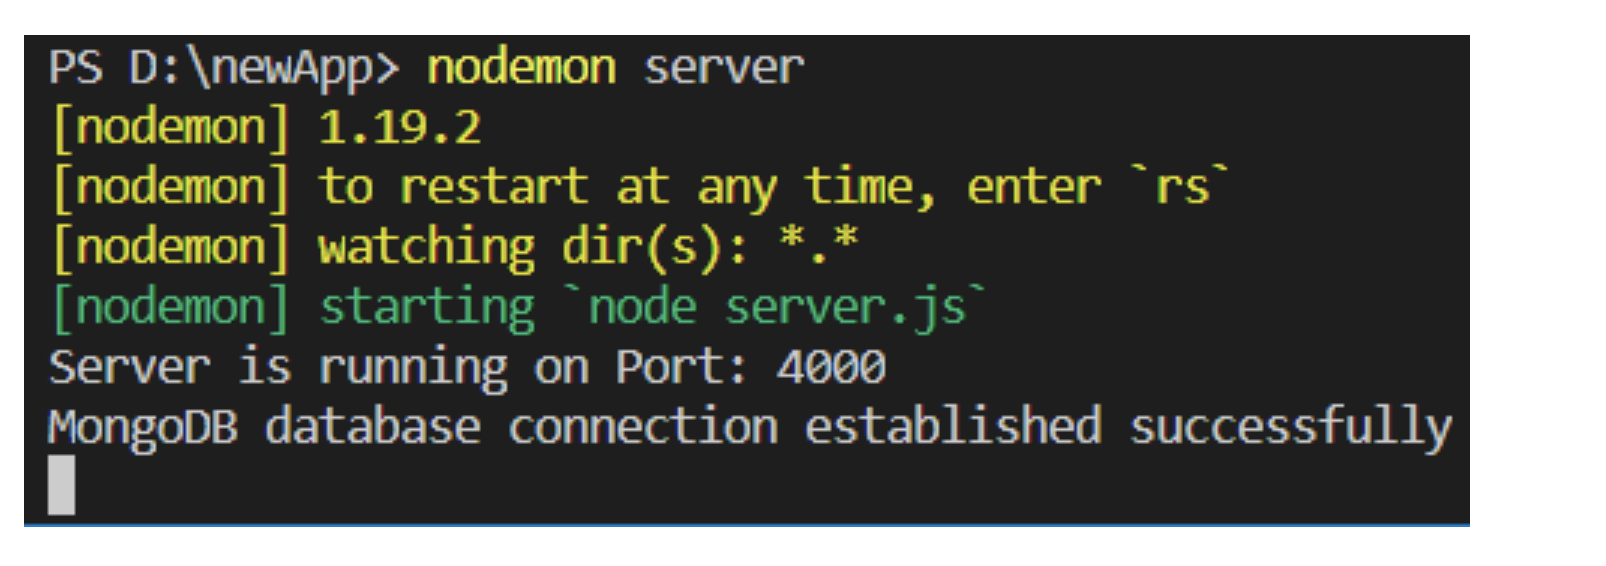
Yes! The connection is successful.
Create a schema
The next step is to create a schema. The documents in the database will be inserted according to the schema we will define. In the same folder, create a new file and name it “model.js”. Paste the following code in it.
1 2 3 4 5 6 7 8 9 10 11 12 13 14 15 16 17 18 19 20 | const mongoose = require("mongoose"); const Schema = mongoose.Schema; let employee = new Schema( { name: { type: String }, age: { type: Number }, location: { type: String } }, { collection: "Employees" } ); module.exports = mongoose.model("employees", employee); |
This is the schema. The collection name is Employees and each document in this collection will hold three fields – name, age, and location. At the end of the file, we exported the schema because we need it inside the server.js file. Paste the following code in the server.js file.
1 | const employees = require("./model"); |
Create routes
We can create APIs now. We need a router to create route handlers. Add the following code in the server.js file.
1 2 3 | const router = express.Router(); app.use("/", router); |
Any link, starting with ‘/’ will be captured by the router we created. This is how server.js file looks like now.
1 2 3 4 5 6 7 8 9 10 11 12 13 14 15 16 17 18 19 20 21 22 | const mongoose = require("mongoose"); const express = require("express"); const app = express(); const employees = require("./model"); const router = express.Router(); const port = 4000; var uri = "mongodb://localhost:27017/kennel"; mongoose.connect(uri, { useUnifiedTopology: true, useNewUrlParser: true }); const connection = mongoose.connection; connection.once("open", function() { console.log("MongoDB database connection established successfully"); }); app.use("/", router); app.listen(port, function() { console.log("Server is running on Port: " + port); }); |
Creating an api route
Until now, we used Nodejs and express to create a server. Then we established a connection with MongoDB using mongoose. Using mongoose again we created a schema for our collection and at last, we defined a router. Now we can create the APIs.
The first API will insert data into the Employees collection. So the router handler will make a post request.
1 | router.route("/insertdata").post(function(req, res) {}); |
The above route handler will be invoked when the endpoint ‘/insertdata’ will be executed.
To insert the data we can use the insertMany() method. The insertMany() method takes an array of objects as its parameter. We will insert three documents in the Employees collection.
1 2 3 4 5 6 7 8 9 10 11 12 13 14 15 16 17 | var data = [ { name: "John", age: 21, location: "New York" }, { name: "Smith", age: 27, location: "Texas" }, { name: "Lisa", age: 23, location: "Chicago" } ]; |
To invoke the insertMany() method, we will use the model we created and imported in the server.js file.
1 2 3 4 5 6 7 | employees.insertMany(data, function(err, result) { if (err) { res.send(err); } else { res.send(result); } }); |
We passed the array to the insertMany() method. Place the above in the route handler we created earlier.
Now, we will use the postman tool to test this endpoint.
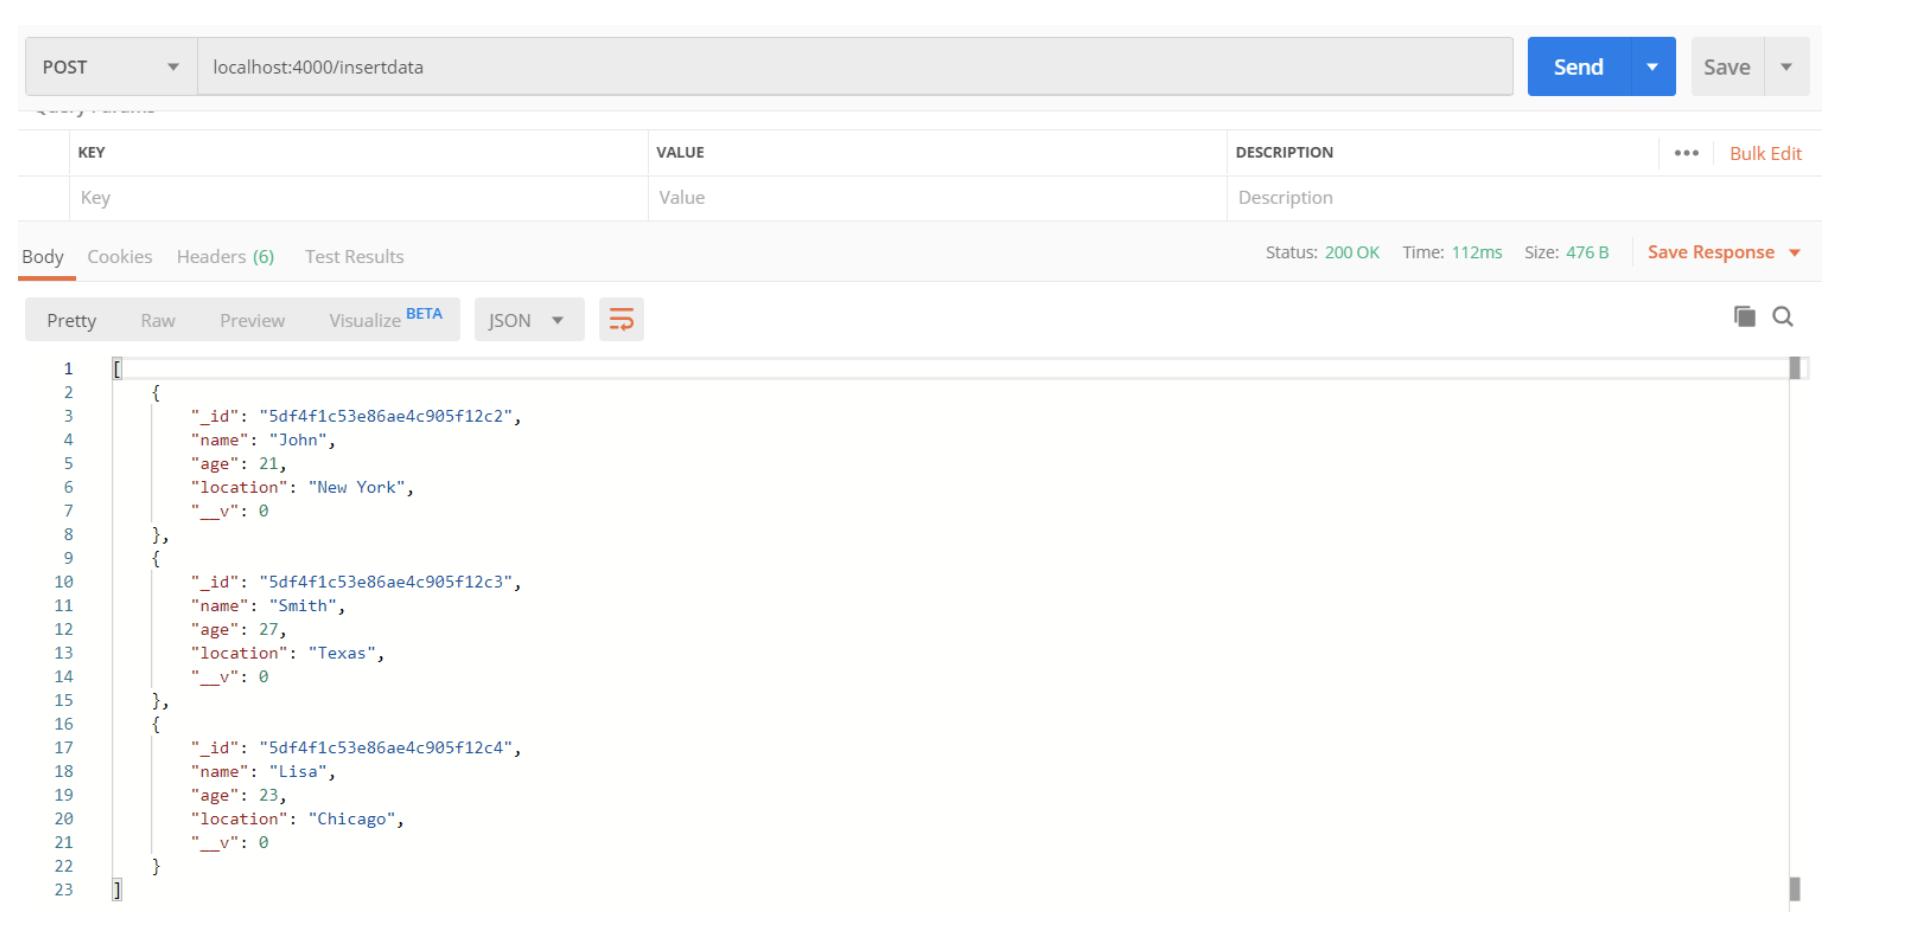
The insertMany() method returns the documents that were inserted successfully in the collection.
Similarly, we can create another route handler to fetch the documents. The difference here will be – Instead of the POST method, we will make the GET method and instead of insertMany() method, we will use the find() method.
1 2 3 4 5 6 7 8 9 | router.route("/fetchdata").get(function(req, res) { employees.find({}, function(err, result) { if (err) { res.send(err); } else { res.send(result); } }); }); |
Let’s execute the route using the postman tool.
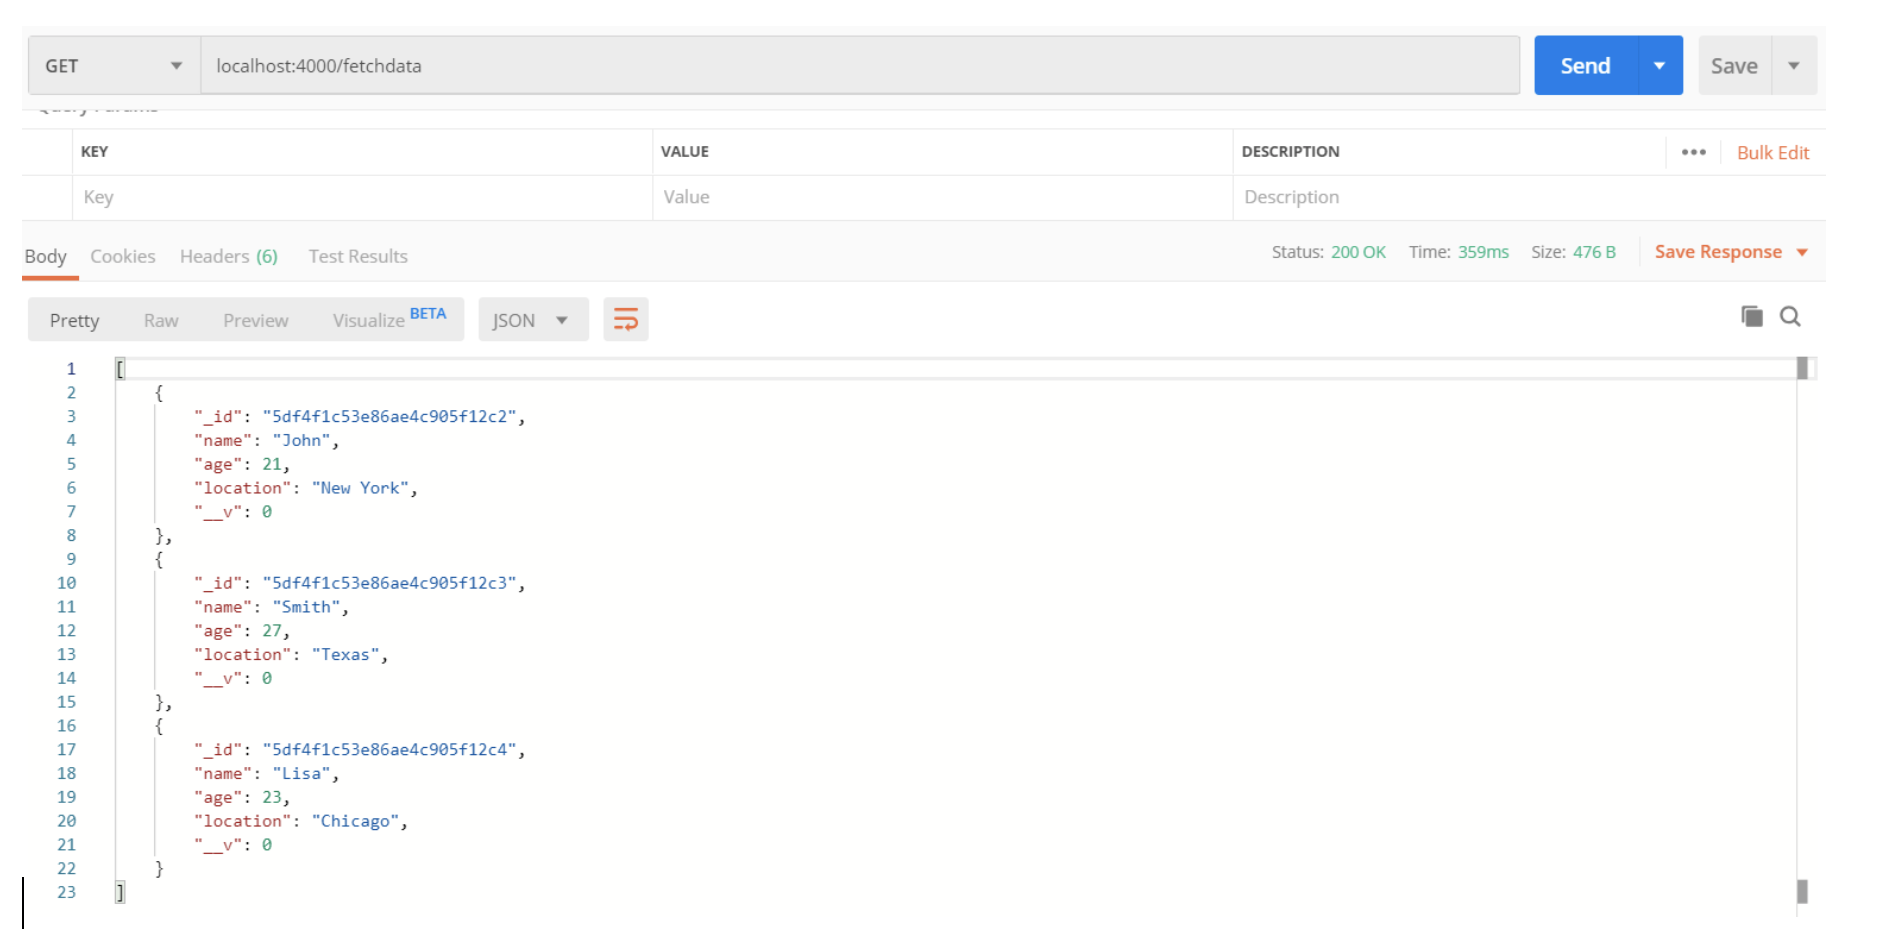
Yes! It returns all the documents.
Conclusion
So this was a simple mongoose and nodejs example. In this application, we created a server using express and nodejs. Then, we used mongoose to establish a connection with MongoDB. We also used mongoose to create the schema. You would have noticed that express is a very useful framework. The router is created using express only. Then, we created two APIs for inserting and fetching data from the collection.


Pilot the ObjectRocket Platform Free!
Try Fully-Managed CockroachDB, Elasticsearch, MongoDB, PostgreSQL (Beta) or Redis.
Get Started