Install and Setup MongoDB on a Raspberry Pi (Part 1)
Introduction
If you’re interested in running MongoDB on your Raspberry Pi device, it’s important to know how to complete the proper setup and installation process. This tutorial series will explain everything you need to know about getting started with MongoDB and Raspberry Pi. In this first article, we’ll show you how to set up and install the free Raspbian operating system on a Raspberry Pi single-board computer. With this operating system in place, you can run a local MongoDB development server using the Raspberry Pi.
Prerequisites
Before we begin the installation process, let’s review the key prerequisites for this task:
Keep in mind that it takes some time for Raspbian to install and for the APT and APT-GET repositories to update after Raspbian boots up. Be sure you allot sufficient time for this step of the process.
You’ll need to have a Raspberry Pi single-board computer that’s able to install and run an ARM-based version of MongoDB. You’ll also need an SD card that’s at least 8GB in size and formatted as FAT32.
You should have a working knowledge of MongoDB and the JavaScript commands used for the Mongo command-line interface (CLI). This article also assumes that your Raspberry Pi will be running Raspbian, which a Debian-based Linux distribution that’s based on Ubuntu.
Download Raspbian
The NOOBS version of Raspbian doesn’t require any terminal commands. All you have to do is unzip the downloaded archive and then copy the contents of the extracted folder to the FAT32 formatted SD card.
NOTE: Make sure you’re installing Raspbian and not some other OS or media player when you first start the NOOBS installation process on the Raspberry Pi.
You’ll need to download a version of Raspbian Linux that’s compatible with your Raspberry Pi device. The more popular ones are NOOBS or Raspbian Lite. The key is to download one that has long-term support and is able to run MongoDB.
If you’re using an older Raspberry Pi such as a Pi 1, 2, or 3a, then you’ll also need to have a WiFi USB dongle. Alternatively, you can also connect the single-board to a router or switch directly using a Cat5e ethernet cable.
Format the SD card
You’ll need a FAT32 formatted SD card on which to install Raspbian. Most cards will already be formatted as FAT32, but many higher-capacity cards are formatted as ExFAT. In the event that you have an ExFAT card, here’s how you can format it properly so that you can install Raspbian OS on it.
WARNING: When you use sudo elevated privileges in Linux, it’s easy to damage important file systems or destroy important data while formatting volumes and drives. Please be very careful in choosing the correct device name for the target SD card to be formatted.
Format the Raspbian SD card in macOS
If you’re creating the Raspbian SD card in macOS, you should use the Docker Utility.app located in the Utilities sub-directory of your macOS Applications folder.
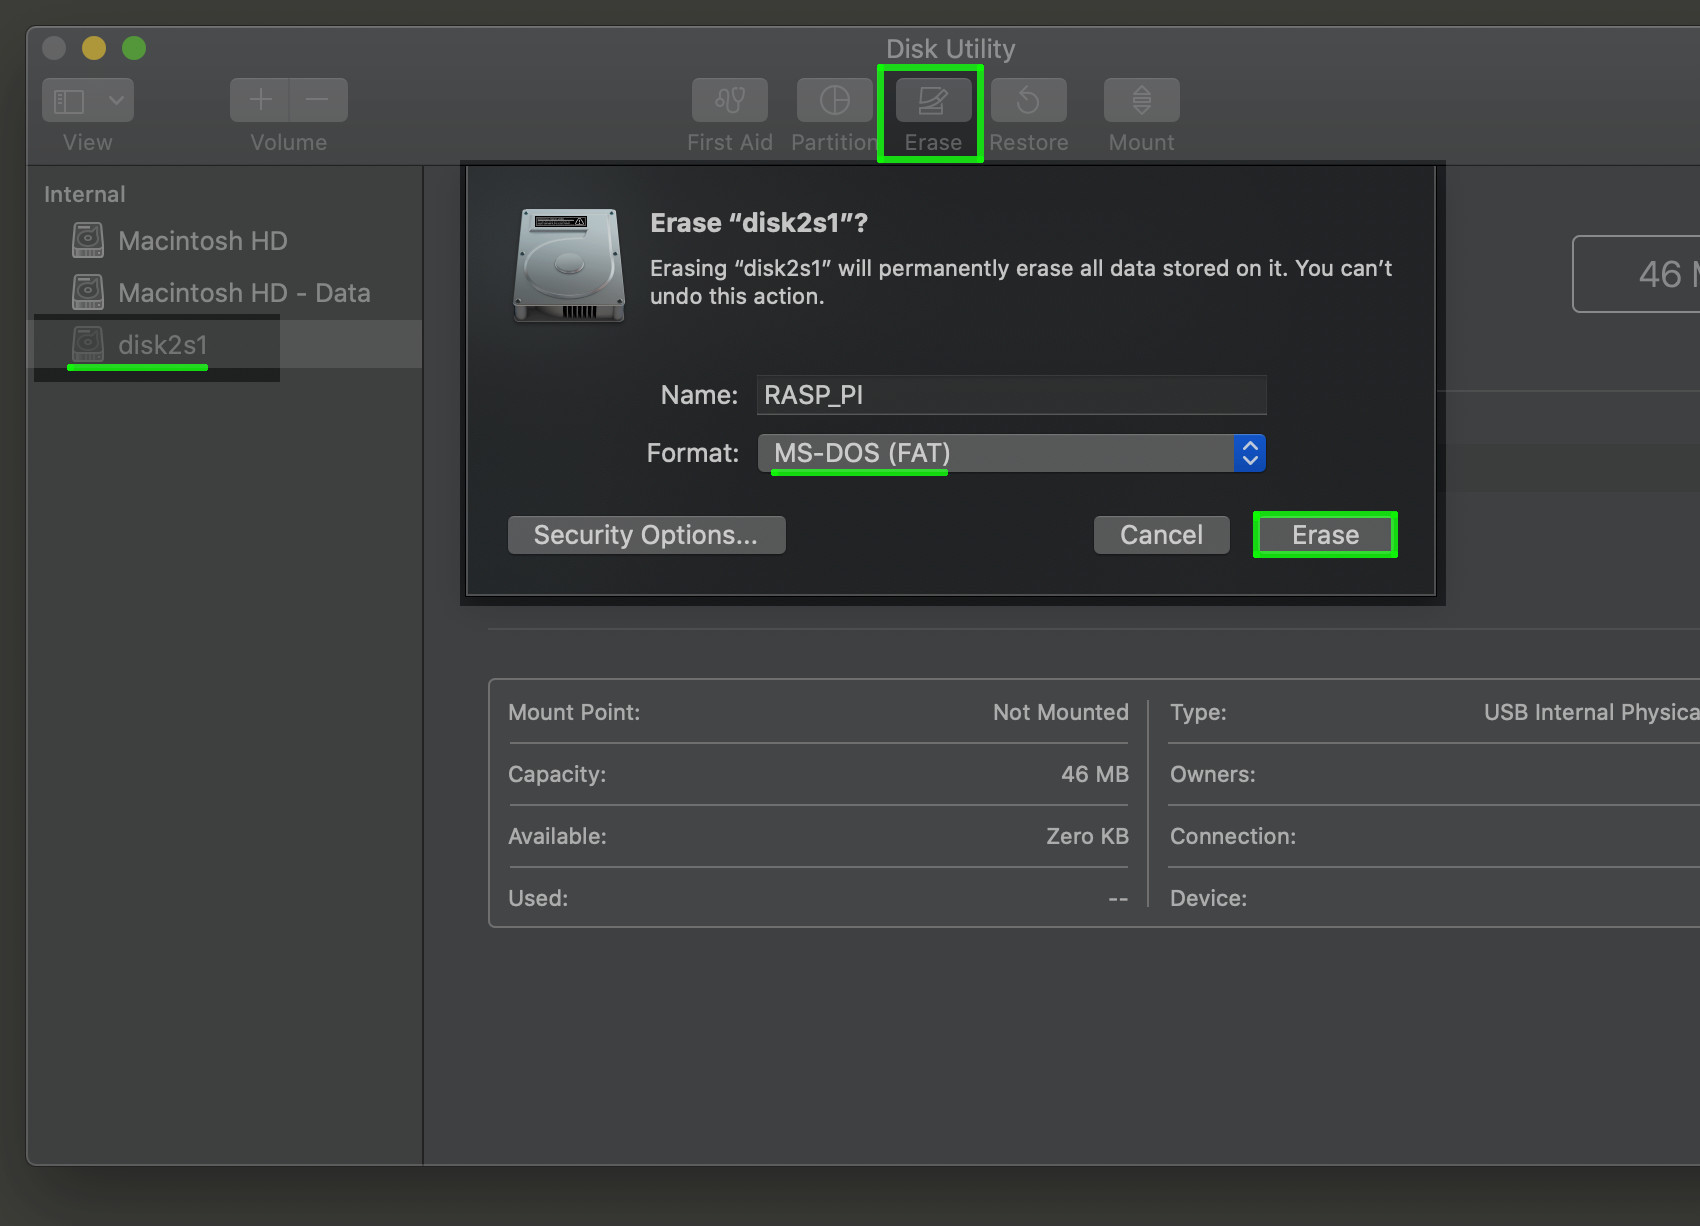
Double-click the Disk Utility application to open it. Then, select the SD card volume listed in the Internal panel, which can be found on the left-hand side of the application.
After you complete those steps, click the Erase button at the top, and make sure to change the Format: drop-down option to MS-DOS (FAT). Last but not least, click the Erase button on the pop-up window once everything looks correct:
When you’re finished, you can close the application and unmount the SD card.
Format a Raspberry Pi SD card in Linux
If you’re building the Raspbian SD card in Linux, you can use a graphical app like GParted to delete the old partitions and create a FAT32 one. You can also use the mkfs.vfat command in a terminal window.
Using GParted to format the SD card
GParted is a great GUI-based tool that makes it easy to delete partitions and format drives in Linux. Some distributions come with GParted pre-installed– it often can be found in the Ubuntu or Linux Mint software manager. Otherwise, you can use the APT-GET repository to install it.
To install GParted, we first update the apt-get package repository using the following command:
1 | sudo apt-get update |
Then we’ll install the gparted application using the APT-GET install command:
1 | sudo apt-get install gparted |
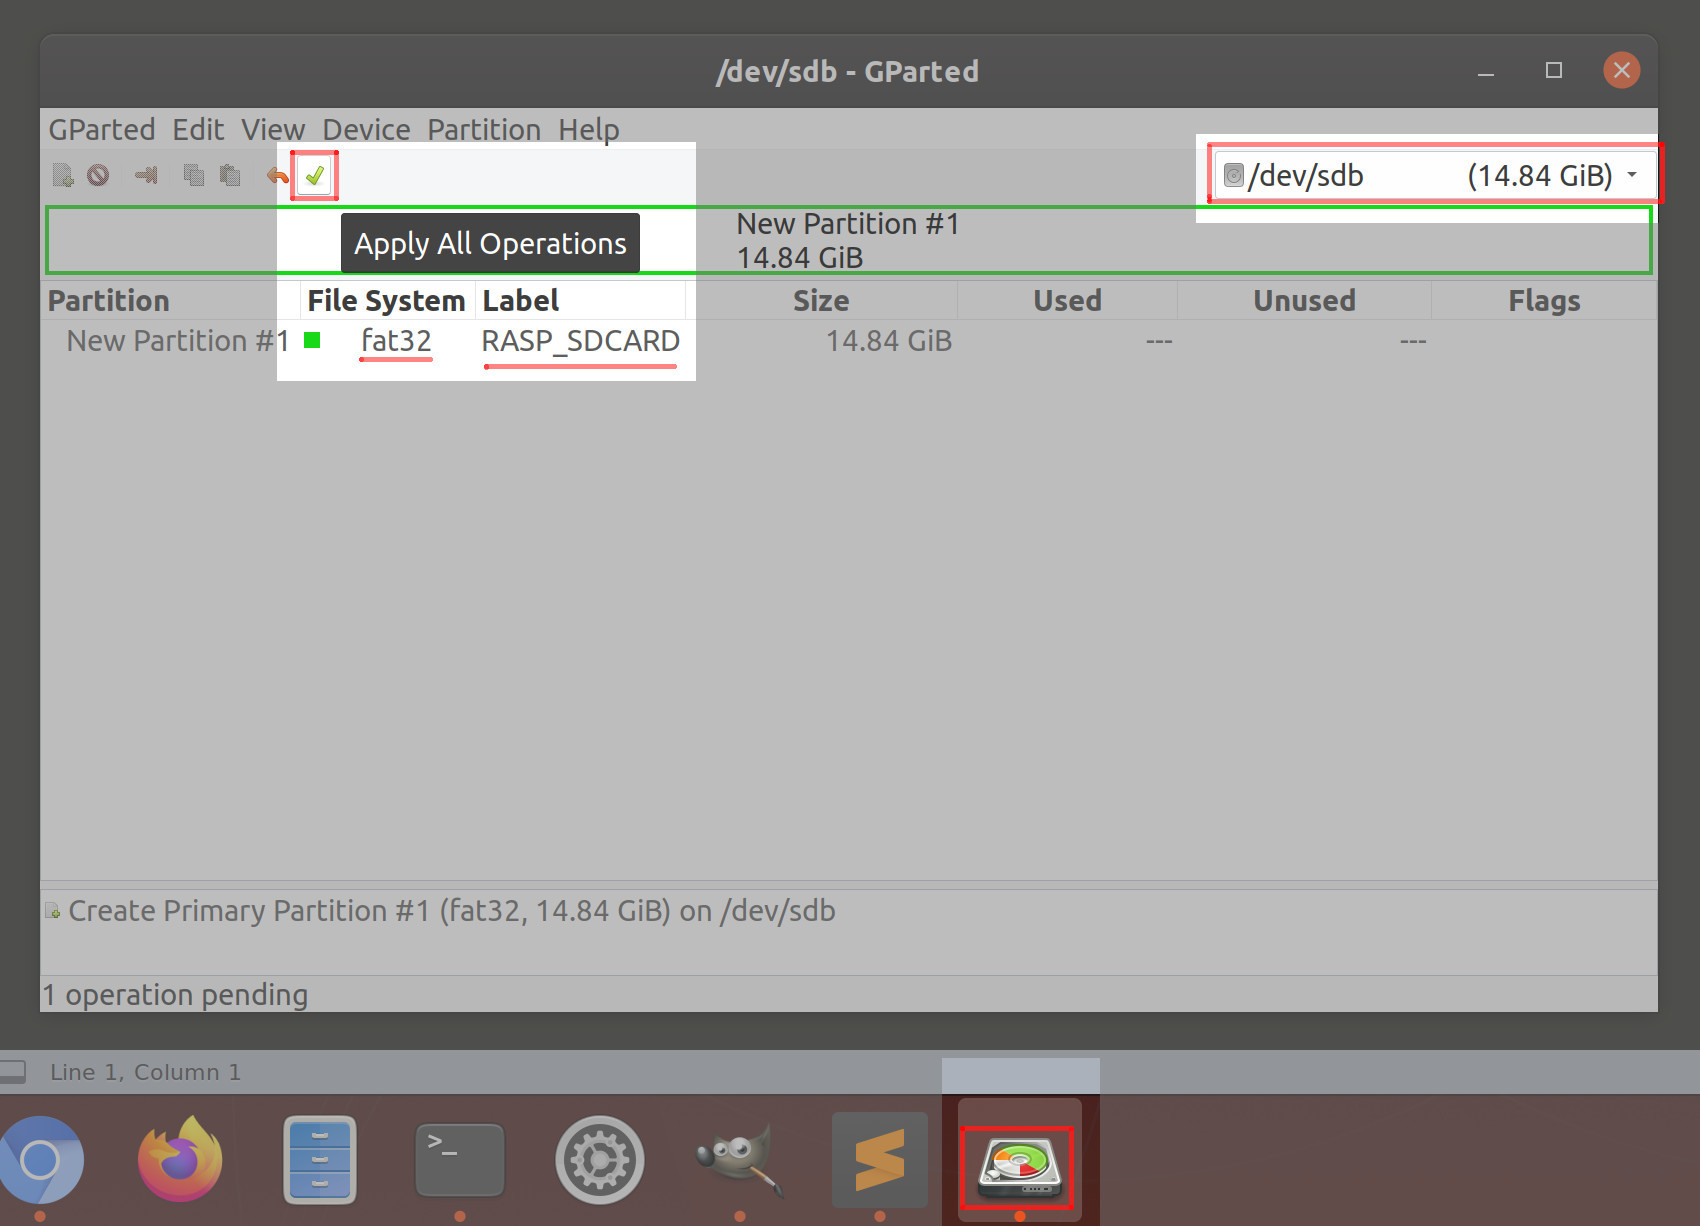
Next, we’ll open up the application and carefully select the correct /dev/ drive name from the drop-down menu on the right-hand side of the application.
WARNING: Very carefully select the correct drive name or you may cause irreparable damage to the Linux file systems or drives connected to your machine.
You’ll need to delete any old partitions and create a new FAT32 partition. You can also give the drive a label if desired.
Once you’re finished and you’ve confirmed that all of the settings look correct, click the green check mark to execute the operations. Close the GParted application when the operation is complete and unmount the SD card.
Formatting an SD card as FAT32 in a Linux terminal
You can use the fdisk command in Linux to get partition information about all of your drives and volumes:
1 | sudo fdisk -l |
NOTE: You can also use the df command to display all of the volumes. The man fdisk command can be used to get more information on the application.
Unmount the SD card
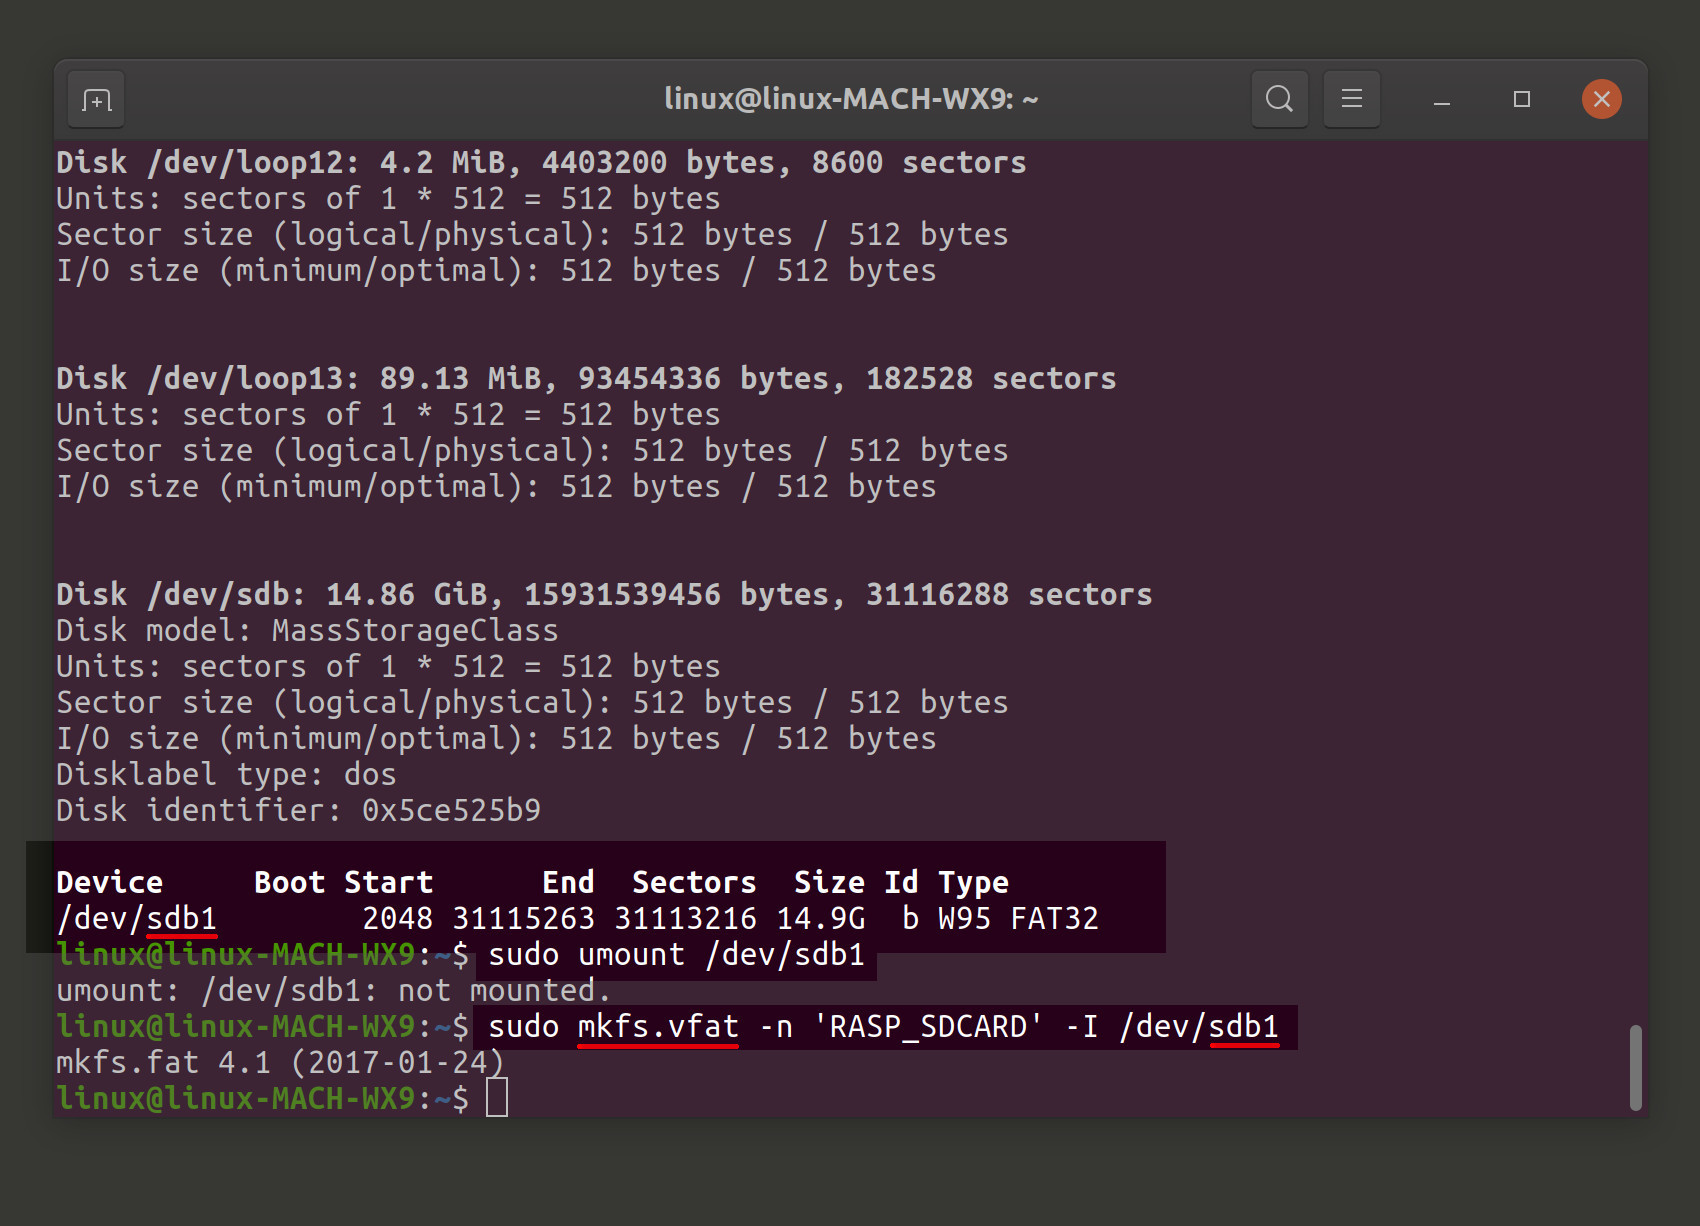
Next, let’s unmount the SD card drive so that operations can be performed on it. We’ll use the following command:
1 | sudo umount /dev/sdbX |
NOTE: When you run this command yourself, be sure to replace X with the appropriate disk number. Otherwise, you’ll receive a response of umount: /dev/sdbX: not mounted.
Use the ‘mkfs’ command to format the card
The following mkfs command can be used to format the card as FAT32. Like before, be sure to change sdbX to your card’s respective device name:
1 | sudo mkfs.vfat -n 'RASP_SDCARD' -I /dev/sdbX |
If you don’t want to provide a volume label using the -n flag, you can just use the following syntax:
1 | sudo mkfs.vfat -I /dev/sdbX |
It may take a few minutes for the above mkfs operation to complete.
Install Raspbian
At this point, we’re ready to install Raspbian on an SD card that will run the MongoDB server. You can use the diskutil list command in macOS X or thesudo fdisk -l command in Linux to list all of the drives and volumes.
We’ll be using the dd command to write the Raspbian image to the SD card:
1 | sudo dd bs=1m if=/path/to/raspbian.img of=/dev/diskX conv=sync |
NOTE: The df -h command will also list all of the volumes and where they’re mounted.
‘Resource busy’ error while attempting to write Raspbian
If you get a response stating Resource busy while attempting to write Raspbian to the SD card, you might need to unmount the drive. You can accomplish this with sudo umount /dev/sdbX in Linux or sudo diskutil unmount /dev/diskX in a macOS terminal.
You can also try the following unmountDisk command in a macOS terminal if the other methods fail:
1 | sudo diskutil unmountDisk dev/diskX |
If that still didn’t work, try to get the exact number for the offending partition. You can then use the following command, making sure to replace X with the appropriate number followed by s1 and s2:
1 | sudo diskutil unmount /dev/diskXs1 |
The command shown above should return a response of Volume RASP_SDCARD on disk2s1 unmounted. When the command finishes executing, you can attempt to run the dd command again.

Allow the terminal to write Raspbian to the SD card
The dd operation takes some time to complete. It won’t give any feedback while writing to the card or even return a response once it’s finished; just be patient and give it time.
The SD card should now have a new volume name called “boot”. At this point, you should be able to unmount the SD card. Eject it and physically insert it into the open SD card slot on your Raspberry Pi board.
Conclusion
The Raspbian setup process is nearly complete at this point. Simply plug in the Raspberry Pi device using a power supply that supplies enough wattage. If you see a yellow lightning bolt icon in the upper right-hand corner of the screen, it means the power adapter isn’t providing sufficient voltage. Complete the installation and setup, and take note of your Raspbian admin password– you’ll need it shortly to install and run MongoDB.
We’ve wrapped up the first part of our tutorial series on working with MongoDB and Raspberry Pi. In this article, we showed you how to install and set up Raspbian. Our next article will focus on installing MongoDB and setting up the MongoDB server on the Raspberry Pi device.


Pilot the ObjectRocket Platform Free!
Try Fully-Managed CockroachDB, Elasticsearch, MongoDB, PostgreSQL (Beta) or Redis.
Get Started