Install and Setup MongoDB on a Raspberry Pi (Part 2)
Introduction
This article is the second installment in our Raspberry Pi series. Over the course of this series, we’ll show you how to set up Raspbian Linux on a single-board computer and run a MongoDB server that’s accessible to all devices on a local network. In the first article, we showed you how to install and configure Raspbian Linux on the Pi. Now, we’ll pick up where we left off and explain how to install MongoDB on Raspberry Pi.
Prerequisites
Before we attempt to install MongoDB on Raspberry Pi, we need to review some prerequisites that are essential for this task:
First, you’ll need a working Raspberry Pi that’s able to connect wirelessly to your local network. If you can’t make a wireless connection, make sure you have an available CAT5e port in your router that you can use to connect the Raspberry Pi.
You’ll need to have a wireless router or a switch so that your Raspberry Pi’s MongoDB server and your computer can communicate over a local network.
This tutorial assumes that your ARM-based single-board computer is running a Debian-based Linux distribution that can install packages from the APT repository. Our examples use a Raspbian “Buster” flavor of Debian Linux.
If you’re unsure what version of Linux is running on the Raspberry Pi, use the following command in a terminal window:
1 | cat /etc/*-release |
Connect to the Raspberry Pi
In this section, we’ll review how to connect to the Raspberry Pi device in a UNIX terminal. We’ll be using the SSH (Secure Shell) command and transferring files back and forth using the SCP (Secure Copy) command in a terminal.
Enable SSH on the Raspberry Pi
If you’re using an older Raspbian distribution, you can skip the following step; however, if you’re running a version released since November 2016, you’ll need to manually enable SSH on the Raspberry Pi before it will accept connections. Without manually enabling SSH, you’re likely to get the following error when you attempt to run an ssh command:
1 | Network Error: Connection Refused |
Click the Raspberry Pi icon in the menu and navigate to the Preferences drop-down menu. You should see a button that says Raspberry Pi Configuration—click on it that you can use to open the configuration’s modal window:
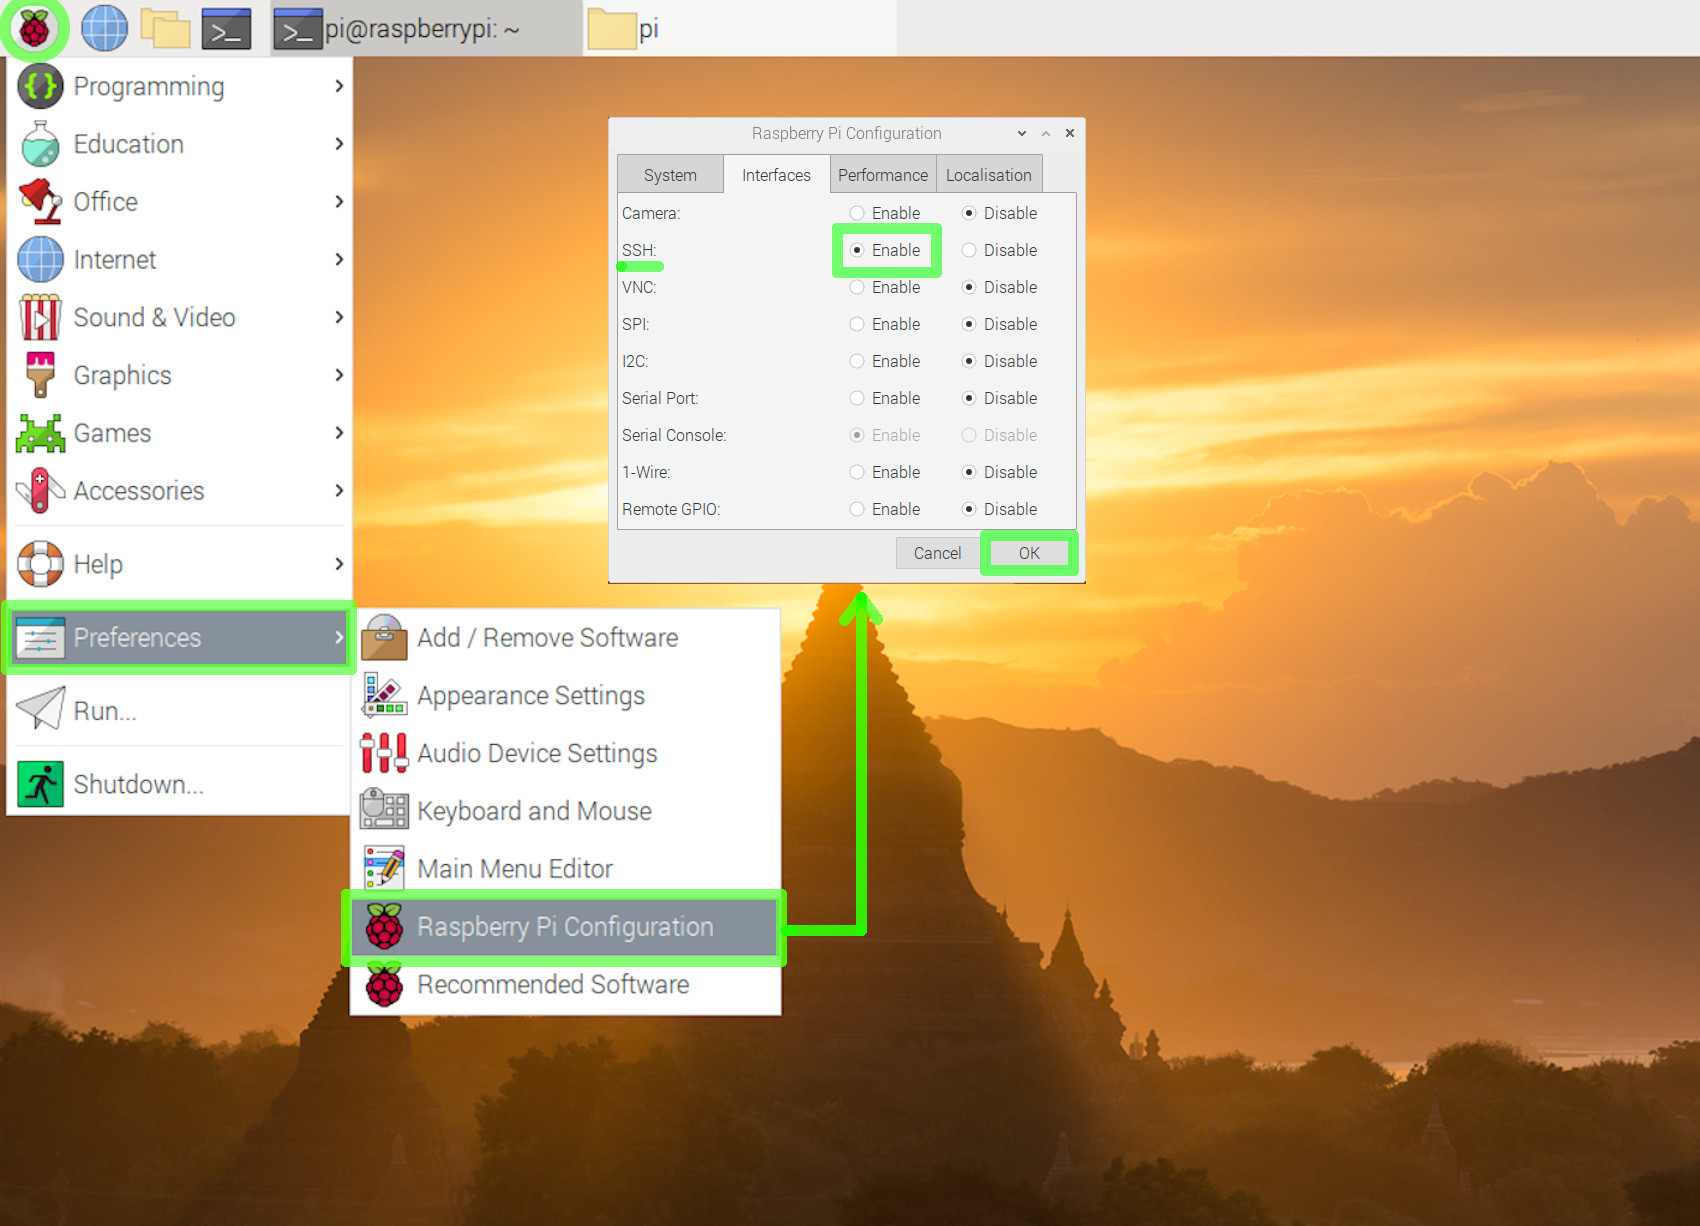
Now click on the Interface tab and enable the radio button for SSH by clicking on the modal window’s OK button.
Get the local IP address for the Raspberry Pi
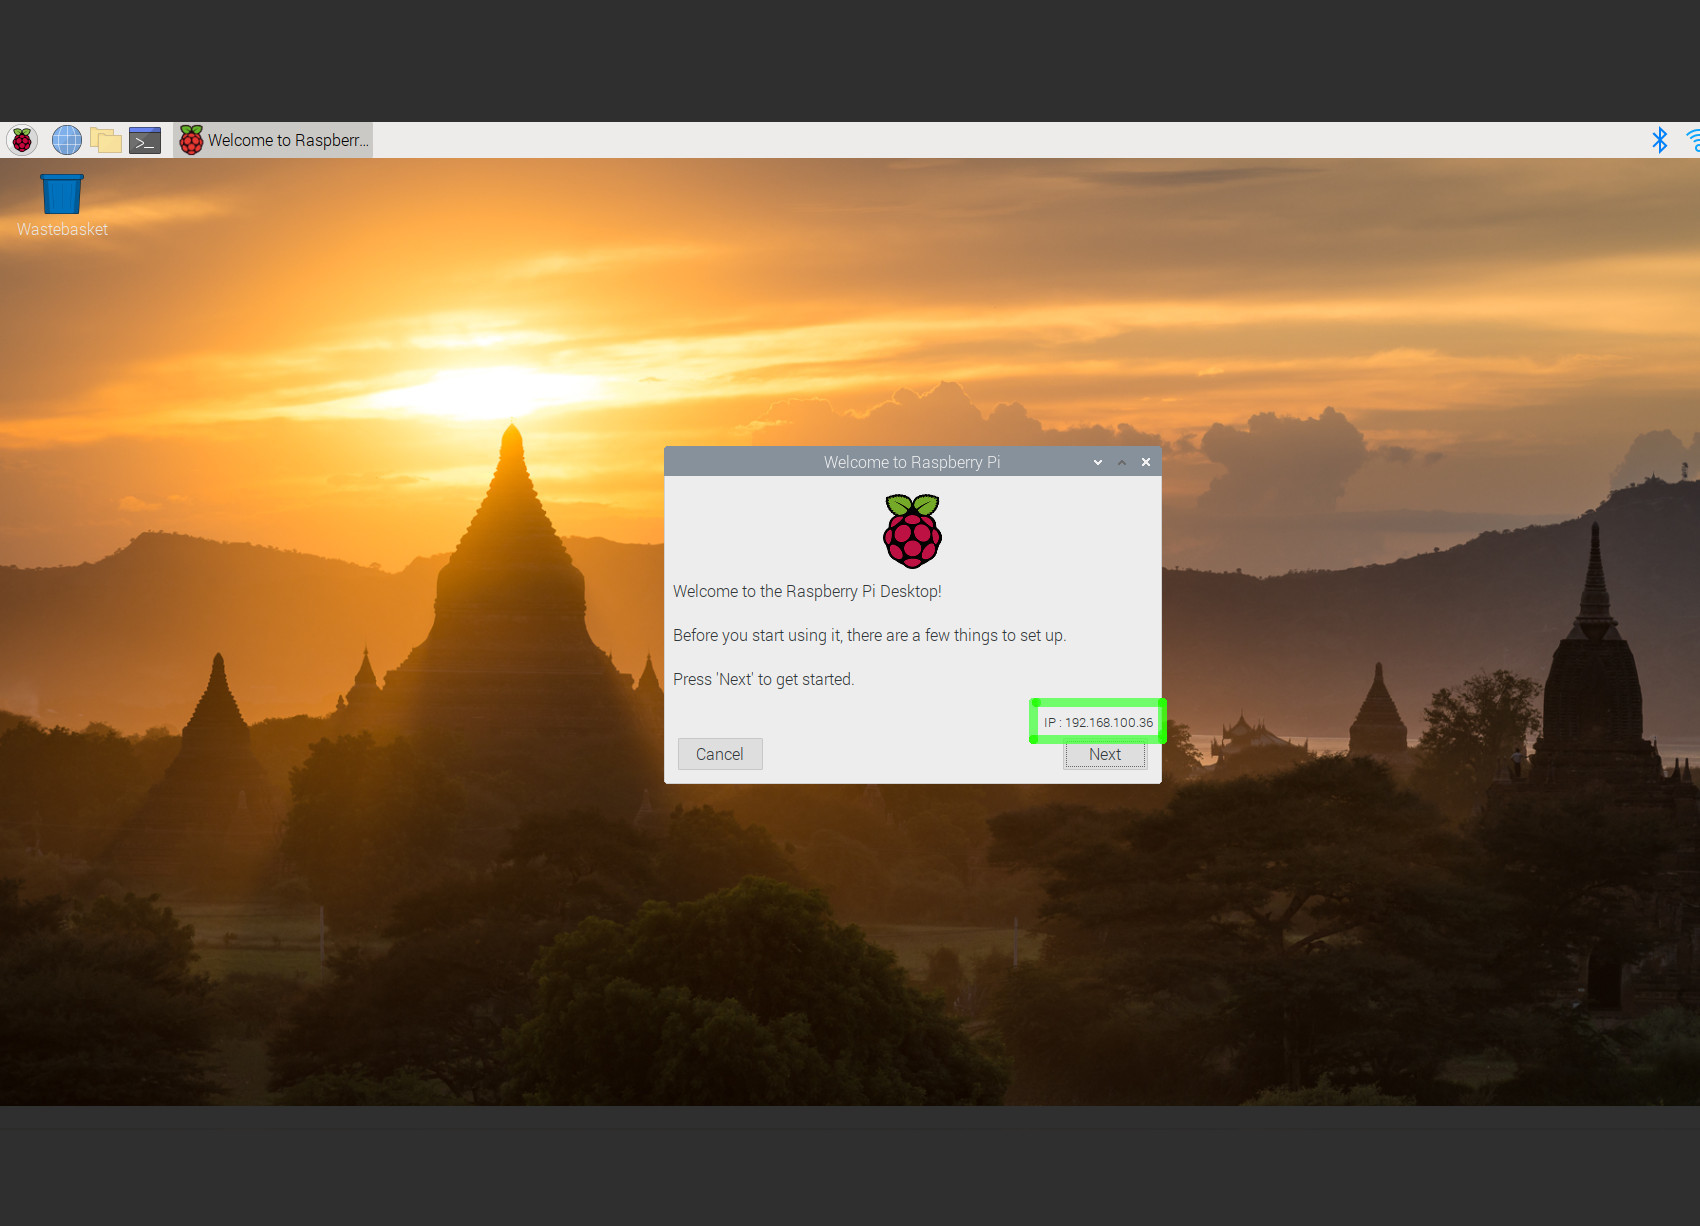
Be sure to use the hostname -I command in the Raspberry Pi’s terminal before attempting the SSH and SCP commands. This will confirm that you have the correct local IP address for the single-board computer on your network.
Your router will likely assign a Class C IP address to the Raspberry Pi that starts with 192.168.
NOTE: To get the local IP address for a Mac, use the ifconfig en0 command instead.
Use SCP (Secure Copy) with Raspberry Pi
If you want to transfer files to the Raspberry Pi, you can also use scp to upload and download files using your local network. The command shown below uses SCP to upload two CSV files to the Raspberry Pi:
1 | scp my-data1.csv my-data2.csv pi@192.168.100.36: |
This is a very convenient way to transfer data such as MongoDB data or CSV files from your primary development computer to the Raspberry Pi server.
Download a file from the Raspberry Pi
Our next scp example will download a file called my-data.csv from the Raspberry Pi into our computer’s present working directory:
1 | scp pi@192.168.100.36:/home/pi/my-data.csv $PWD |
Use SSH (Secure Shell) to connect to the Raspberry Pi
Although you can use the Raspberry Pi itself to install MongoDB and modify file systems, it’s usually quicker to just do it remotely via an SSH connection in a terminal on another computer.
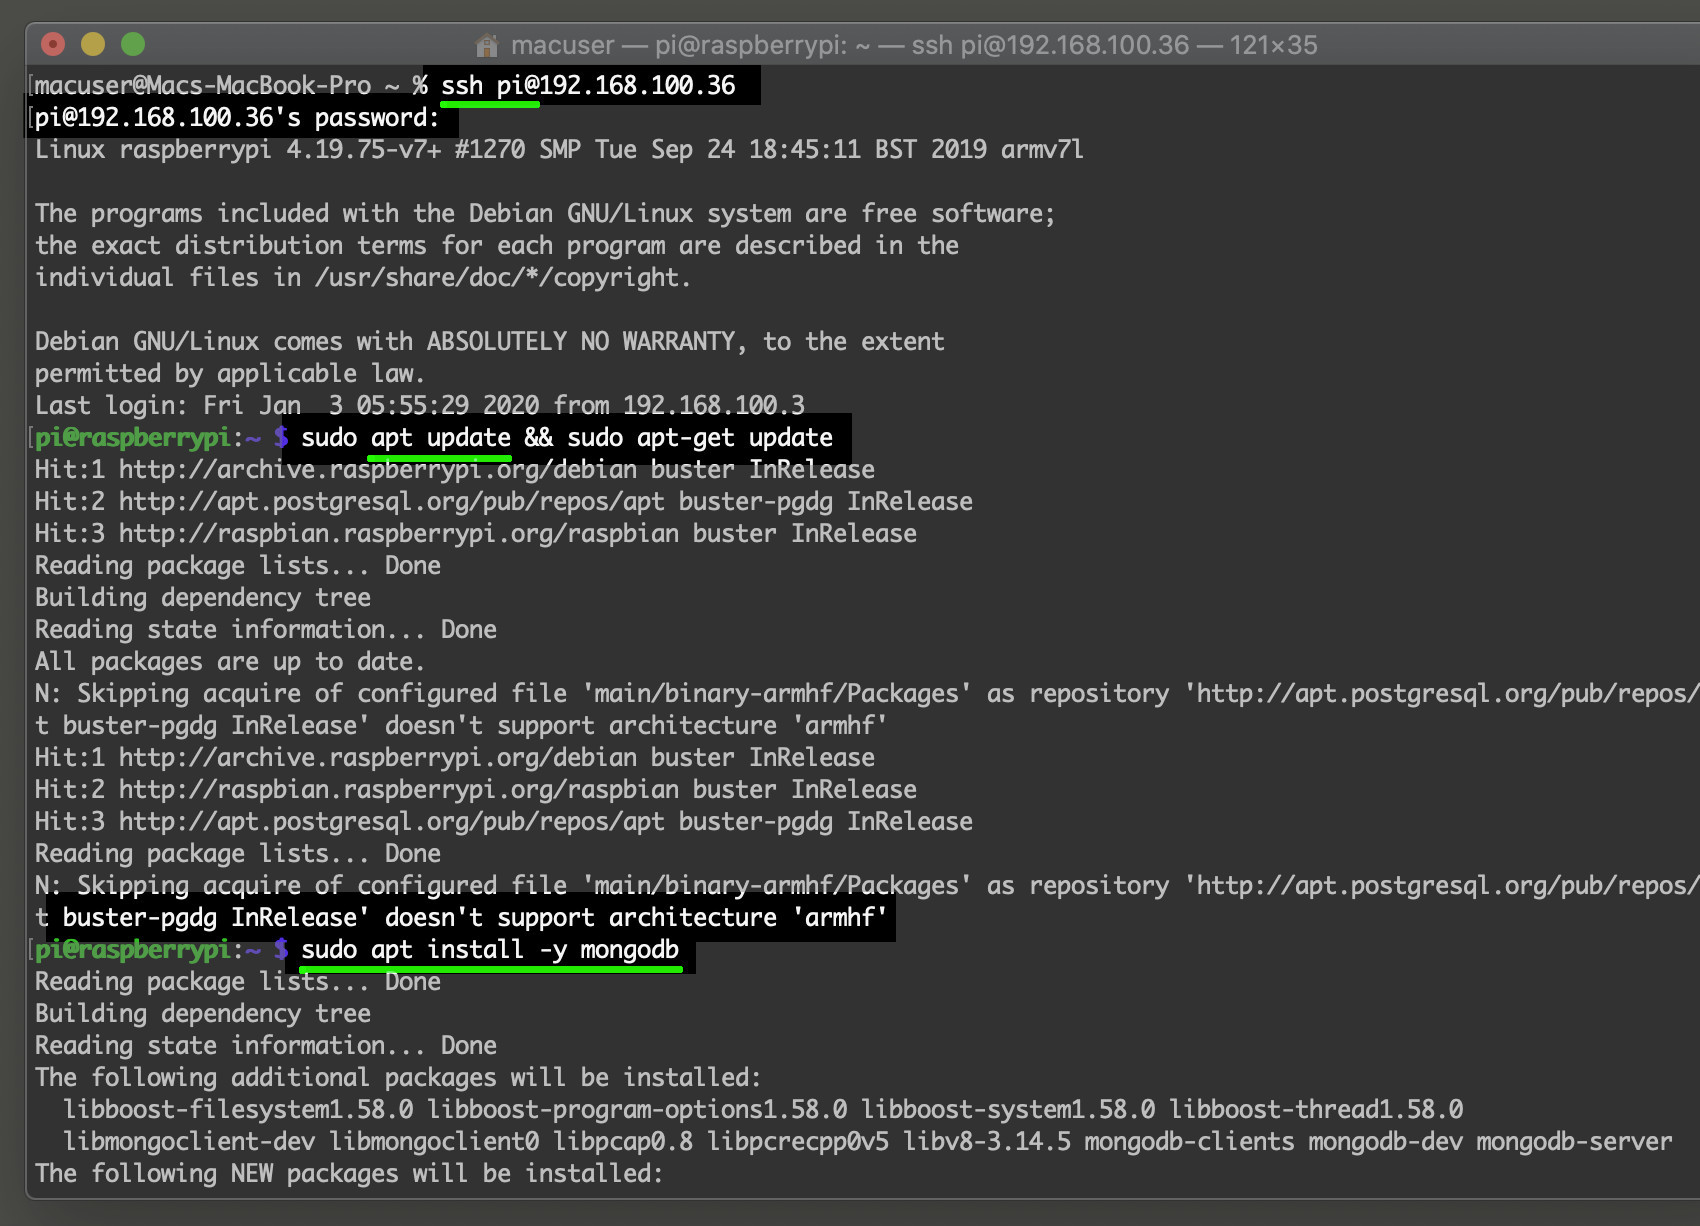
Use the ssh pi@ command, followed by the Raspberry Pi’s local IP address, to establish a secure shell connection to the device using your local network. You can see how this works in the following example:
1 | ssh pi@192.168.100.36 |
Be sure to update the APT and APT-GET repositories before installing MongoDB:
1 | sudo apt update && sudo apt-get update |
Install MongoDB
Once the repositories have finished updating, you can install the mongodb package on the Raspberry Pi while you’re connected remotely via SSH.
Install MongoDB on Debian Buster
The following command can be used to install MongoDB from the APT repository:
1 | sudo apt install -y mongodb |
When the installation is complete, use the systemctl status mongodb command, which should return a response stating Active: active (running).
Configure the MongoDB server on the Raspberry Pi
After installing MongoDB, you can use the cat /etc/mongodb.conf command to get a printout of the MongoDB configuration for the Raspberry Pi; this command will also allow you to verify that MongoDB is indeed there.
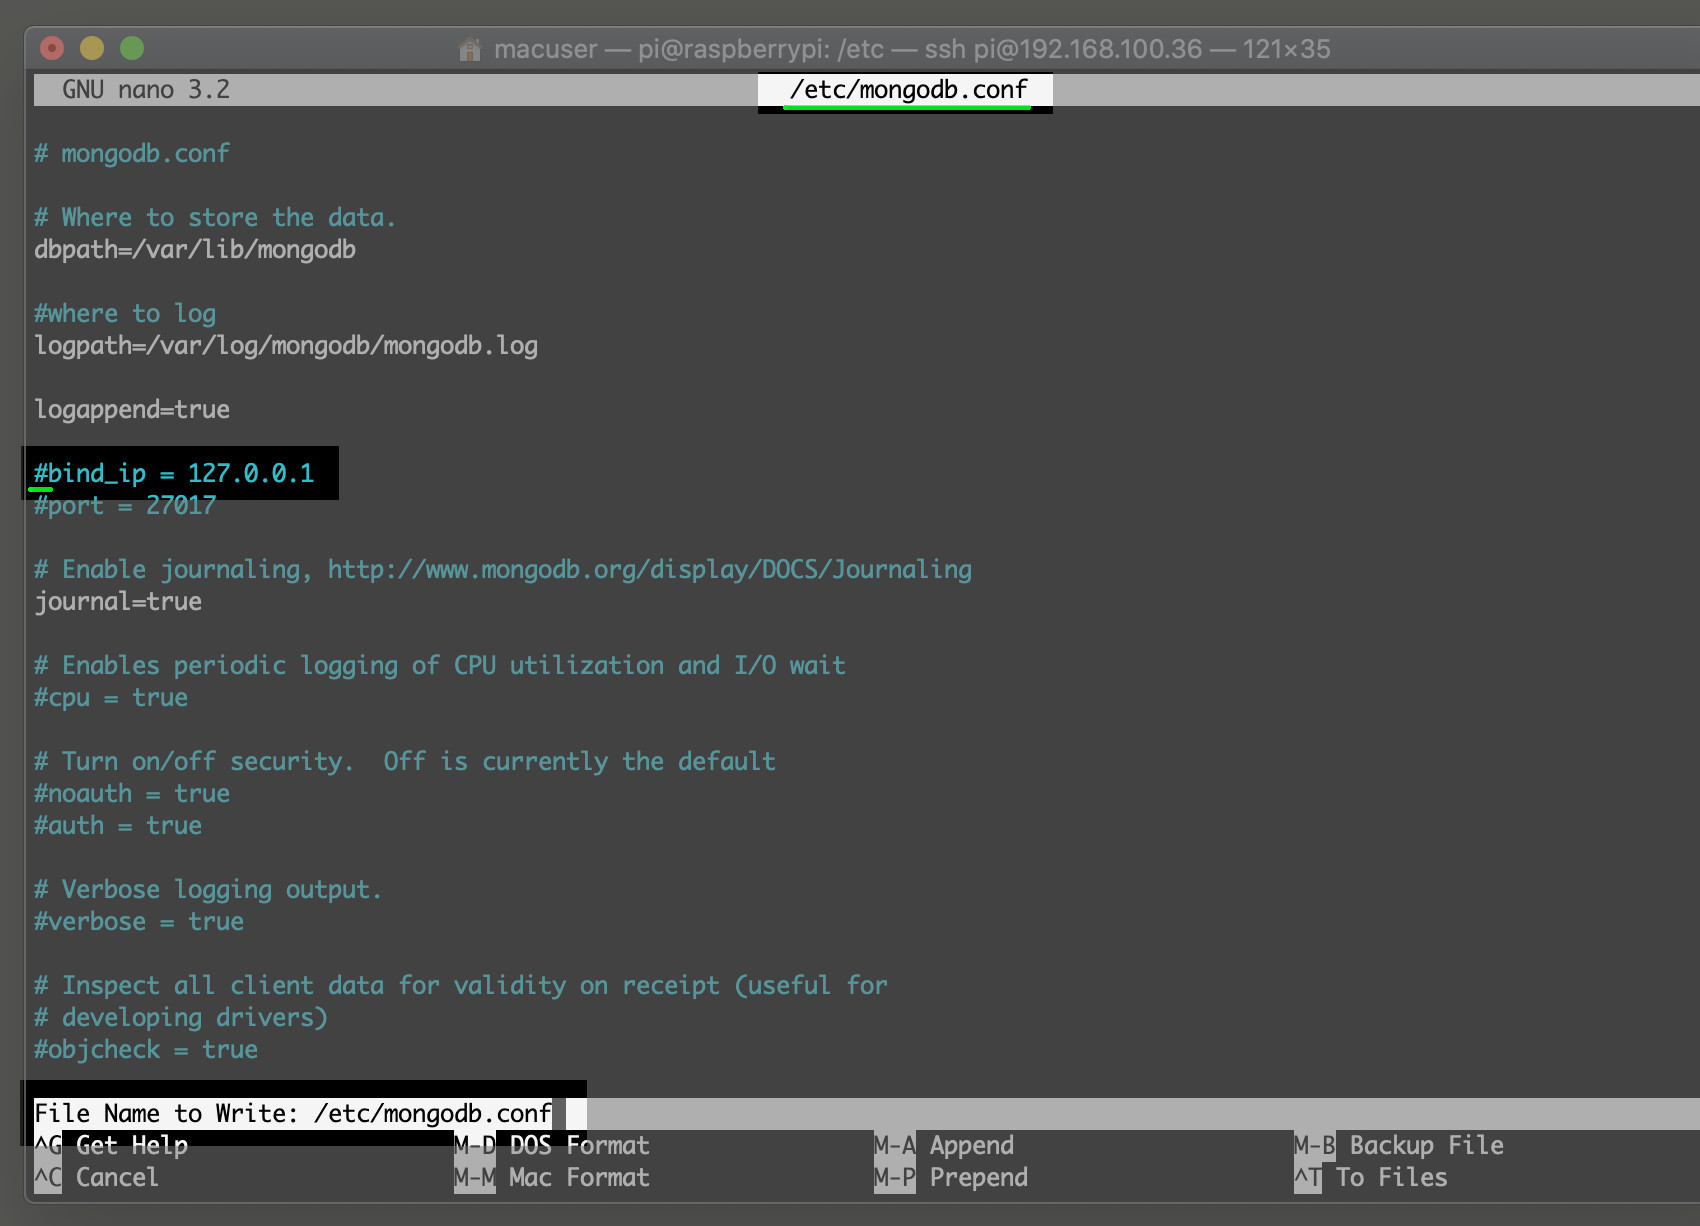
Now, let’s use a terminal-based text editor like vim, nano or gedit to modify the /etc/mongodb.conf configuration file:
1 | sudo nano /etc/mongodb.conf |
Look for the bind_ip = 127.0.0.1 line in the file and comment it out with a hashtag (#) at the start of the line. Once you restart the service, MongoDB will assign it an IP address for the local network.
NOTE: If you’re using nano, you can write the changes to the file using CTRL+O. To close nano and exit back to your Raspberry Pi SSH terminal connection, simply press CTRL+X.
Once you’ve finished, be sure to save your file and restart the MongoDB server using the command shown below:
1 | sudo systemctl restart mongodb |
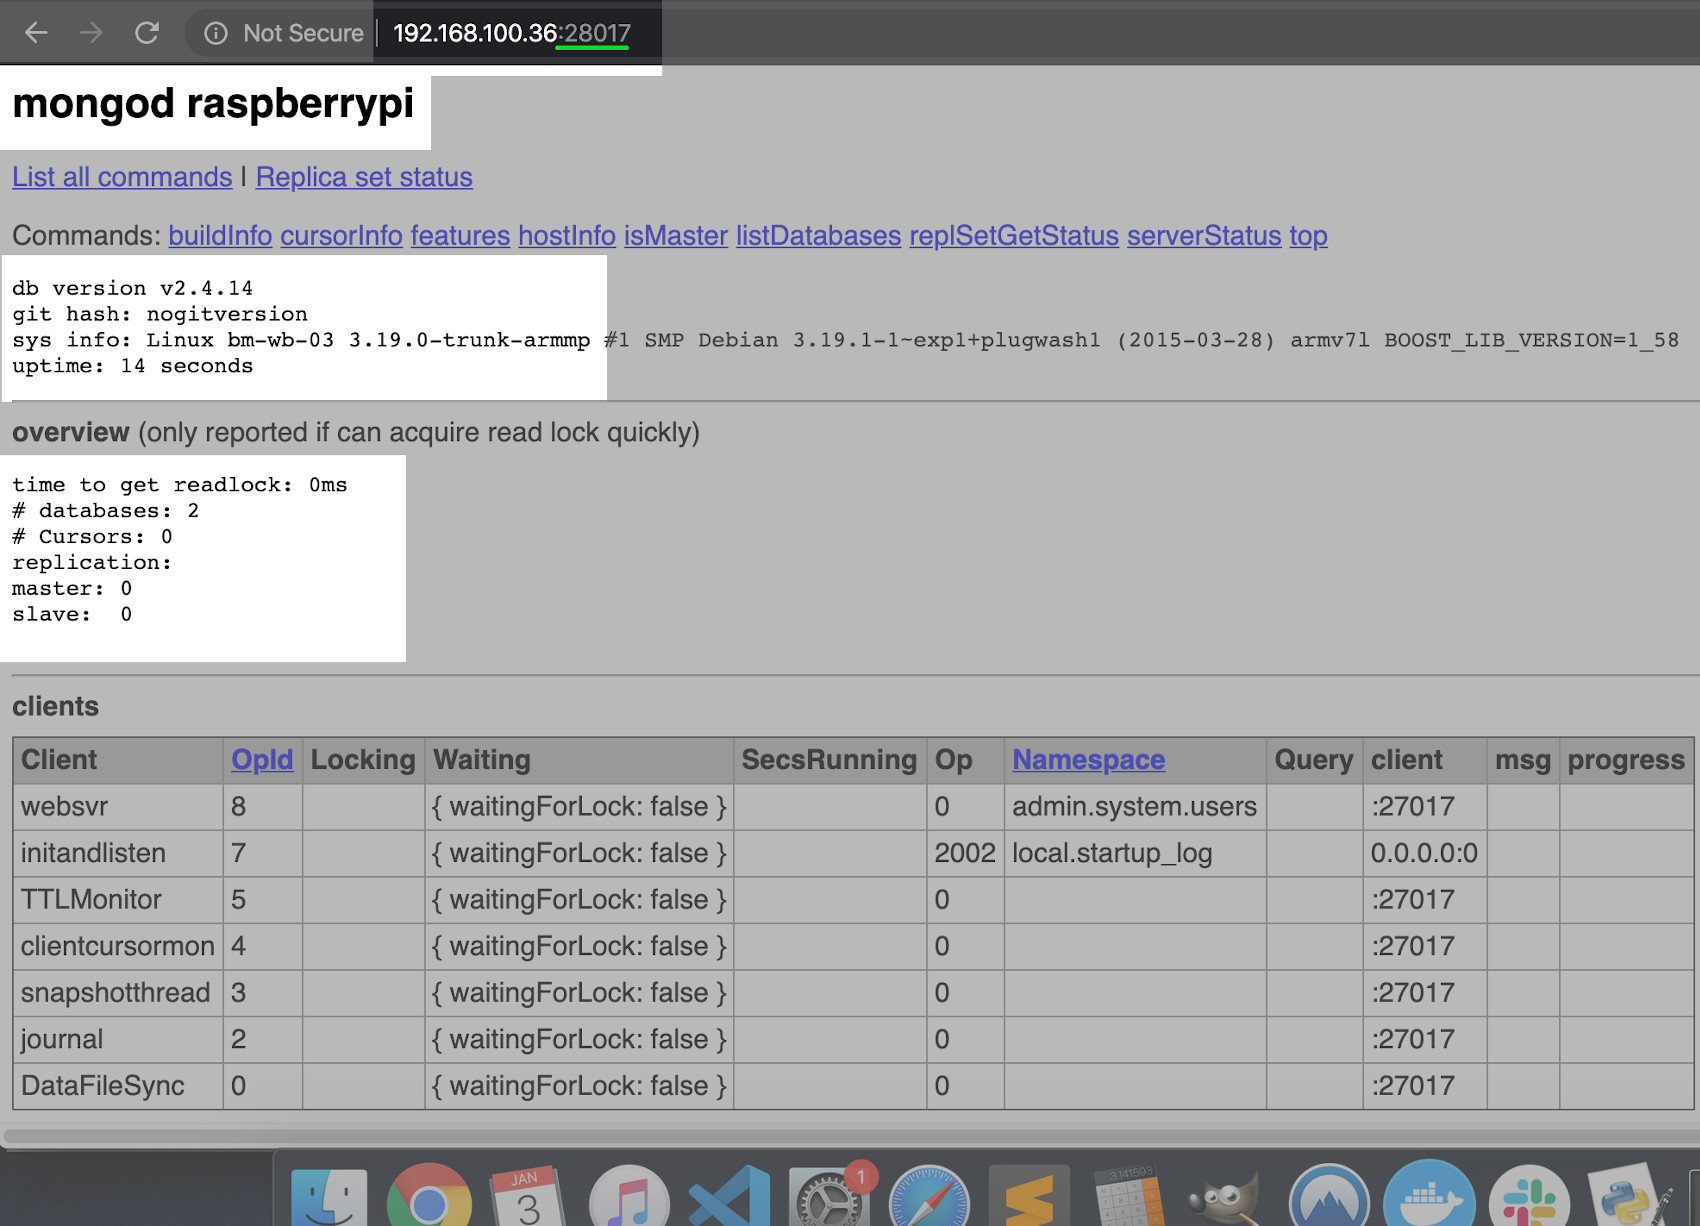
Next, you’ll need to open a browser on any device connected to your network and navigate to your Raspberry Pi’s IP address. This address needs to be followed by :28017. You should see the following webpage load:
Mongo CLI in Raspberry Pi
At this point, you should be able to access the Mongo CLI on the Raspberry Pi as well. The mongo --help command can be used to verify that the CLI is working.
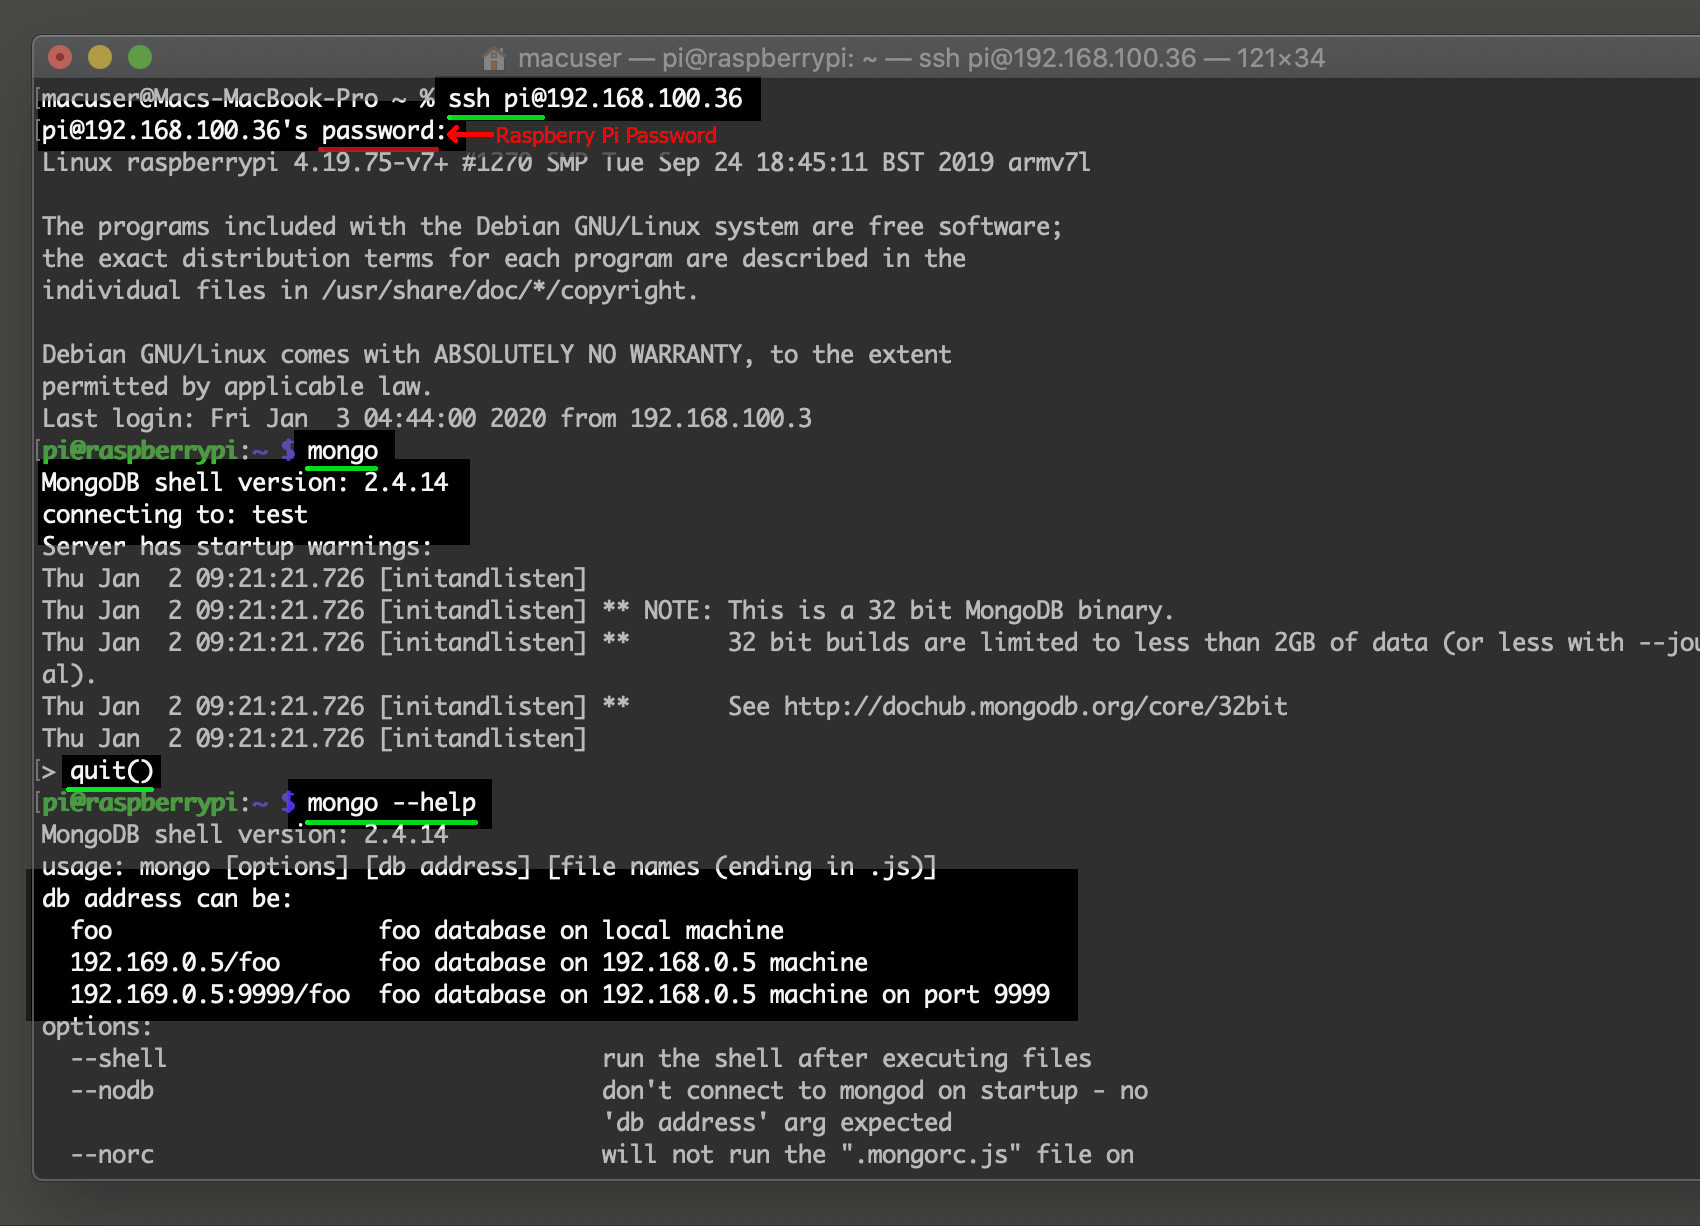
You can access the Mongo interface using the mongo command; alternatively, you can use something like the following to connect to a specified host and port:
1 | mongo --host 192.168.100.36 --port 28017 |
It’s also possible to use the --ssl option to connect with a more secure SSL connection:
1 | mongo --ssl --host 192.168.100.36 --port 28017 |
Raspbian only supports v2.4 of MongoDB
It’s important to note that as of Jan 2020, MongoDB only supports v2.4 of its server on the ARM-based Raspbian Linux distribution.
You can use the following command to check the version of MongoDB that you’re using:
1 | db.version() |
If you’re running Raspbian, it’s likely that you’ve installed an older version of MongoDB.
Property ‘insertOne’ of object is not a function
Older versions of MongoDB will return a type error if you attempt to use the insertOne() function in versions of MongoDB older than 3.x. An example of the error is shown below:
1 2 | TypeError: Property 'insertOne' of object someDB.someColl is not a function |
If you’re planning to use a driver like PyMongo or Mongoose on the Raspberry Pi, make sure that the module is compatible with older versions of MongoDB like the default one on Raspbian.
Older MongoDB insert document example
You’ll need to use the insert() function instead of insertOne() if you’re running an older Raspbian version of MongoDB, as seen in the following example:
1 2 | use raspberryDb db.raspberryCol.insert( { 'foo':'bar' } ) |
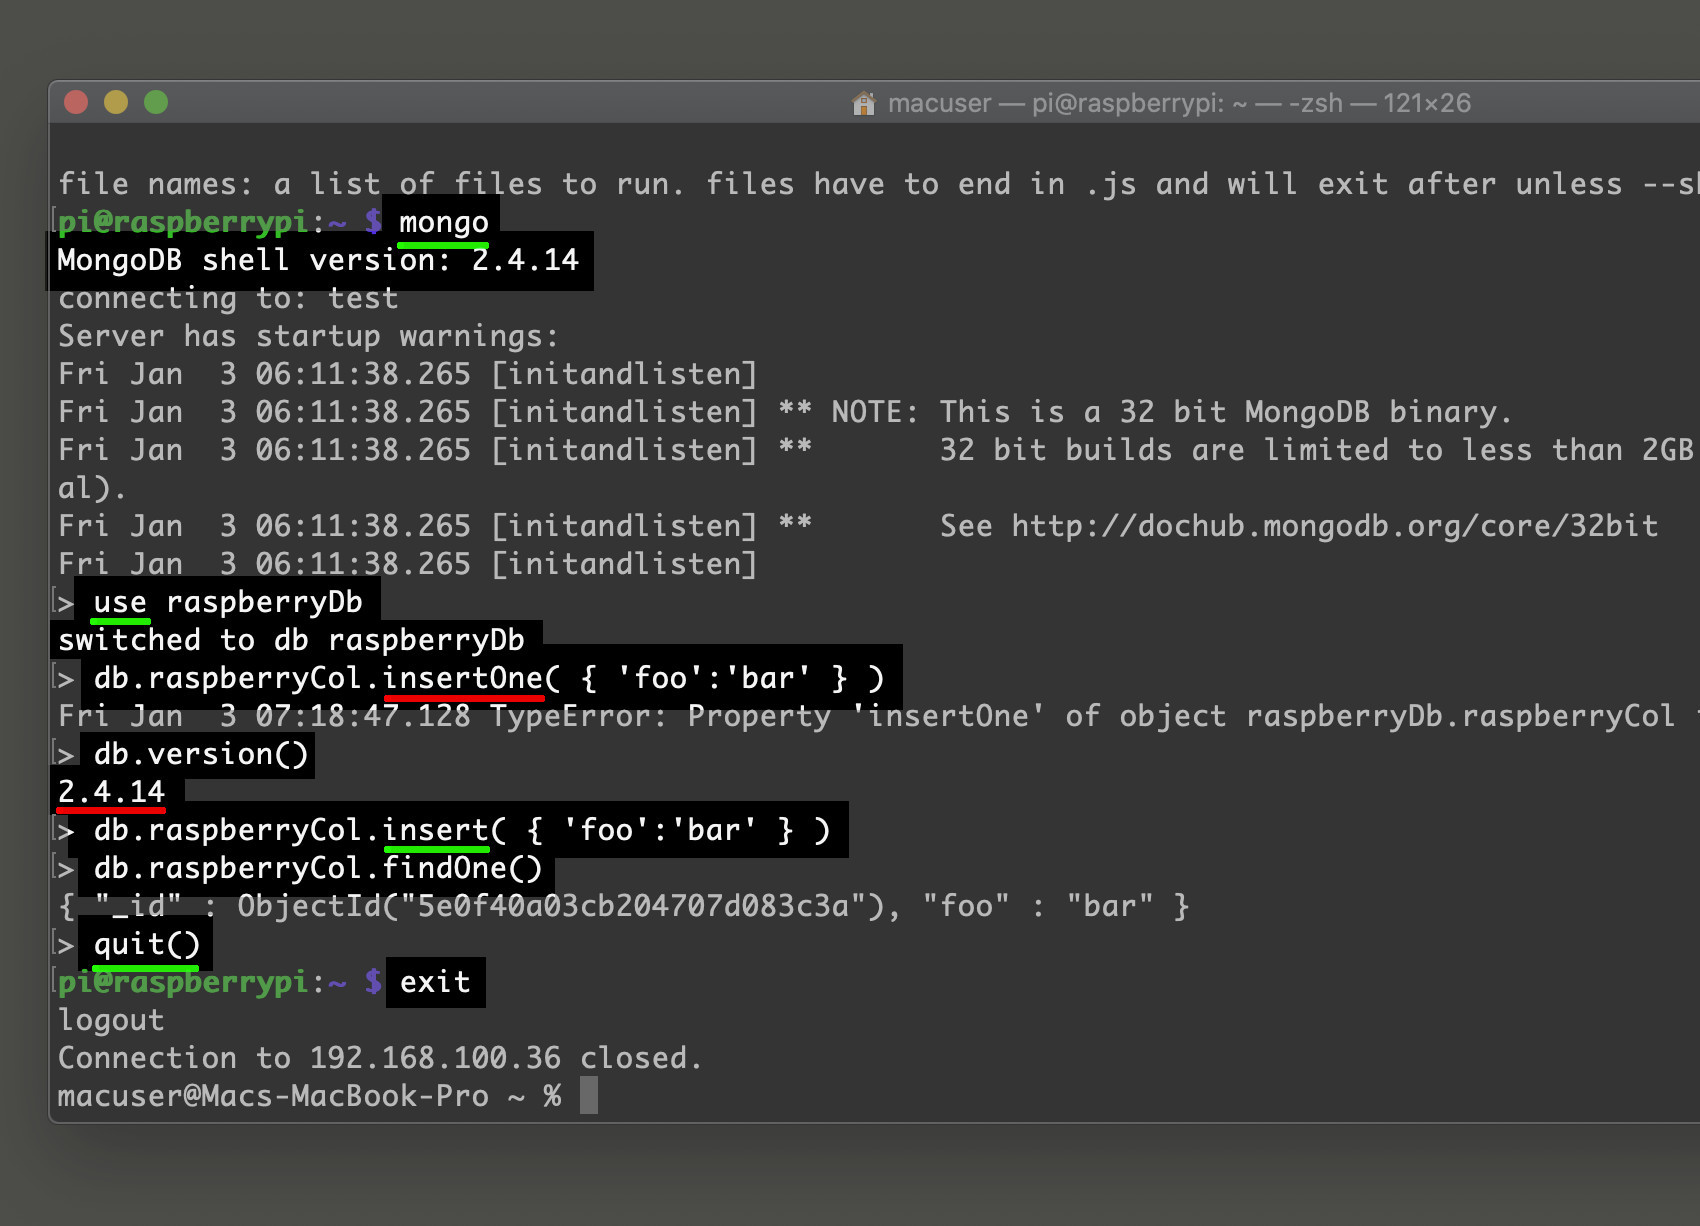
Once you’ve completed your work in Mongo CLI you can type quit() to exit the interface.
Remove MongoDB
If you need to remove MongoDB from your Raspberry Pi, you’ll need to first stop the service with the following command:
1 | sudo service mongod stop |
Then, you can use the following commands to remove and purge all packages associated with MongoDB:
1 2 3 | sudo apt-get purge mongodb mongodb-clients mongodb-server mongodb-dev sudo apt-get purge mongodb-org* sudo apt-get autoremove |
Finally, use the rm command with the recursive (-r) option to remove the database and log files:
1 2 | sudo rm -r /var/log/mongodb sudo rm -r /var/lib/mongodb |
When you’re done, type exit to disconnect from the secure SSH connection to your Raspberry Pi, then close your terminal window.
Conclusion
This article concludes our two-part tutorial series demonstrating how to install and set up MongoDB on Raspberry Pi. Our step-by-step instructions first walked you through the process of installing Raspbian Linux on an SD card; this operating system can be used in a Raspberry Pi single-board computer in order to run a MongoDB server. We then reviewed the steps needed to install and run MongoDB on the Raspberry Pi device. If you follow along with these instructions, you’ll be prepared to set up and start using MongoDB on your Pi as a local server for development.
Pilot the ObjectRocket Platform Free!
Try Fully-Managed CockroachDB, Elasticsearch, MongoDB, PostgreSQL (Beta) or Redis.
Get Started


