How to Use Mongoose with a db
Introduction
MongoDB is one of the most popular NoSQL databases. It stores data in BSON format (an extension of JSON). It is relatively faster than SQL databases and handles unstructured data very efficiently. MongoDB is often used with NodeJS.
For object mapping between MongoDB and NodeJS, a library known as Mongoose is used.
Mongoose is an Object Data Modeling library. It provides schema validation and manages relationships between data. So let’s discuss how can we use mongoose with a db – aka database.
Installing express and mongoose
The first step is to install some necessary packages. Create a new folder and name it whatever you like. Then open a terminal and move to the newly created folder. We need a package.json file to start. Run the following command to create a package.json file.
1 | npm init -y |
The next step is to install express. Express will provide all the necessary node modules.
1 | npm install express |
The last step here is to install mongoose.
1 | npm install mongoose |
We also need nodeman to run the server.
1 | npm install -g nodemon |
Creating schema
The next step is to create a schema for the database. As MongoDB is a schemaless database, we use mongoose for creating the schema. To create a schema, create a new file and name it “model.js”. We will create the schema in this file.
First of all, we need mongoose in this file.
1 | var mongoose = require("mongoose"); |
Next, we need a reference to the schema.
1 | var Schema = mongoose.Schema; |
Suppose the database will contain details of various dogs of a kennel. It will have their names, age, and breed. So let’s create it.
1 2 3 4 5 6 7 8 9 10 11 | var kennels = new Schema({ name: { type: String }, age: { type: Number }, breed: { type: String } }); |
The schema is ready. The next step is to create a model for the collection we created and export it.
1 | module.exports = mongoose.model("kennels", kennels); |
The model is ready and this is how model.js file looks.
1 2 3 4 5 6 7 8 9 10 11 12 13 14 15 16 | var mongoose = require("mongoose"); var Schema = mongoose.Schema; var kennels = new Schema({ name: { type: String }, age: { type: Number }, breed: { type: String } }); module.exports = mongoose.model("kennels", kennels); |
Connection with MongoDB
Let’s connect with the database.
In the same folder, create a new file and name it “index.js”. This will be the starting point of the application. Let’s import express and mongoose.
1 2 | var mongoose = require("mongoose"); const express = require("express"); |
Next, we need an instance of express.
1 | const app = express(); |
The model we created earlier is also needed in this file. Let’s import it.
1 | var kennels = require("./model.js"); |
Now pay attention to the next step. It is the most important part. We need the URI that will specify the database in the localhost.
1 | var uri = "mongodb://127.0.0.1:27017/kennels"; |
Here, ‘127.0.0.1’ is the localhost and ‘27017’ is the default port on which MongoDB runs. ‘Kennels’ is the name of the database.
Finally, we can connect to MongoDB using the connect() method. The URI we created will be the first parameter of this method.
1 | mongoose.connect(uri, { useUnifiedTopology: true, useNewUrlParser: true }); |
The second parameter is an object to avoid warnings.
The final step is to create a connection and run the server on a port.
1 2 3 4 5 6 7 8 9 | const connection = mongoose.connection; connection.once("open", function() { console.log("MongoDB database connection established successfully"); }); app.listen(4000, function() { console.log("Server is running on Port: 4000"); }); |
This is how index.js looks.
1 2 3 4 5 6 7 8 9 10 11 12 13 14 15 16 | var mongoose = require("mongoose"); const express = require("express"); const app = express(); var kennels = require("./model.js"); var uri = "mongodb://127.0.0.1:27017/kennels"; mongoose.connect(uri, { useUnifiedTopology: true, useNewUrlParser: true }); const connection = mongoose.connection; connection.once("open", function() { console.log("MongoDB database connection established successfully"); }); app.listen(4000, function() { console.log("Server is running on Port: 4000"); }); |
Let run the server using nodemon.
1 | nodemon index |
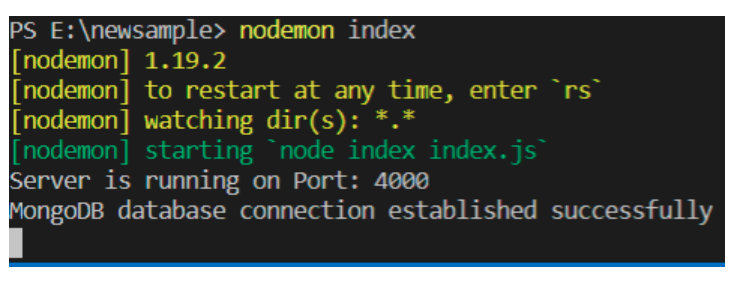
So the server is working. To check the schema, let’s insert some data into the database. The following route handle will insert data in the database.
1 2 3 4 5 6 7 8 9 10 11 12 | router.route("/addData").post(function(req, res) { kennels.create({ name: "Rambo", age: 5, breed: "Pitbull" }, function( err, result ) { if (err) { res.send(err); } else { res.send(result); } }); }); |
We also need to insert a router instance in the file. This is how the final index.js looks.
1 2 3 4 5 6 7 8 9 10 11 12 13 14 15 16 17 18 19 20 21 22 23 24 25 26 27 28 29 30 31 | var mongoose = require("mongoose"); const express = require("express"); const app = express(); var kennels = require("./model.js"); var uri = "mongodb://127.0.0.1:27017/kennels"; const router = express.Router(); mongoose.connect(uri, { useUnifiedTopology: true, useNewUrlParser: true }); const connection = mongoose.connection; connection.once("open", function() { console.log("MongoDB database connection established successfully"); }); router.route("/addData").post(function(req, res) { kennels.create({ name: "Rambo", age: 5, breed: "Pitbull" }, function( err, result ) { if (err) { res.send(err); } else { res.send(result); } }); }); app.use("/", router); app.listen(4000, function() { console.log("Server is running on Port: 4000"); }); |
Let’s execute the route handler using the postman tool. You can download the postman tool from www.getpostman.com.
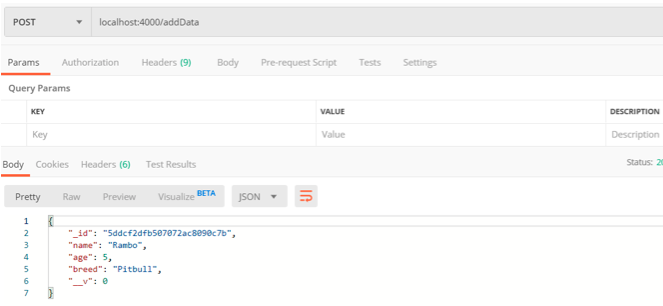
Yes, the document is inserted successfully.
Conclusion
Thank you for reading our tutorial on how to use Mongoose with a database. Mongoose is a great ODM for MongoDB that is very popular in the developer community. We also used the express framework for NodeJS and nodemon to monitor our files and rerun the application when any changes were made. Thanks for joining us and please don’t hesitate to reach out to us at Object Rocket for all of your database needs.

Pilot the ObjectRocket Platform Free!
Try Fully-Managed CockroachDB, Elasticsearch, MongoDB, PostgreSQL (Beta) or Redis.
Get Started