How to Save MongoDB Documents using Spring Data Part 2
Introduction
This is part two in the tutorial series explaining how to save MongoDB documents using Spring data. Directions were provided in part one of the series on how to configure a spring boot project with the online tool ‘Spring Initializr’ and import it as a Maven project. Part one also created Java classes for the project that will be used in this section to explain how to save a MongoDB document using spring data via ECLIPSE IDE.
Prerequisites
- Have a thorough understanding of part one of this tutorial series as it is the foundation of how to save MongoDB document using Spring data.
Creating MongoDB Annotations
The MongoDB specific annotations must be defined in order for the Java classes to work seamlessly with MongoDB. As the Hotel.java class is the aggregate route, the applied entity must have the required annotations. This is accomplished with the following code:
1 2 3 4 5 6 7 8 9 10 |
Using the
@Documentannotation at the class level implies this class will be treated as a MongoDB document and saved in its database. The collection where the details will be stored will be named ‘(collection = “Resorts”)’.The
@Idannotation will map theidof the Resort.java class to the MongoDB ‘_Id’ field.
NOTE: The MongoDB ‘_Id’ field is an ObjectId type. MongoDB uses this, by default, to store the identifier.
Creating a MongoDB Repository.
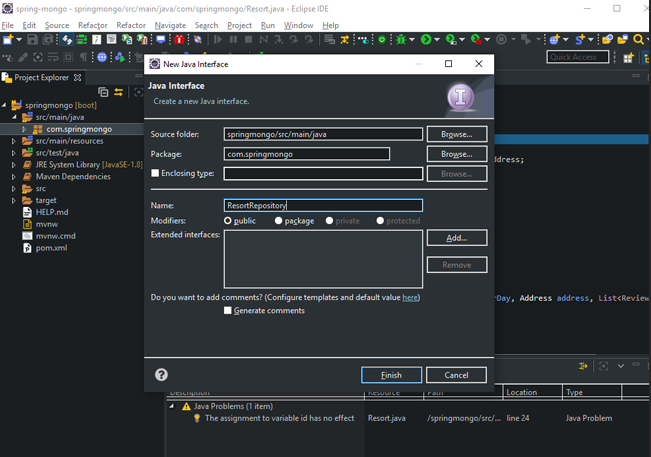
With the domain set up, now add the MongoDB Repository to allow performing the SAVE operation with this application. As shown in the following screenshot, execute this by creating a new Java interface file and name it ‘ResortRepository’.
- Now execute the following Java code:
1 2 3 4 5 6 7 8 9 | package com.springmongo; import org.springframework.data.mongodb.repository.MongoRepository; import org.springframework.stereotype.Repository; @Repository public interface ResortRepository extends MongoRepository-Resort, String- { } |
Now extend the
MongoRepository-Resort, String-that requires two types. In this case the type being stored is theResortand the type of the ID isString.The
@Repositoryannotation is used to let the application know this file will be treated as the repository.
NOTE: The MongoRepository is almost identical to the JpaRepository and uses the same methods.
Creating a MongoDB Database via Database seeder.
With the required files and configuration for the basic application established, the database can now be created using a database seeder via spring boot.
This section will cover how to populate the MongoDB database with a basic collection as a sample dataset.
- First, create a new Java class and name it ‘DataSeeder’. Now execute the following code:
1 2 3 4 5 6 7 8 9 10 11 12 13 14 15 16 17 18 19 20 21 22 23 24 25 26 27 28 29 30 31 32 33 34 35 36 37 38 39 40 41 42 43 44 45 46 47 48 49 | package com.springmongo; import java.util.Arrays; import java.util.List; import org.springframework.boot.CommandLineRunner; import org.springframework.stereotype.Component; @Component public class DataSeeder implements CommandLineRunner{ // lets reference our repository private ResortRepository resortRepository; // Creates a constructor of the DataSeeder public DataSeeder(ResortRepository resortRepository) { this.resortRepository = resortRepository; } @Override public void run(String... args) throws Exception { Resort bythesea = new Resort( "ByTheSea", "12345", 100, new Address("Olongapo","Region 3"), Arrays.asList( new Review("Rommel", 9, false), new Review("Risa", 9, true) ) ); Resort elnido = new Resort( "ElNido", "4567", 300, new Address("Palawan","MIMAROPA"), Arrays.asList( new Review("Rommel", 10, false), new Review("Risa", 10, true) ) ); // delete all resorts if already exist this.resortRepository.deleteAll(); // add resorts to database List<Resort> resort = Arrays.asList(bythesea,elnido); this.resortRepository.saveAll(resort); } } |
- The class implements a
CommandLineRunnerthat will start when the spring boot is initiated. - The
@Componentannotation will treat the Java class as a bean so the spring component-scanning mechanism can remove it and then add it to the application. - Now create two Resort documents, specifically ‘bythesea’ and ‘elnido’
- Next, use the
.deleteAll()method for spring to drop any existing documents. - Finally, save all the Resort documents using the
saveAll()method.
Creating the Java Controller Class
This section will cover how to create the controller for the basic app.
- First, create a Java class and name it
ResortRepository.java. - Now execute the following Java code:
1 2 3 4 5 6 7 8 9 10 11 12 13 14 15 16 17 18 19 20 21 22 23 24 | package com.springmongo; import java.util.List; import org.springframework.web.bind.annotation.RequestMapping; import org.springframework.web.bind.annotation.RestController; @RestController @RequestMapping("/resorts") public class ResortController { private ResortRepository resortRepository; public ResortController(ResortRepository resortRepository) { this.resortRepository = resortRepository; } public List<Resort> getAll() { List<Resort> resorts = this.resortRepository.findAll(); return resorts; } } |
Configuring MongoDB Database Connection
With all of the Java classes properly configured, the database connection will be created using the spring application.properties file.
- Execute the following code to establish the database connection:
1 2 3 4 5 6 | // localhost for the host spring.data.mongodb.host=localhost // mongodb port spring.data.mongodb.port=27017 // the name of our database spring.data.mongodb.database=ResortDB |
The application can now be started by simply clicking on the ECLIPSE “Run” button.
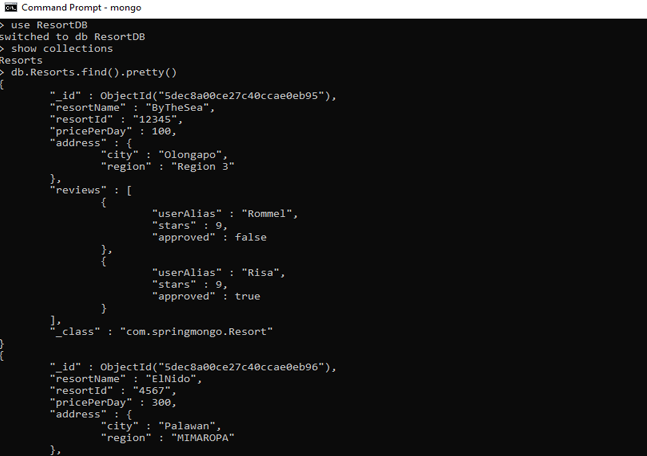
Referring to the following screenshot, it can now be confirmed via mongoshell if the initial documents, set earlier, were successfully saved within the MongoDB:
Saving a Record in MongoDB using Spring
Recall that the method saveAll() was used to save all of the Resort entities created previously. This section will explain how to save a just single document to a MongoDB collection.
First, modify the ResortController.java file.
Now execute the following code:
1 2 3 4 | @PostMapping public void update(@RequestBody Resort resort) { this.resortRepository.save(resort); } |
The
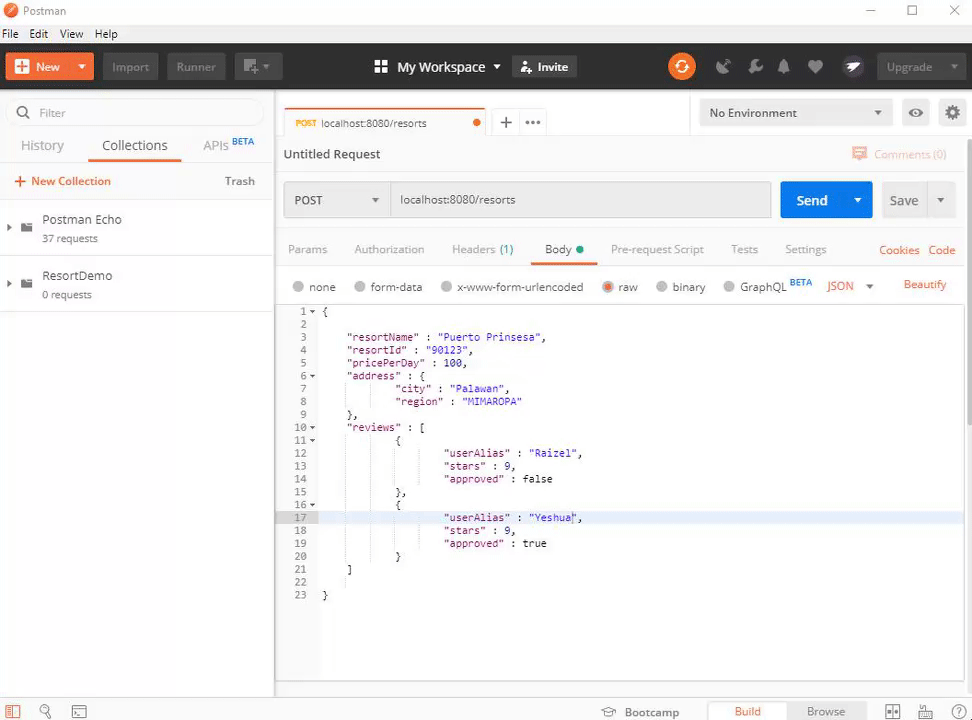
@PostMappingannotation was used for this function as it will handle the POST request with a given matching URI.As shown in the following screenshot, this function can be tested using an application named ‘Postman’.
The results should look something like the following in Mongo shell:
1 2 3 4 5 6 7 8 9 10 11 12 13 14 15 16 17 18 19 20 21 22 23 | { "_id" : ObjectId("5dec916ece27c40ccae0eb97"), "resortName" : "Puerto Prinsesa", "resortId" : "90123", "pricePerDay" : 100, "address" : { "city" : "Palawan", "region" : "MIMAROPA" }, "reviews" : [ { "userAlias" : "Raizel", "stars" : 9, "approved" : false }, { "userAlias" : "Yeshua", "stars" : 9, "approved" : true } ], "_class" : "com.springmongo.Resort" } |
Conclusion
This was part two of the tutorial series How to Save MongoDB Document using Spring Data. Specifically, part two went into detail on creating MongoDB annotations, creating a MongoDB repository, creating a MongoDB database via the database seeder, creating the Java controller class, configuring the MongoDB database connection and saving a record in MongoDB using Spring data. Remember that the MongoDB annotations must be specified in order for the Java classes to work seamlessly with MongoDB when creating MongoDB annotations.


Pilot the ObjectRocket Platform Free!
Try Fully-Managed CockroachDB, Elasticsearch, MongoDB, PostgreSQL (Beta) or Redis.
Get Started