How to Insert MongoDB Document using Spring Data Part 1
Introduction
This is part one of a tutorial series that will provide a step-by-step explanation on how to set up a Spring project, insert MongoDB document using Spring data and integrate it with a MongoDB database on its back-end. ECLIPSE IDE as well as Postman, a powerful HTTP client used for testing, developing and documenting APIs, will be used in this tutorial series.
Prerequisites
The following prerequisites are required before proceeding with this tutorial series.
- ECLIPSE Integrated Development Environment must be installed and working properly. ECLIPSE can be download at: Eclipse-span-.org
- Access to the online tool at: Spring Initializr
- Postman software must be installed and working properly. Postman can be download here: getpostman-span-.com
- A basic understanding of how to use the ECLIPSE IDE.
- Java must be installed and properly configured. Following is the Java version used in this tutorial:
1 2 | java version "1.8.0_221" Java(TM) SE Runtime Environment (build 1.8.0_221-b11) |
Creating The Spring Project
Begin by creating the Spring project using the Spring Initializr online tool as outlined here:
- First, open the browser and navigate to the following URL: https:-span-//start.-span-spring-span-.io
- Execute the steps shown in the following screenshot:
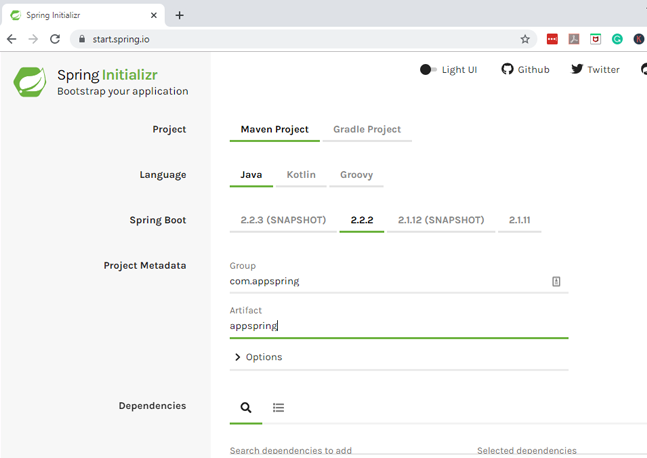
As shown, the group name
com.appspringwas provided for this purpose, however, other names can be used as needed.Next, dependencies will be added by using the search bar provide in the application. This tutorial will make use of Spring web and Spring data MongoDB as shown in the following screenshot:
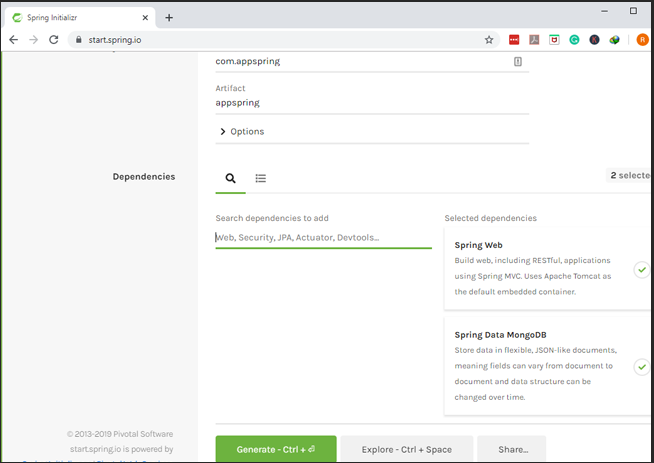
- After the dependencies are added, click on the ‘Generate’ button to download the project file that was just configured.
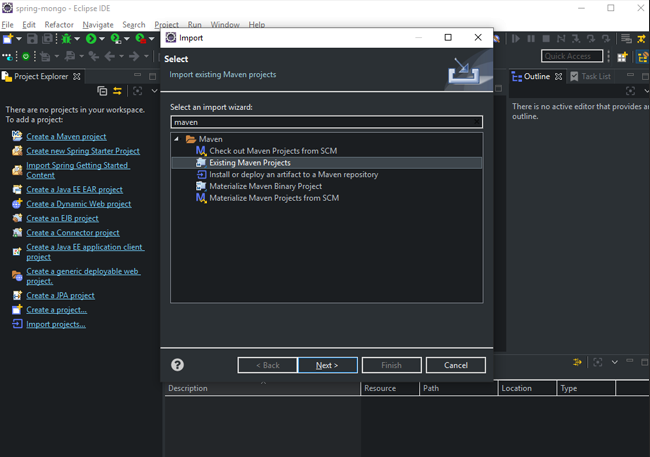
- Next, open up the ECLIPSE application and import the file as an ‘Existing Maven Project’, as shown here:
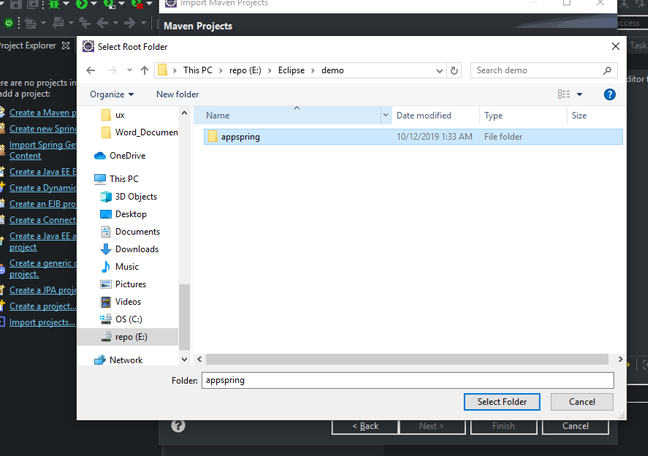
- Now select the extracted file as shown in the below image:
- As shown in the following screenshot, the Spring boot project has now been created:

Creating the Java Classes in ECLIPS IDE
Now a category of products for a fictitous company will be created. This will require three Java domains named: Product.java; ManDetails.java; and ShipDetails.java.
Execute the following steps to create a Java class:
- First, right-click on the main package
com.appspring. Then select ‘New’ and then ‘Class’ under the sub-menu.
Type in the name of the first Java class, here being
product.- Finally, click the ‘Finish’ button to create the Java class.
NOTE: This process will be identical whenever a Java class is created.
Coding the Java Class Domains
This section will cover creating the rest of the Java class domains and adding the required code for each domain.
Coding the Java Class Product.java
Open up the Product.java file and execute the following Java code:
1 2 3 4 5 6 7 8 9 10 11 12 13 14 15 16 17 18 19 20 21 22 23 24 25 26 27 28 29 30 31 32 33 34 35 36 37 38 39 40 41 42 43 44 45 46 47 48 49 50 51 | package com.appspring; public class Product { private String sku; private String title; private String description; private ManDetails manDetails; private ShipDetails shipDetails; private int quantity; private int price; public Product(String sku, String title, String description, ManDetails manDetails, ShipDetails shipDetails, int quantity, int price) { this.sku = sku; this.title = title; this.description = description; this.manDetails = manDetails; this.shipDetails = shipDetails; this.quantity = quantity; this.price = price; } public String getSku() { return sku; } public void setSku(String sku) { this.sku = sku; } public String getTitle() { return title; } public void setTitle(String title) { this.title = title; } public String getDescription() { return description; } public void setDescription(String description) { this.description = description; } public ManDetails getManDetails() { return manDetails; } public void setManDetails(ManDetails manDetails) { this.manDetails = manDetails; } public ShipDetails getShipDetails() { return shipDetails; } public void setShipDetails(ShipDetails shipDetails) { this.shipDetails = shipDetails; } public int getQuantity() { return quantity; } public void setQuantity(int quantity) { this.quantity = quantity; } public int getPrice() { return price; } public void setPrice(int price) { this.price = price; } } |
The above code will create the constructors and the getter-and-setters of this Java class.
NOTE: The same procedure will be used in creating the other Java-class domains.
Coding the Java Class MandDetails.java
The Java class created with the following code holds the fields for the manufacturing details of each product:
1 2 3 4 5 6 7 8 9 10 11 12 13 14 15 16 17 18 19 20 21 22 23 24 25 26 27 28 29 30 31 | package com.appspring; public class ManDetails { private String modelNumber; private String partNumber; protected ManDetails() {} public ManDetails(String modelNumber, String partNumber) { this.modelNumber = modelNumber; this.partNumber = partNumber; } public String getModelNumber() { return modelNumber; } public void setModelNumber(String modelNumber) { this.modelNumber = modelNumber; } public String getPartNumber() { return partNumber; } public void setPartNumber(String partNumber) { this.partNumber = partNumber; } } |
Coding the Java Class ShipDetails.java
The Java class created with the following code holds the fields for the shipment details of the products:
1 2 3 4 5 6 7 8 9 10 11 12 13 14 15 16 17 18 19 20 21 22 23 24 25 26 27 28 29 30 31 32 33 | package com.appspring; public class ShipDetails { private int weight; private int width; private int height; private int depth; protected ShipDetails() {} public ShipDetails(int weight, int width, int height, int depth) { this.weight = weight; this.width = width; this.height = height; this.depth = depth; } public int getWeight() { return weight; } public void setWeight(int weight) { this.weight = weight; } public int getWidth() { return width; } public void setWidth(int width) { this.width = width; } public int getHeight() { return height; } public void setHeight(int height) { this.height = height; } public int getDepth() { return depth; } public void setDepth(int depth) { this.depth = depth; } } |
Conclusion
This was part one of a multipart tutorial series explaining how to set up a Spring project, insert MongoDB document using Spring data and integrate it with a MongoDB database. Part one specifically discussed the various tools used for setting up the project, such as Spring and ECLIPSE. Part one also discussed setting up the basic structure of the application by creating the Java domains. Part two in this series will go into detail on how to configure Spring data for MongoDB annotations, create a Spring data MongoDB repository, a sample dataset and how to configure the MongoDB database connection.

Pilot the ObjectRocket Platform Free!
Try Fully-Managed CockroachDB, Elasticsearch, MongoDB, PostgreSQL (Beta) or Redis.
Get Started