How to insert MongoDB Document using Laravel
Introduction
This tutorial will explain the steps required for configuring Laravel to perform an insert operation against a MongoDB document. Laravel is a PHP web-application framework using a refined syntax that is designed to make the common tasks of authentication, routing and caching simpler. As MongoDB is an excellent data storage system for API-heavy applications, the two programs are compatible and complement each other nicely when used to insert MongoDB document using Laravel.
Prerequisites
Composer must be properly installed and configured to install Laravel and create the Laravel project(s). Composer can be downloaded at: (https://getcomposer.org/Composer-Setup.exe)
[XAMMP] must be installed and can be download at: (https://www.apachefriends.org/xampp-files/7.1.33/xampp-windows-x64-7.1.33-0-VC14-installer.exe). It can be ran as a service.
Have a working text editor; this tutorial will be using [Visual Studio Code] that can be downloaded at: (https://code.visualstudio.com/download).
- The compatible
php_mongodb.dllfor the installed PHP version on the host system must be download and set up beforehand. - MongoDB must be properly installed and configured. Enter the following command to obtain the MongoDB version used:
1 | db version v4.2.1 |
- Enter the following command to obtain the PHP version used:
1 | php 7.3.11 |
- The Postman application must be installed and working.
Note: A Windows system was used for executing the examples in this tutorial.
How to Configure MongoDB database in Windows
This section will explain how to configure a MongoDB database in a Windows system to insert MongoDB document using Laravel.
If it has not already been done, the PHP MongoDB driver must be downloaded. For best results, the driver version should be compatible with the currently installed PHP version.
To download the PHP MongoDB driver, execute the following steps in order:
First, extract the downloaded dll file into the PHP extensions directory where XAMPP stores the required dll of the application. The path will be
C:\xampp\php\ext.Next, open the
php.inifile using a text editor, which should be an administrator account, and look for the “extensions” section where the needed extensions for the application can be specified. Then append the following text:exetnsion=php_mongodb.dll.
Note that the driver must be bootstrapped once the server starts.
Installing Laravel
With MongoDB now properly configured, the Laravel project can now be created by executing the following steps in sequence:
- First, navigate to the htdocs (C:xampphtdocs-) and execute the following command:
1 | composer create-project --prefer-dist laravel/laravel laravelmongo |
This command will install Laravel in the system and will create a new directory inside the xampp’s htdocs named “laravelmongo.”
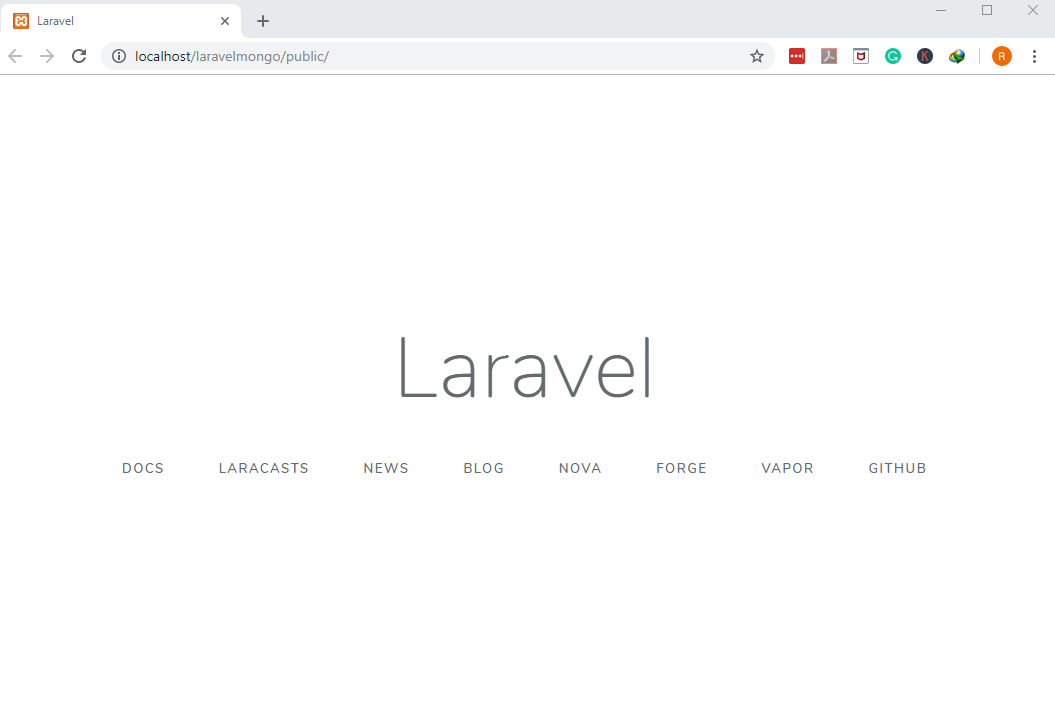
Verify the Laravel project was successfully created by entering the following URL in the browser: http://localhost/laravelmongo/public.
The output should resemble the following:
Setting Up Laravel Virtual Host
This section will explain how to create a virtual host that will customize the URL from this: http://localhost/laravelmongo/public to this: laravelmongo.net.
To do this, execute the following the steps in sequence:
- First, open the
hhtpd-vhosts.conffile, with administrator privileges, within the XAMPP application. - Now navigate to the
C:\xampp\apache\conf\extradirectory and add the following line of texts:
1 2 3 4 5 6 7 8 | <VirtualHost *:80> DocumentRoot "C:/xampp/htdocs" ServerName localhost </VirtualHost> <VirtualHost *:80> DocumentRoot "C:/xampp/htdocs/laravelmongo/public" ServerName laravelmongo.net </VirtualHost> |
Now, for the settings to actually take effect, the system host file must be modified. Navigate to the following URL:
C:\Windows\System32\drivers\etcModify the
hostsfile by appending the following line of texts:
1 2 | 127.0.0.1 localhost 127.0.0.1 laravelmongo.test |
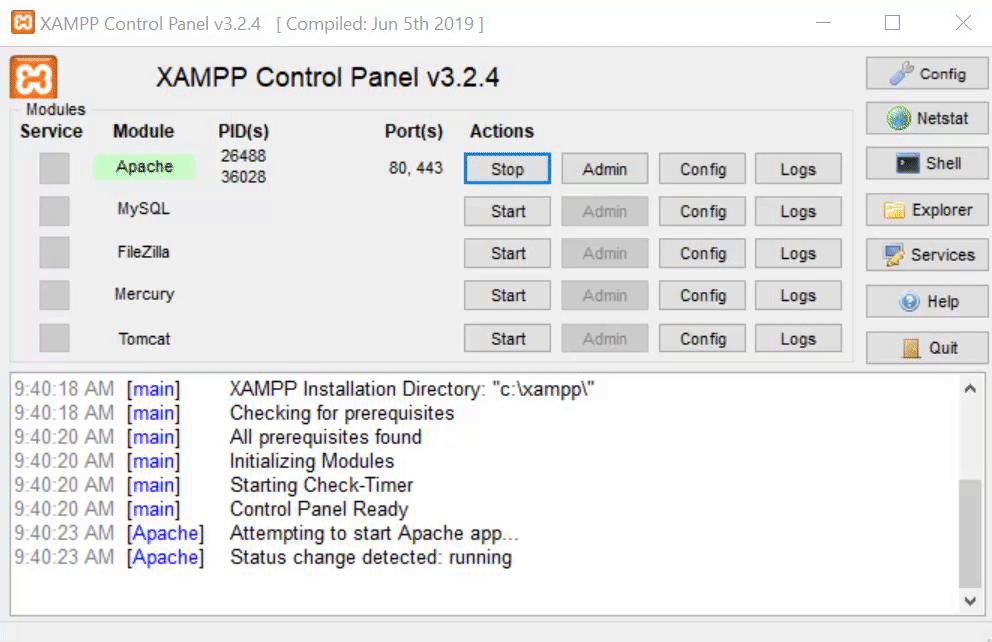
- After saving the changes, restart Apache from the XAMPP panel by clicking on the -kbd-stop-/kbd- and -kbd-start-/kbd- button, as shown in the following image:
Now test the application to confirm it is using the laravelmongo.net URL configured previously.
The output should resemble the following:
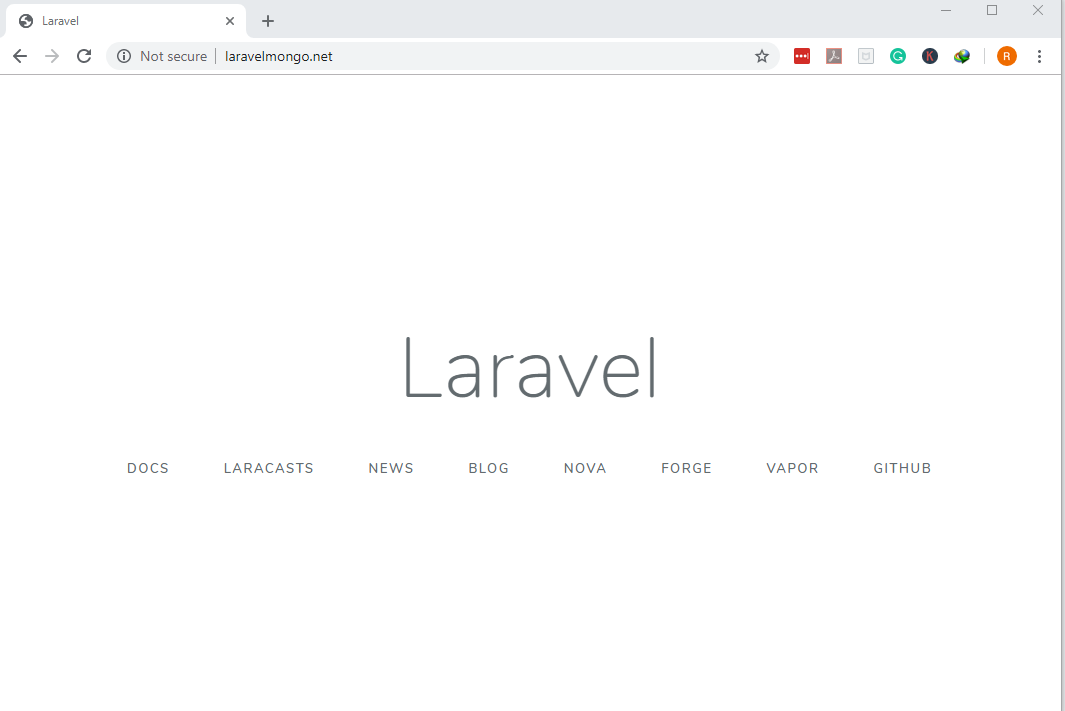
If successful, the applications will now be using the customized URL!
Configure MongoDB Database in Laravel
With a running Laravel application properly set up, the MongoDB database can now be configured to work with the application.
- First, open and append the
.envfile as follows:
1 2 3 4 5 6 | DB_CONNECTION=mongodb DB_HOST=127.0.0.1 DB_PORT=27017 DB_DATABASE=ProductDb DB_USERNAME= DB_PASSWORD= |
- Next, add MongoDB to the database.php under the config directory using the following PHP script:
1 2 3 4 5 6 7 8 9 | 'mongodb' => [ 'driver' => 'mongodb', 'host' => env('MONGO_DB_HOST', 'localhost'), 'port' => env('MONGO_DB_PORT', 27017), 'database' => env('MONGO_DB_DATABASE','ProductDb'), 'username' => env('MONGO_DB_USERNAME'), 'password' => env('MONGO_DB_PASSWORD'), 'options' => [] ], |
NOTE: Remember the mysql in this script’s 'default' => env('DB_CONNECTION', 'mysql'), must be changed to 'default' => env('DB_CONNECTION', 'mongodb')for it to work properly.
Install MongoDB package in Laravel
This process for installing the MongoDB package in Laravel is very straightforward, however, make absolutely certain to execute the following command from the project directory:
1 | composer require jenssegers/mongodb |
Register MongoDB Provider
The MongodbServiceProvider can be registered by appending the following PHP script within the app.php under the config directory as follows:
1 2 3 | 'providers' => [ Jenssegers\Mongodb\MongodbServiceProvider::class, ] |
Create a Laravel Model
This section will cover creating a model for the application using the following command in the command prompt or terminal:
1 | php artisan make:model Product |
This command will generate a new file in the application called Product.php. Open and append that file with the following PHP script:
1 2 3 4 5 6 7 8 9 10 11 12 13 14 15 16 | <?php namespace App; use Illuminate\Database\Eloquent\Model; use Jenssegers\Mongodb\Eloquent\ Model as Eloquent; class Product extends Eloquent { protected $connection = 'mongodb'; protected $collection = 'product'; protected $fillable = [ 'phonecompany', 'model','price' ]; } |
Creating a Laravel View for Inserting MongoDB Document
Create a new template in the application under the directory resources\views and name it create_phone.blade.php.
Now append the following HTML tags to create a form with the {{route('product.store')}} action:
1 2 3 4 5 6 7 8 9 10 11 12 13 14 15 16 17 18 19 20 21 22 23 24 25 26 27 28 29 30 31 32 33 34 35 36 37 38 39 40 41 42 43 44 45 46 47 | <!DOCTYPE html> <html> <head> <meta charset="utf-8"> <title>Create MongoDB</title> <link rel="stylesheet" href="{{asset('css/app.css')}}"> <link href="https://maxcdn.bootstrapcdn.com/bootstrap/3.3.6/css/bootstrap.min.css" rel="stylesheet"> <script src="http://ajax.googleapis.com/ajax/libs/jquery/1.9.1/jquery.js"></script> <script src="https://maxcdn.bootstrapcdn.com/bootstrap/3.3.6/js/bootstrap.min.js"></script> </head> <body> <div class="container"> <h2 class = "text-center">Create MongoDB</h2><br/> <form method="post" action="{{route('product.store')}}"> @csrf <div class="row"> <div class="col-md-4"></div> <div class="form-group col-md-4"> <label for="phonecompany">Phone Company:</label> <input type="text" class="form-control" name="phonecompany"> </div> </div> <div class="row"> <div class="col-md-4"></div> <div class="form-group col-md-4"> <label for="model">Model:</label> <input type="text" class="form-control" name="model"> </div> </div> <div class="row"> <div class="col-md-4"></div> <div class="form-group col-md-4"> <label for="price">Price:</label> <input type="text" class="form-control" name="price"> </div> </div> <div class="row"> <div class="col-md-4"></div> <div class="form-group col-md-4"> <button type="submit" class="btn btn-success">Submit</button> </div> </div> </form> </div> </body> </html> |
The form created by the above code will be defined in the following section.
Create a Laravel Controller and a Route
This section will explain how to create the Laravel controller by executing the following command: php artisan make:controller ProductController
The following code will use Laravel to insert a MongoDB document:
1 2 3 4 5 6 7 8 9 | public function insert(Request $request) { $product = new Product(); $product->phonecompany = $request->get('phonecompany'); $product->model = $request->get('model'); $product->price = $request->get('price'); $product->save(); return ('Phone has been successfully added'); } |
Now the route of the application can be defined by modifying the web.php under the routes directory and executing the following PHP script:
1 2 3 4 5 | Route::get('/', function () { return view('create_phone'); }); Route::post('store',['as' => 'product.store', 'uses' => 'ProductController@insert']); |
Note that the above scripts will load the form as a default homepage and the next code will route the request from the form, here being product.store, to the controller for performing the insert function.
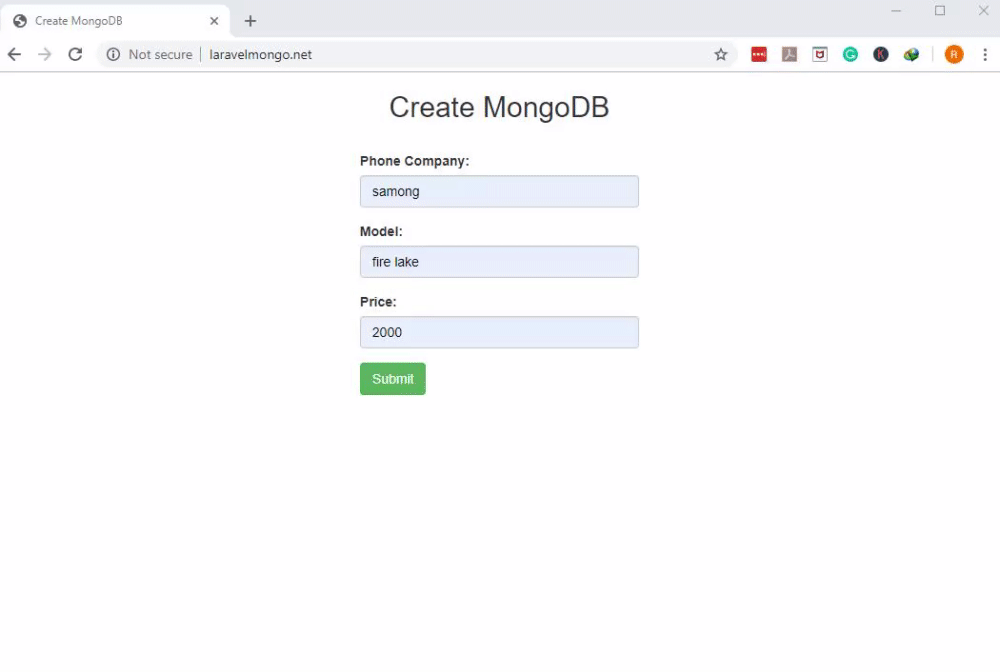
The application can now be tested and should resemble the following:
The insert operation can now be verified via the Mongo shell as follows:
1 2 3 4 5 6 7 8 9 10 11 12 13 14 | > use ProductDb switched to db ProductDb > show collections product > db.product.find().pretty() { "_id" : ObjectId("5df48f91e74c00009c007344"), "phonecompany" : "samong", "model" : "fire lake", "price" : "2000", "updated_at" : ISODate("2019-12-14T07:30:24Z"), "created_at" : ISODate("2019-12-14T07:30:24Z") } > |
Conclusion
This tutorial explained the steps used to insert MongoDB document using Laravel. The article specifically covered how to configure Laravel to work with a MongoDB database and explained how to configure the MongoDB database in Windows, install Laravel and set up the Laravel virtual host. The tutorial also covered how to register the MongoDB provider, create a Laravel model, create a Laravel controller and create a route and how to verify the insert operation was successful via the Mongo shell. Remember that the PHP MongoDB driver must be bootstrapped once the server starts and before trying to insert MongoDB document using Laravel.”


Pilot the ObjectRocket Platform Free!
Try Fully-Managed CockroachDB, Elasticsearch, MongoDB, PostgreSQL (Beta) or Redis.
Get Started