How to Delete MongoDB Document using Spring Data Part 2
Introduction
This article is the second installment in a tutorial series that explains how to delete a MongoDB document using Spring Data. In our previous article, we configured a Spring boot project using the ‘Spring Initializr’— an online tool for creating a Spring project. Then we imported that boot project as a Maven project in our Eclipse IDE. We also created two Java classes to use throughout the tutorial. Now, we’ll pick up where we left off, and we’ll be creating more Java classes to complete our basic application.
Prerequisite
Before moving forward with the instructions in this article, be sure you’ve read and followed along with the steps outlined in the first part of the tutorial. You’ll need to ensure that you’ve set up your Spring project and built the classes that we’re going to work with in this article.
Creating Spring Data MongoDB Annotations
In this section, we’re going to add some Spring Data MongoDB annotations that will enable our Java classes to work with our MongoDB database:
1 2 3 4 5 6 7 8 9 10 |
Let’s take a closer look at these annotations:
The
@Documentannotation indicates that MongoDB will treat this Java class as a document, and it will be saved as a document. We specify the collection name by declaring it inside the annotation as follows:collection = "EmployeeInfo"Annotating a field using
@Idcauses it to be mapped to a MongoDB Id field.
Creating a Spring Data MongoDB Repository
In the previous section, we created our Java domains. Now we’ll be creating a repository that enables us to perform DELETE operations. Let’s get to work:
- First, we’ll create a new Java interface and name it ‘EmpRepo’.
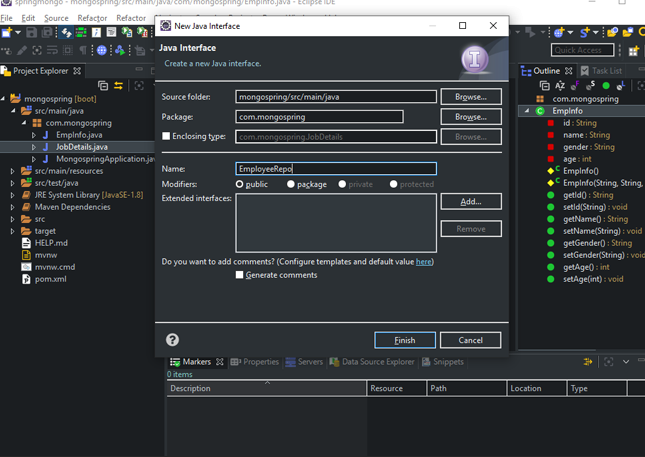
- Next, we’ll use the following code:
1 2 3 4 5 6 7 8 9 | package com.mongospring; import org.springframework.data.mongodb.repository.MongoRepository; import org.springframework.stereotype.Repository; @Repository public interface EmployeeRepo extends MongoRepository<EmpInfo, String> { } |
A couple of key things are going on in this code:
Notice that the
EmployeeRepointerface extends theMongoRepository<EmpInfo, String>. We’ll need to provide the type that we’ll be storing in our database– in this case, it’s theEmpInfo.javaclass. We’ll also provide the type for the id field, which is a String.We annotate this Java class at the class level using the
@Repositoryannotation which makes the class the application repository.
Creating a MongoDB Database via Database Seeder
At this point, we’ve created the initial required files for our basic application. We’re ready to create a database seeder– this will allow us to create a database and insert both a document and a collection.
Let’s create a file for this task and call it ‘DatabaseSeeder’. We’ll add the following code to it:
1 2 3 4 5 6 7 8 9 10 11 12 13 14 15 16 17 18 19 20 21 22 23 24 25 26 27 28 29 30 31 32 33 34 35 36 37 38 39 40 41 42 | package com.mongospring; import java.util.Arrays; import java.util.List; import org.springframework.boot.CommandLineRunner; import org.springframework.stereotype.Component; @Component public class DatabaseSeeder implements CommandLineRunner { private EmployeeRepo employeeRepo; protected DatabaseSeeder(EmployeeRepo employeeRepo) { this.employeeRepo = employeeRepo; } @Override public void run(String... args) throws Exception { EmpInfo first = new EmpInfo( "emp-101", "rommel", "male", 37, new JobDetails("ICT","Programmer") ); EmpInfo second = new EmpInfo( "emp-102", "raizel", "female", 16, new JobDetails("ICT","Graphic design") ); // delete all resorts if already exist this.employeeRepo.deleteAll(); // add resorts to database List<EmpInfo> emp = Arrays.asList(first,second); this.employeeRepo.saveAll(emp); } } |
Let’s break down this code and discuss what’s happening in each section:
- First, notice that this class implements a
CommandLineRunnerthat will be invoked once Spring boot is initiated. - This class will be treated as a bean because of the
@componentannotation. - We then create two documents:
firstandsecond. - Since this is just a seeder, we want to ensure that the database is empty before we create a new document, so we use the
deleteAll()method. - Finally, we save the document using the
saveAll()method.
Creating the Java Controller Clas
Next, we’ll be creating the controller of our application. Let’s create a new Java class and name it EmpController.java. We’ll then add the following Java code to it:
1 2 3 4 5 6 7 8 9 10 11 12 13 14 15 16 17 18 19 20 21 22 23 24 25 26 27 28 29 30 31 32 33 34 35 36 37 38 39 40 | package com.mongospring; import java.util.List; import org.springframework.web.bind.annotation.DeleteMapping; import org.springframework.web.bind.annotation.GetMapping; import org.springframework.web.bind.annotation.PathVariable; import org.springframework.web.bind.annotation.RequestMapping; import org.springframework.web.bind.annotation.RestController; @RestController @RequestMapping("/employee") public class EmpController { private EmployeeRepo employeeRepo; public EmpController(EmployeeRepo employeeRepo) { this.employeeRepo = employeeRepo; } @GetMapping public List<EmpInfo> getAll(){ List<EmpInfo> emp = this.employeeRepo.findAll(); return emp; } @DeleteMapping("/delete/{empId}") public void deleteByEmpId(@PathVariable("empId") String empId){ this.employeeRepo.deleteByEmpId(empId); } @DeleteMapping("/{id}") public void delete(@PathVariable("id") EmpInfo id) { this.employeeRepo.delete(id); } } |
Notice that we used different annotations for every function. These are REST VERBS that will map the required operation to its respective annotations.
Configuring MongoDB Database Connection
In this section, we’ll open up the application.properties file and configure our database connection. We’ll add the code shown below:
1 2 3 4 5 6 | // localhost for the host spring.data.mongodb.host=localhost // mongodb port spring.data.mongodb.port=27017 // the name of our database spring.data.mongodb.database=EmployeeDB |
Now that our Spring Data project is configured, let’s test our application by clicking the Run button in Eclipse.
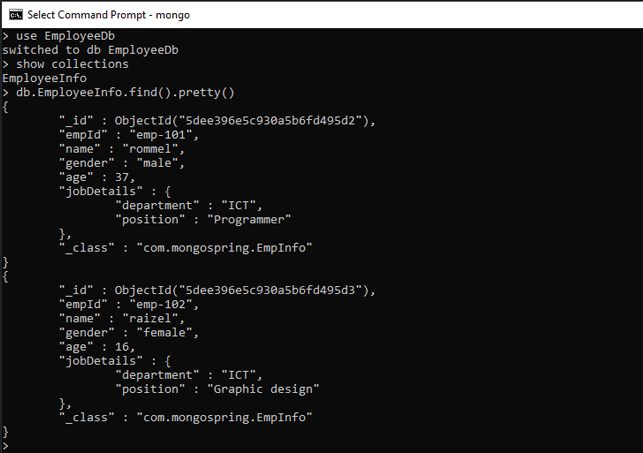
We can use the MongoDB shell to verify that we were able to create our database:
Deleting a Record in MongoDB
Next, we’ll revisit the functions that we created earlier in our application’s controller ‘EmpController.java’.
Deleting a MongoDB Document via Custom Function
The function shown below is a custom function that will delete a MongoDB document based on a chosen field. In this example, we’re using the empId:
1 2 3 4 | @DeleteMapping("/delete/{empId}") public void deleteByEmpId(@PathVariable("empId") String empId){ this.employeeRepo.deleteByEmpId(empId); } |
This code will delete a record that matches a given value for its
empIdfield. The value is specified in the URIlocalhost:8080/delete/<empId>.We can now test our function using ‘Postman’ using the following URI:
localhost:8080/employee/delete/emp-102. This will delete a document with anempIdof ’emp-102′.
If we query our database via the Mongo shell, we should see something like this:
1 2 3 4 5 6 7 8 9 10 11 12 13 14 | > db.EmployeeInfo.find().pretty() { "_id" : ObjectId("5dee40449624f4139b46bc51"), "empId" : "emp-101", "name" : "rommel", "gender" : "male", "age" : 37, "jobDetails" : { "department" : "ICT", "position" : "Programmer" }, "_class" : "com.mongospring.EmpInfo" } > |
Deleting a MongoDB via Built-in Delete Function
In this example, we’ll be deleting a MongoDB document using the MongoRepository built-in delete function:
1 2 3 4 | @DeleteMapping("/{id}") public void delete(@PathVariable("id") EmpInfo id) { this.employeeRepo.delete(id); } |
The above code uses the MongoDB ObjectId. Like we did in the previous example, we can use Postman with the following URI localhost:8080/<ObjectId>

We can then verify our results via the Mongo Shell:
1 2 3 4 5 6 7 8 9 10 11 12 13 14 | > db.EmployeeInfo.find().pretty() { "_id" : ObjectId("5dee4796653f6c4ea8a14d20"), "empId" : "emp-102", "name" : "raizel", "gender" : "female", "age" : 16, "jobDetails" : { "department" : "ICT", "position" : "Graphic design" }, "_class" : "com.mongospring.EmpInfo" } > |
We can confirm that the entry with ""_id" : ObjectId("5dee4796653f6c4ea8a14d1f")" was deleted from our collection.
Conclusion
If you’re using Spring Data to build an application that works with MongoDB, you’ll want the ability to perform database operations such as deleting records. In this tutorial, we showed you how to build an application that can delete a MongoDB document using Spring Data. This article picked up where the last one left off, explaining how to configure a Spring boot with MongoDB using the Eclipse IDE and how to perform different methods of a DELETE operation. If you’ve followed along with our instructions and examples, you’ll be ready to build your own application using Spring Data and MongoDB.


Pilot the ObjectRocket Platform Free!
Try Fully-Managed CockroachDB, Elasticsearch, MongoDB, PostgreSQL (Beta) or Redis.
Get Started