How to CRUD MongoDB using NodeJS and SailsJS Part 3
Introduction
This is Part 3 of multiple-series tutorial, “How to CRUD MongoDB using NodeJS and SailsJS.” In Part 2, you learned how to use Bootstrap to assist with Embedded JavaScript (EJS) files. This enabled you to create a homepage design sample. You also incorporated MongoDB. Today, In Part 3, you’ll learn how to successfully configure the controller for your application, and then create a view to display data from your new application.
If you already know the steps to perform controller configuring, and want to skip the details of this tutorial, go to Just the Code.
Prerequisites
- Complete Parts 1 and 2 of the multiple-series tutorial, “How to CRUD MongoDB using NodeJS and SailsJS.”
Use SailsJS to perform a MongoDB document retrieval
Here’s how to obtain every MongoDB document inside a collection, and then use a browser to display the results.
Make a Customer Controller configuration
Navigate to the
api/controllersdirectory, and then open the fileCustomerController.js.For the
listcustomer, use this code:
1 2 3 4 5 6 7 8 | listcustomer: async (request, response) => { try { let customer = await Customer.find({}); response.view("list", { customer }); } catch (err) { response.serverError(err); } }; |
The above code illustrates that when one process finishes, the next one begins. This is possible with the method
async/wait. Use it so that you’ll get the data for every customer.Taking care of errors is simplified with the
try/catchbasic block.The command
Customer.find({})retrieves the database information. You now refer to thecustomersetting. Next, thecustomerparameter is passed to the list in the view display of the application for your CRUD MongoDB using NodeJs and SailsJs example.Perform a
/listcustomerconfiguration for the route. Update the route.js file by opening it with this code:
1 2 3 4 | '/customer/list': { controller: 'CustomerController', action: 'listcustomer' }, |
- You’ve just completed the application routing so you can use the
CustomerController. At a URL, theCustomerControlleris what the route.js will scan and search for. It specifically is looking for thelistcustomeraction code to execute.
Create the view for the application
Make a view so that the user can display the fetched documents in the application sample for your CRUD MongoDB using NodeJs and SailsJs learning.
Go to the folder pages and generate an EJS file. Save it as list for its name.
Next, open the list file you just created.
Design a table using tags in HTML.
Get the data for the table from the
Customerparameter you passed to theCustomerControllerearlier.
1 2 | # Customer Information Listing ID First Name Last Name Age <%= customer.id %> <%= customer.firstname %> <%= customer.lastname %> <%= customer.age %> |
- To traverse through the customer data items, the command
forEach()is used.
NOTE: You can extract the specifics of a document with the “<%= %>” tag utilized by EJS .
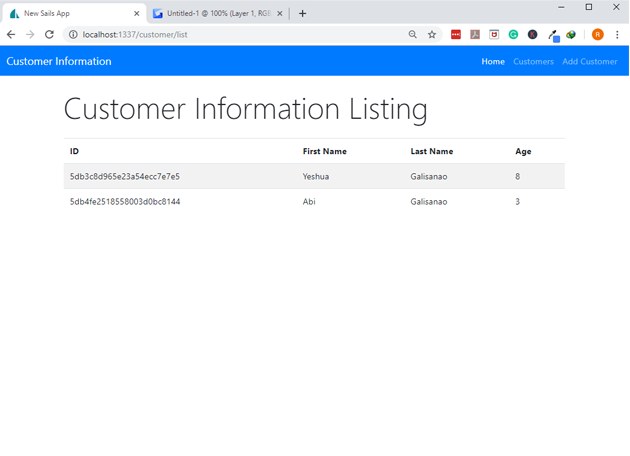
The collection customerinfo contained documents and all of them were successfully retrieved using SailsJs.
Since you created a view, it’s now time to use the browser with the
localhost:1337/customer/listcustomerURL to see if the application works properly.The result should resemble an output like this:
Conclusion
This concludes Part 3 of “How to CRUD MongoDB using NodeJS and SailsJS.” In this lesson from the multiple-series, you learned how to make a controller configuration. You also found out how to generate the required EJS file, retrieve the documents, and then display the information. Congratulations on completing this segment! As a refresher, review the Parts 1, 2 and 3 again, and then proceed to Part 4 to advance to the next lesson.
Just the Code
Here’s the code for Part 3 of “How to CRUD MongoDB using NodeJS and SailsJS.” It’s divided into sections for easy accessibility and reference.
CustomerController creation steps
1 2 3 4 5 6 7 8 9 10 11 12 13 14 15 16 17 | /** * CustomerController * * @description :: Server-side actions for handling incoming requests. * @help :: See https://sailsjs.com/docs/concepts/actions */ module.exports = { listcustomer: async (request, response) => { try { let customer = await Customer.find({}); response.view("list", { customer }); } catch (err) { response.serverError(err); } } }; |
Making the list.ejs table
1 2 | # Customer Information Listing ID First Name Last Name Age <%= customer.id %> <%= customer.firstname %> <%= customer.lastname %> <%= customer.age %> |
Configuring the route.js
1 2 3 4 5 6 7 8 9 | module.exports.routes = { // this route if for the homepage '/': { view: 'pages/homepage' }, '/customer/list': { controller: 'CustomerController', action: 'listcustomer' }, |

Pilot the ObjectRocket Platform Free!
Try Fully-Managed CockroachDB, Elasticsearch, MongoDB, PostgreSQL (Beta) or Redis.
Get Started