How to CRUD MongoDB using NodeJS and SailsJS Part 2
Introduction
This second part of this tutorial will go into how to utilize CRUD MongoDB using NodeJs and SailsJs for performing operations with MongoDB. The previous section of this tutorial series, part one, explained how to set up the project by installing SailsJs along with the necessary API or resource needed for the application.
Prerequisites
- Have a solid understanding of part one of this tutorial series.
Configuring MongoDB in SailsJs
As SailsJs uses sails-disk as local disk storage by default, this section will cover how to configure MongoDB for the SailsJs project.
Installing the Sails-Mongo adapter
Sails-Mongo allows easy access to MongoDB via SailsJs.
Execute the following code to install the Sails-Mongo adapter via the command line:
1 | npm install sails-mongo --save |
The output should resemble the following:
1 2 | + sails-mongo@1.0.1 added 15 packages from 10 contributors in 8.865s |
Connecting MongoDB to SailsJs
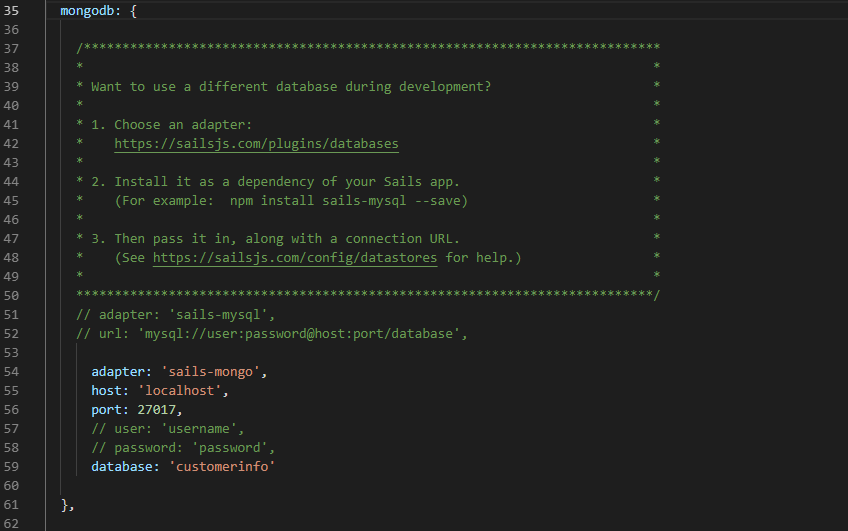
With the sails-mongo adapter installed, connect to MongoDB and SailsJs via the datastore.js file. Open up the datastore.js and then edit the following details from this:
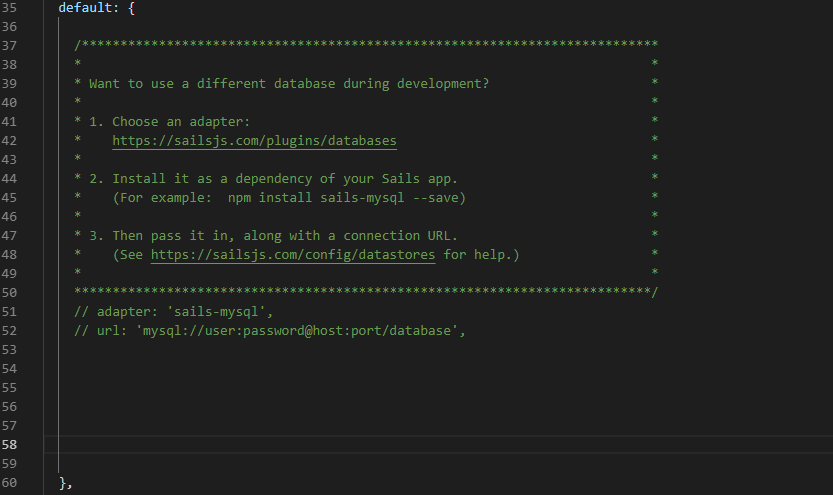 into this:
Now the connection name must be reflected within the model API that was created in the previous section of this tutorial. Open up the file Customer.js and type in the following details after the attribute:{}:
1 | connection: "mongodb"; |
Note: A different database can be specified for different models, if required.
Now save the changes and then test the browser to determine if there is an error.
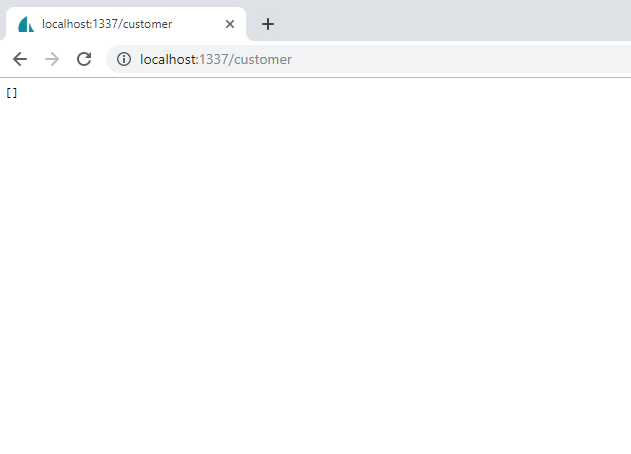
Note that the browser displayed an empty array, This indicates that a connection to the MongoDB database was established.
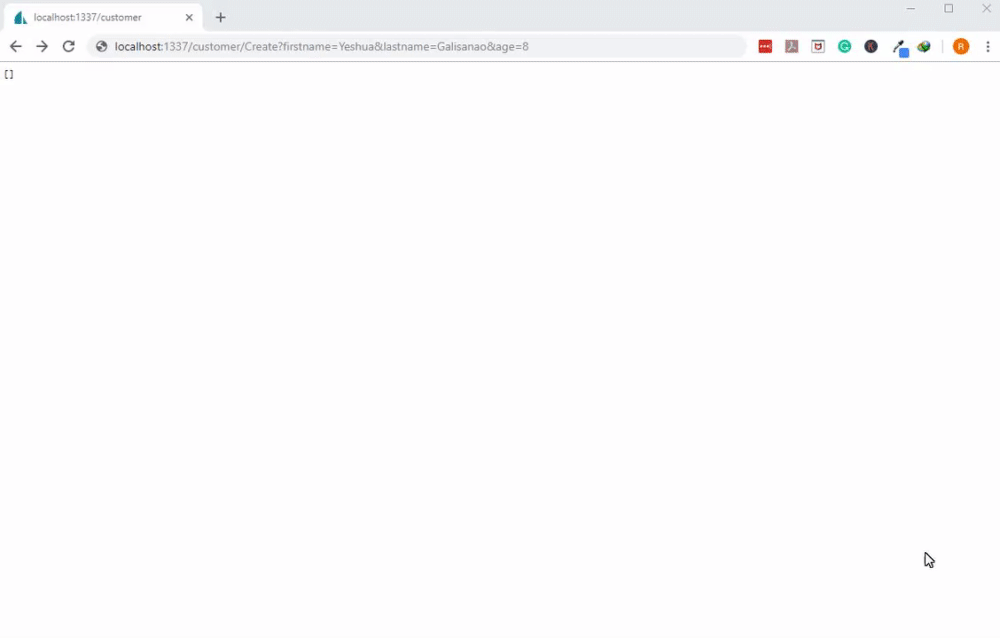
Now try to add a new document in the MongoDB via SailsJs blueprint. Put the following details in the URL and press “Enter:”
localhost:1337/cutomer/Create?firstname=Yeshua&lastname=Galisanao&age=8
The output should resemble the following:
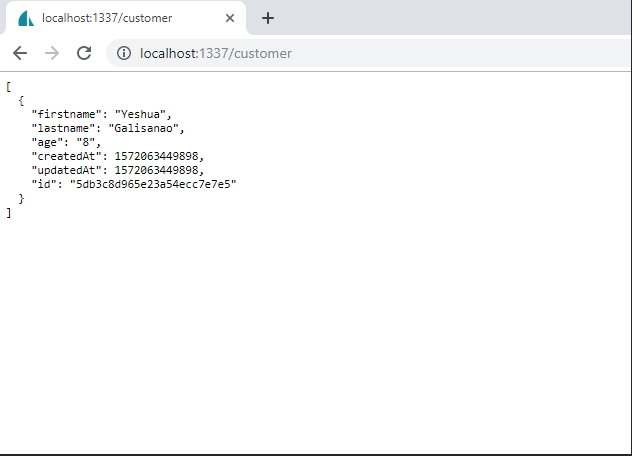
 Now test the browser again, to confirm the data was added to the database, by navigating to the following URL:
 localhost:1337/customer
The results should resemble the following:
It can also be confirm that the record was saved in the MongoDB database by logging into MongoDB via Powershell.
First, confirm MongoDB is running and then run the MongoDB client in the command line using the command
mongo.Once connected, use the
show dbscommand to show all of the available database, as shown here:
1 | show dbs |
The output should resemble the following:
1 2 3 4 | admin 0.000GB config 0.000GB customerinfo 0.000GB local 0.000GB |
Now connect to the
customerinfodatabase using theuse customerinfocommand.Use the
show collectionscommand to list available collections within thecustomerinfodatabase. This will show thecustomercollections.To verify the document within the
customercollection, execute following command:db.customer.find().pretty()
The results should resemble the following:
1 2 3 4 5 6 7 8 | { "_id" : ObjectId("5db3c8d965e23a54ecc7e7e5"), "firstname" : "Yeshua", "lastname" : "Galisanao", "age" : "8", "createdAt" : 1572063449898, "updatedAt" : 1572063449898 } |
Knowing that the SailsJs and MongoDB server connection is working properly, the record within the customer collection can now be persisted.
Setting Up the Model
This section will cover how to configuring the basic model structure that will be used for the duration of this tutorial.
Place the following structure within the customer.js file where it says attribute:{}, as shown here:
1 2 3 4 5 6 7 8 9 | firstname:{ type: 'string' }, lastname:{ type: 'string' }, age:{ type: 'number' } |
Designing The Homepage
This section will explain how to design the homepage within SailsJs via different ejs files or the Embedded JavaScript Template.
- First, open the
homepage.ejsfile and then replace all the default values with the following details:
1 2 3 4 |
Now open the
layout.ejsfile. This controls the look of the layout that will persist across all of the pages. Bootstrap CDN will be used to design the interface. Execute the following steps in sequence:Just above the following HTML code:
1 2 3 |
add the following minified CSS for bootstrap:
1 2 3 4 5 6 | <link href="https://stackpath.bootstrapcdn.com/bootstrap/4.3.1/css/bootstrap.min.css" rel="stylesheet" integrity="sha384-ggOyR0iXCbMQv3Xipma34MD+dH/1fQ784/j6cY/iJTQUOhcWr7x9JvoRxT2MZw1T" crossorigin="anonymous" /> |
- Then include the needed Bootstrap script, right below the following HTML code:
- Now add the following scripts:
1 2 3 4 5 6 7 8 9 10 11 | <script src="https://stackpath.bootstrapcdn.com/bootstrap/4.3.1/js/bootstrap.min.js" integrity="sha384-JjSmVgyd0p3pXB1rRibZUAYoIIy6OrQ6VrjIEaFf/nJGzIxFDsf4x0xIM+B07jRM" crossorigin="anonymous" ></script> <script src="//cdnjs.cloudflare.com/ajax/libs/popper.js/1.15.0/umd/popper.js"></script> <script src="https://stackpath.bootstrapcdn.com/bootstrap/4.3.1/js/bootstrap.min.js" integrity="sha384-JjSmVgyd0p3pXB1rRibZUAYoIIy6OrQ6VrjIEaFf/nJGzIxFDsf4x0xIM+B07jRM" crossorigin="anonymous" ></script> |
- Finally, as shown below, add a Bootstrap Navbar just below the
-body-tag:
1 2 3 4 5 6 7 8 9 10 11 12 13 14 15 16 17 18 19 20 21 22 23 24 25 26 27 28 29 30 | <nav class="navbar navbar-expand-sm navbar-dark bg-primary mb-4"> <a class="navbar-brand" href="/">Customer Information</a> <button class="navbar-toggler" type="button" data-toggle="collapse" data-target="#navbarNav" aria-controls="navbarNav" aria-expanded="false" aria-label="Toggle navigation" > <span class="navbar-toggler-icon"></span> </button> <div class="collapse navbar-collapse" id="navbarNav"> <ul class="navbar-nav ml-auto"> <li class="nav-item active"> <a class="nav-link" href="/" >Home <span class="sr-only">(current)</span></a > </li> <li class="nav-item"> <a class="nav-link" href="/customer/list">Customers</a> </li> <li class="nav-item"> <a class="nav-link" href="/customer/add">Add Customer</a> </li> </ul> </div> </nav> |
Save the changes and then see how it looks in the browser using the following URL: localhost:1337.
The results should resemble the following:
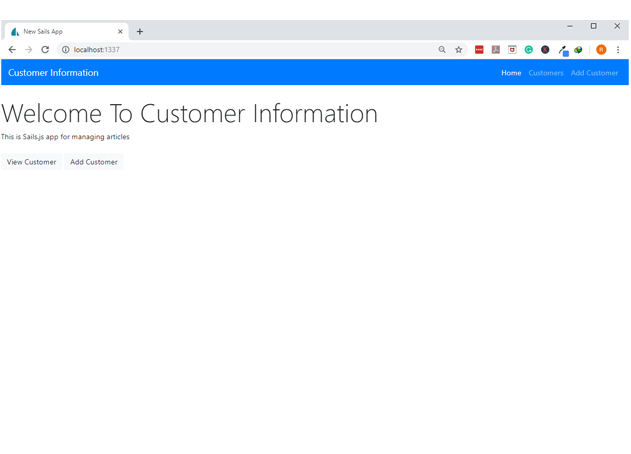
This shows that the integration of Bootstrap into SailsJs was successful.
Conclusion
Part two of this tutorial series explained how to utilize CRUD MongoDB using NodeJs and SailsJs for performing operations with MongoDB. The article specifically explained how to configure MongoDB in SailsJs, how to install the Sails-Mongo adapter, connect MongoDB to SailsJs and test the browser. The tutorial also covered how to set up the model and provide a basic design to the homepage. Remember that the layout.ejs file controls the layout across all of the pages.
The Code
Below is the entire code that we use in the homepage.ejs and the layout.ejs files.
The homepage.ejs files
1 2 3 4 |
The layout.ejs files
1 2 3 4 5 6 7 8 9 10 11 12 13 14 15 16 17 18 19 20 21 22 23 24 25 26 27 28 29 30 31 32 33 34 35 36 37 38 39 40 41 42 43 44 45 46 47 48 49 50 51 52 53 54 55 56 57 58 59 60 61 62 63 64 65 66 67 68 69 70 71 72 73 74 75 76 77 78 | <!DOCTYPE html> <html> <head> <title>New Sails App</title> <!-- Viewport mobile tag for sensible mobile support --> <meta name="viewport" content="width=device-width, initial-scale=1, maximum-scale=1" /> <%/* If you want to discourage search engines from indexing this site, uncomment the following line: */%> <%/* <meta name="robots" content="noindex" /> */%> <link href="https://stackpath.bootstrapcdn.com/bootstrap/4.3.1/css/bootstrap.min.css" rel="stylesheet" integrity="sha384-ggOyR0iXCbMQv3Xipma34MD+dH/1fQ784/j6cY/iJTQUOhcWr7x9JvoRxT2MZw1T" crossorigin="anonymous" /> <!--STYLES--> <link rel="stylesheet" href="/styles/importer.css" /> <!--STYLES END--> </head> <body> <nav class="navbar navbar-expand-sm navbar-dark bg-primary mb-4"> <a class="navbar-brand" href="/">Customer Information</a> <button class="navbar-toggler" type="button" data-toggle="collapse" data-target="#navbarNav" aria-controls="navbarNav" aria-expanded="false" aria-label="Toggle navigation" > <span class="navbar-toggler-icon"></span> </button> <div class="collapse navbar-collapse" id="navbarNav"> <ul class="navbar-nav ml-auto"> <li class="nav-item active"> <a class="nav-link" href="/" >Home <span class="sr-only">(current)</span></a > </li> <li class="nav-item"> <a class="nav-link" href="/customer/list">Customers</a> </li> <li class="nav-item"> <a class="nav-link" href="/customer/add">Add Customer</a> </li> </ul> </div> </nav> <div class="container"> <%- body %> </div> <!--SCRIPTS--> <script src="/dependencies/sails.io.js"></script> <!--SCRIPTS END--> <script src="https://stackpath.bootstrapcdn.com/bootstrap/4.3.1/js/bootstrap.min.js" integrity="sha384-JjSmVgyd0p3pXB1rRibZUAYoIIy6OrQ6VrjIEaFf/nJGzIxFDsf4x0xIM+B07jRM" crossorigin="anonymous" ></script> <script src="//cdnjs.cloudflare.com/ajax/libs/popper.js/1.15.0/umd/popper.js"></script> <script src="https://stackpath.bootstrapcdn.com/bootstrap/4.3.1/js/bootstrap.min.js" integrity="sha384-JjSmVgyd0p3pXB1rRibZUAYoIIy6OrQ6VrjIEaFf/nJGzIxFDsf4x0xIM+B07jRM" crossorigin="anonymous" ></script> </body> </html> |


Pilot the ObjectRocket Platform Free!
Try Fully-Managed CockroachDB, Elasticsearch, MongoDB, PostgreSQL (Beta) or Redis.
Get Started