Docker and MongoDB
Introduction
There may be times when you want to run specific processes or services separate from other ones that run on your operating system. Docker allows developers to precisely accomplish that goal. Find out how with this tutorial that explains how to build a MongoDB image so that you can run the Mongo Server in a Docker containerized environment.
Prerequisites
Download the Docker installer.
Install Docker Compose.
Install MongoDB.
NOTE: Be sure to give yourself elevated privileges to use the applications you installed.
Installing Docker
- Verify that you’ve installed the appropriate version of Docker for your OS whether it is a macOS or a Windows environment. Some system architectures are 32-bit while others are 64-bit. Use the installers that are interactive to simplify the process.
Use the APT-GET repository to install Docker on Debian Linux
- With the commands below, update the repository APT-GET first for your Linux distro (Debian-based), and then get the Docker Engine on your OS:
1 2 | sudo apt-get update sudo apt-get install docker-engine |
- Start the service for the Docker engine with the command
service docker start:
1 | sudo service docker start |
Build Docker from source on Linux
On Linux, you must install Docker and Docker Compose by building Docker from source code. You can do this by:
- use cURL
OR
Get the package archive with
wgetIn either case, when finished, complete the validation steps for the download with the Docker’s GPG key as your confirmation.
Next, use Linux distro’s repository to install required packages:
1 | ca-certificates curl gnupg2 software-properties-common |
NOTE: Linux distros (Debian-based) use
apt getto install the libraryapt-transport-https.
- Here’s an example of the
wgetcode for a MongoDB package system requiringv4.2:
1 | wget -qO - https://www.mongodb.org/static/pgp/server-4.2.asc | sudo apt-key add - |
- Perform a package update when you’re done with that. For a Red Hat Linux OS, use
yum update.
Verify that Docker is installed
- Check your Docker versions to confirm they were installed the right way. Use the commands
docker-compose versionanddocker versionto do this.
Build a Docker MongoDB image
From a terminal window, run a Docker default image with the command
docker run mongo:latest.Alternatively, use the file
docker-compose.ymlto use Docker Compose to construct a customized MongoDB image. ADockeriflewill hold those specific commands for the image.
Build a MongoDB Docker image with Dockerfile
Another way to build an image is by using a text editor such as nano.
Optionally, you can use Sublime.
NOTE: If you use a different type of editor to build your image, be sure that your pick has support for syntaxes and YAML indentation. You’ll make an extensionless
Dockerfile.
- Here’s the code showing how to use Sublime:
1 | subl Dockerfile |
NOTE: Adhere to the case sensitivity of the code by entering lowercase and uppercase letters as shown. (For example, the “D” is uppercase in Dockerfile. If it’s entered as a lowercase letter, the code won’t work as expected.)
Run Docker commands in Dockerfile
Bash command is automatically elevated with privileges, so you can go ahead and delete the sudo commands from the code.
- Here is an example of the commands with
sudoelevated privileges missing:
1 2 3 4 5 6 7 8 9 10 11 12 13 14 | FROM mongo:latest # custom label for the docker image LABEL version="0.1" maintainer="ObjectRocket" # use 'RUN' to execute commands in the container's bash terminal RUN apt-get update -y RUN apt-get remove mongodb-org -y RUN apt-get install mongodb -y RUN mkdir -p ./data/db RUN service mongodb start -y # expose MongoDB's default port of 27017 EXPOSE 27017 |
NOTE: Sidestep errors occurring on your build by using
service mongodb startthat specifies the service name asmongodbdue to the fact that your package usesmongodb, notmongod.
Build a Docker image for MongoDB
- Build the image with the Docker command
buildas shown below:
1 | docker build . |
NOTE: If you want to specify another directory for the Dockerfile, indicate the path. Otherwise, the
.(period) signifies the current directory location.
- After it’s finished loading, (and the time will depend on the speed of your internet), your response should look similar to this:
1 | Successfully built 836e9c0dc6c2 |
Now, confirm the creation of the image with the command
docker images:Start the Docker container by copying the Docker image ID and add it to the end of your command
docker runlike this:
1 | docker run 836e9c0dc6c2 |
NOTE: When finished, exit the container with CTRL+C or if you’re using a Linux terminal, you might need to press CTRL+SHIFT+C instead.
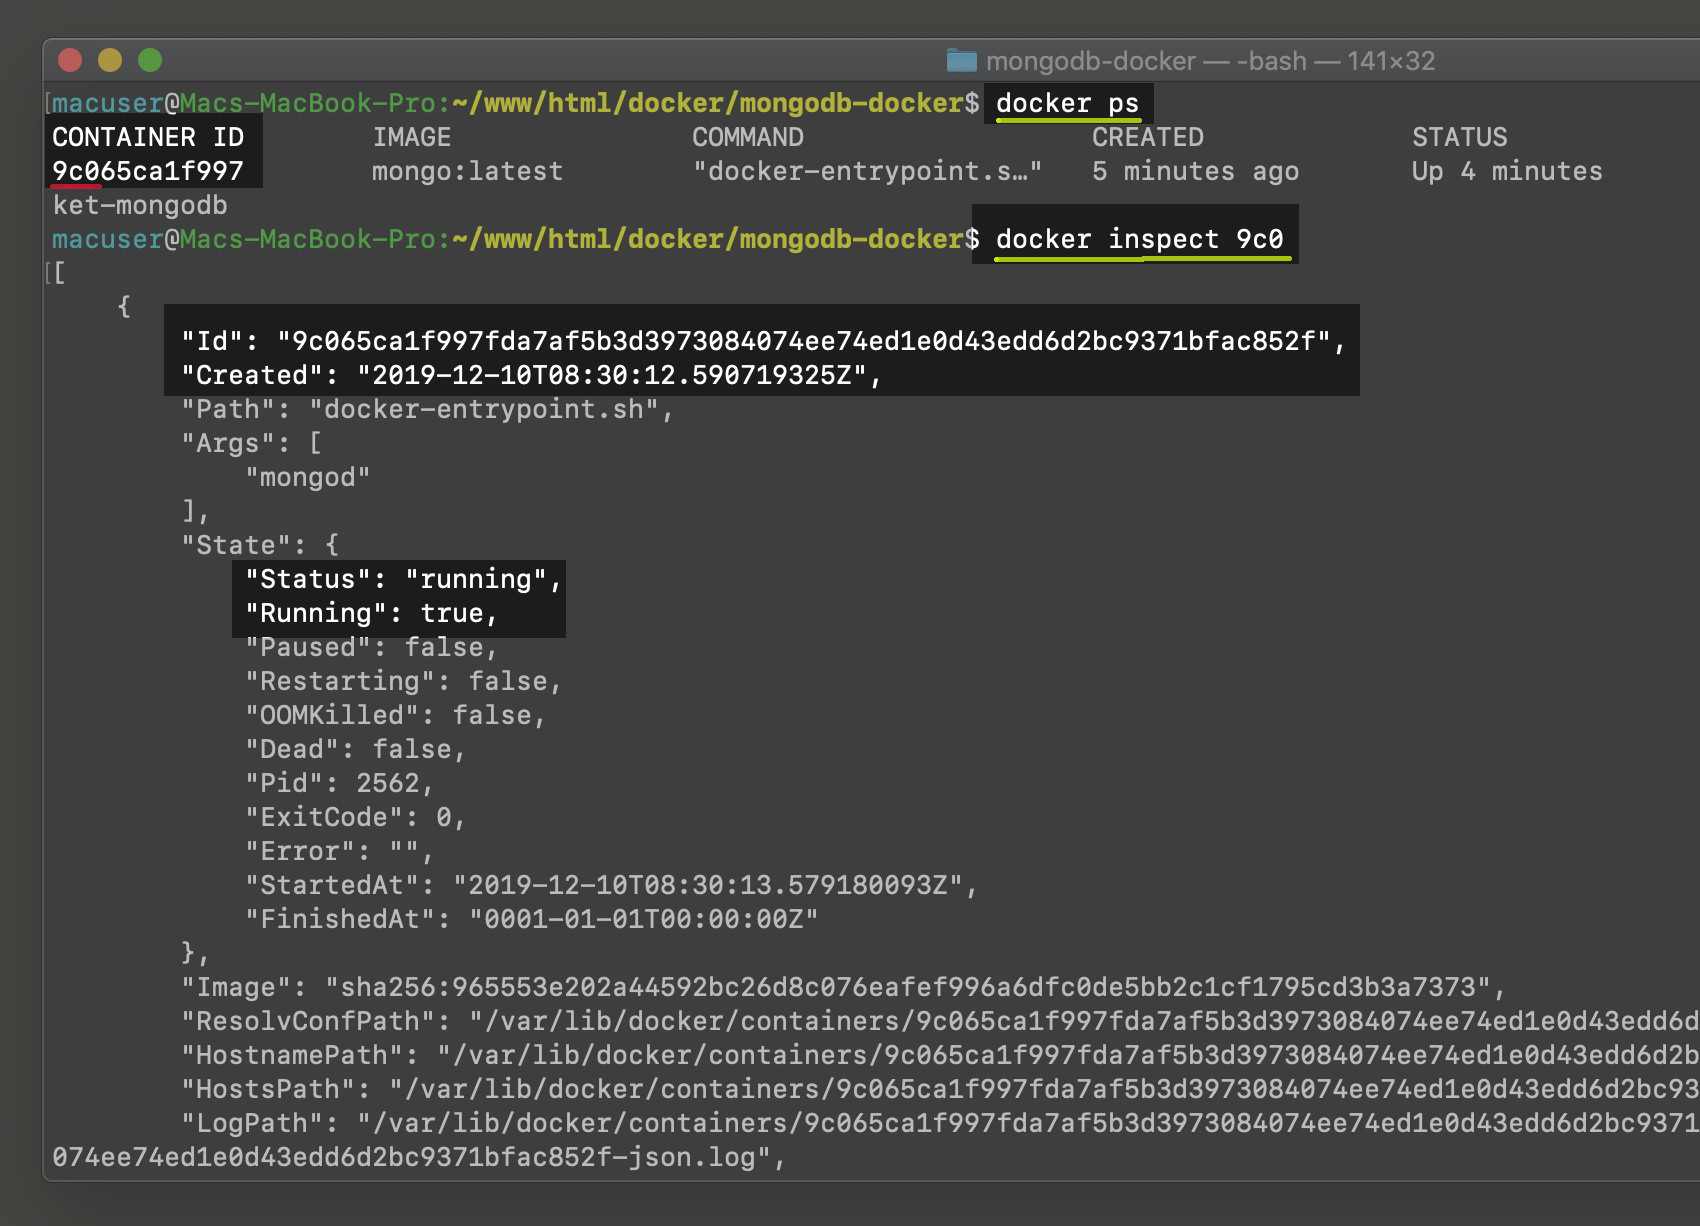
Input
docker psfrom a different tab. You’ll be able to read information about the container.Go into the container with this command:
1 | docker exec -it {CONTAINER_ID} bash |
Troubleshooting Docker build
- You can get assistance with Docker and its various commands including options and flags. Learn more about them by going to a command prompt or terminal window and inputting
docker build --help.
Run MongoDB with Docker Compose
You can run more than one container. As shown earlier in the “Build a Docker MongoDB image” section, you can build a unique Docker container.
An example of how to use the Sublime IDE to create or get a project directory Docker file:
1 | subl docker-compose.yml |
- Here’s an example of the code to use YAML data-serialization for your test project. It does three things: (1) makes a bind mount for the data in your MongoDB, (2) does the server or machine port opening for it in order to get the process completed, and (3) makes a root user for the MongoDB which will also have a password.
1 2 3 4 5 6 7 8 9 10 11 12 13 14 15 16 17 18 19 | version: "3.2" services: # setup the MongoDB database mongo-database: # pulls the latest, stable image image: mongo:latest container_name: objectrocket-mongodb # bind mount volume for MongoDB documents volumes: - $PWD/mongo-data:/data/db ports: - "27017:27017" # configure the Docker entrypoint for MongoDB environment: - MONGO_INITDB_ROOT_USERNAME=root - MONGO_INITDB_ROOT_PASSWORD=1234 |
NOTE: If you receive an error for your Linux system when you try to install Docker, check your syntaxes for YAML. Make sure they’re indented correctly and done in the same manner in regard to formatting. Another way to overcome the error is to install at the beginning of the file, an earlier version such as
2.2.
Build the MongoDB container with Compose
- Use the command
docker-compose upto test the success of the container building process. The most recent image of MongoDB Docker is what the image should be automatically built on.
Using Compose and Dockerfile to build a MongoDB image
- Remember to use the cmmand
buildas opposed toimageif you used a Dockerfile to create an image that’s customized. Next, use the nested keycontext:like this:
1 2 3 4 5 6 7 | version: "3.2" services: # setup the MongoDB database mongo-database: # build the image from Dockerfile build: context: ${PWD}/path/to/Dockerfile |
Here’s an example of what an error-free build for a front end service container that is running might look like at a command prompt or in your terminal:
NOTE: To find out the details about an image build, use
docker inspect. View a list of your images stored locally with the commanddocker images.
Access the Docker container for MongoDB
From the terminal window, find out how many Docker containers are running with the
docker pscommand.The command
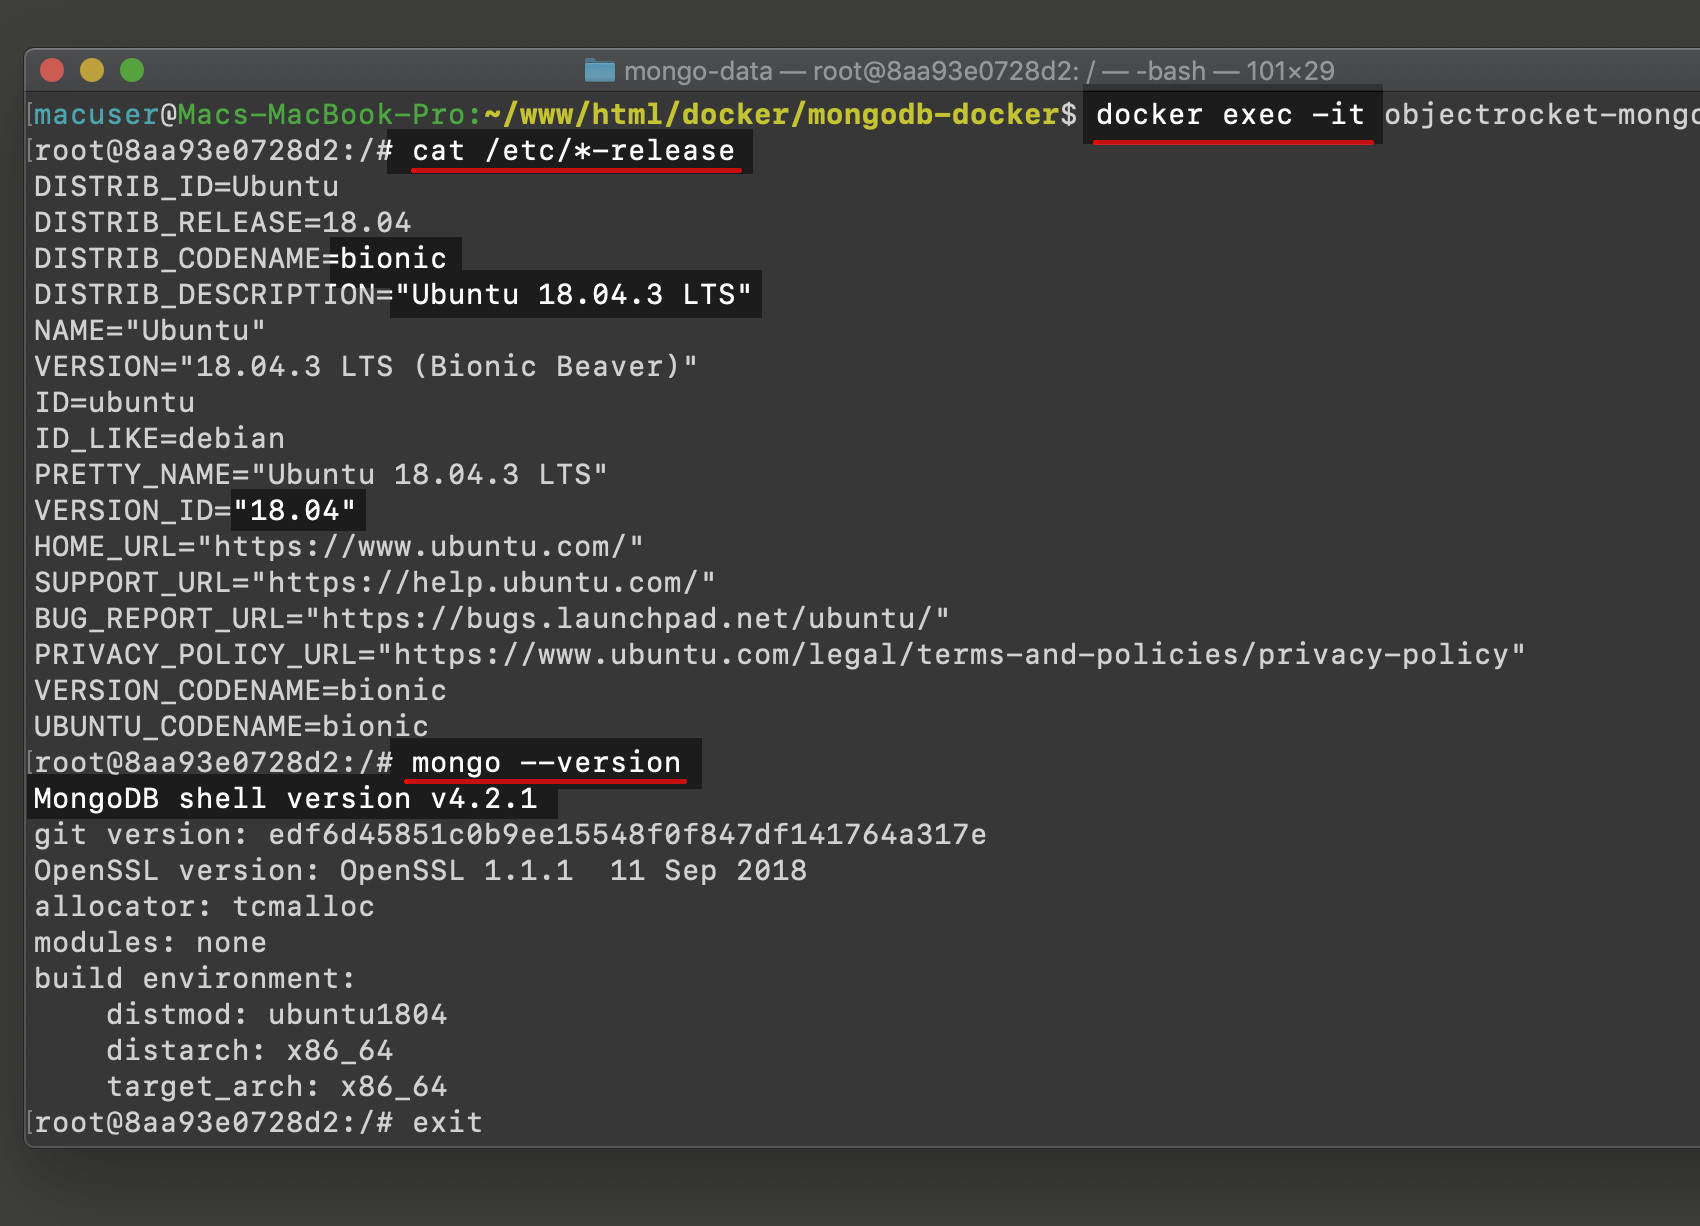
docker execenables you to enter the MongoDB service that is running by listing the ID of the container. Save time by just entering the starting three digits of the container ID.
1 | docker exec -it 8aa bash |
- Optionally, input the file name of the Docker Compose YAML that you created:
1 | docker exec -it objectrocket-mongodb bash |
Use bash commands in the MongoDB container
Input the command
docker execand you’ll see the container ID is shown after theroot@terminal output. This means as a root user, you’re gaining access to the container.Find out the environment’s Linux version with the command
cat /etc/*-release.Use the command
mongo --versionto confirm the correct installation of MongoDB and JavaScript shell.
NOTE: Always use the tag
latestto install Docker MongoDB images. This is because it ensures that you get long-term support (LTS) with the stable installation versions.
The command apt-get install mongodb -y will result in a MongoDB image being built from the ground up by installing the Mongo Shell v3.6.3.
MongoDB Shell inside of Docker
You’re now ready to add a document to the container using the Mongo Shell.
NOTE: Using the command
mongoto perform the document addition will work, but it won’t give you database modification privileges.
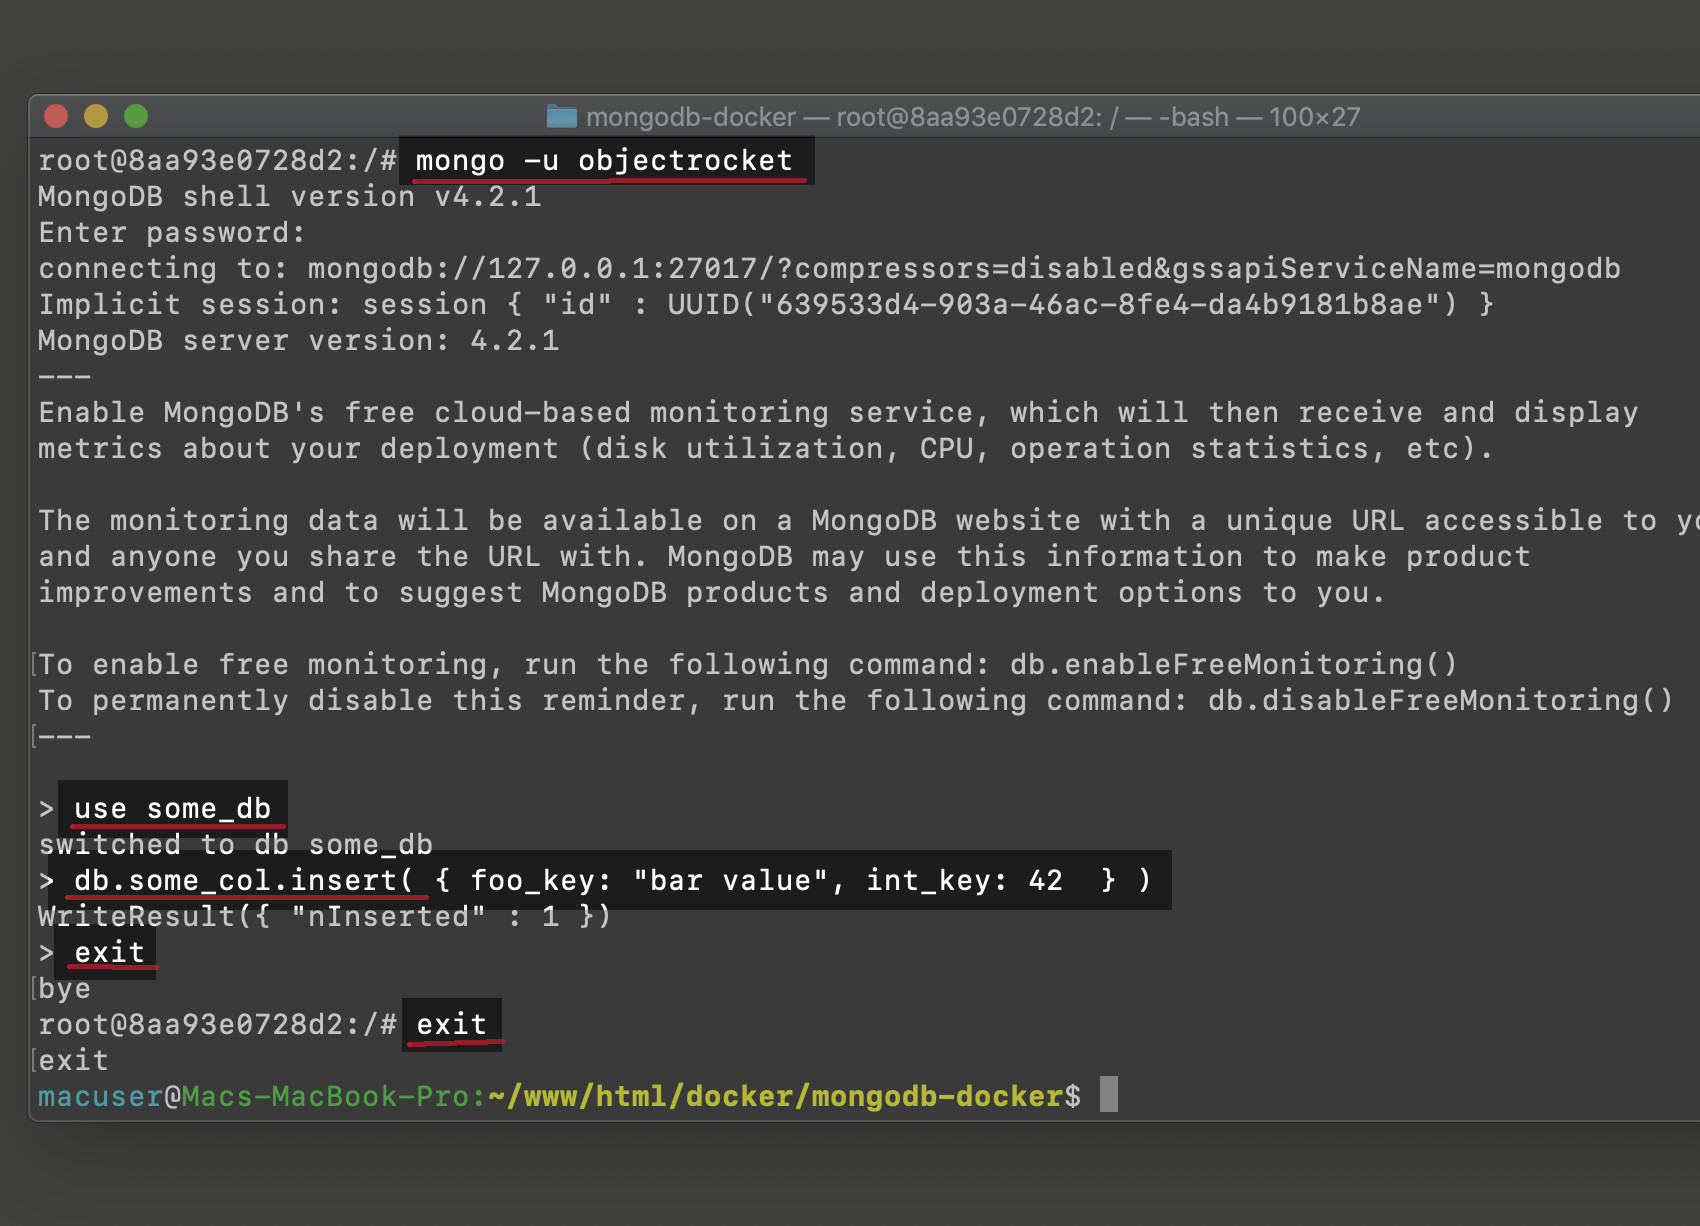
Access the mongo Shell using the user specified in Docker
- Obtain user access into the interactive MongoDB shell environment with the flag
-u. The user was created earlier in this tutorial when you made the file withdocker-compose.yml.
1 | mongo -u objectrocket |
NOTE: Avoid error messages by correctly entering the user name and password for the user as indicated in the file made by Docker Compose.
Insert a document in the mongo shell
Input the
usecommand, and then put the database name (without any spaces) you have for the project of inserting documents.Make a database
dbalias to gain entrance into the collections within the database.
1 | use some_db |
A successful response for the command above is
switched to db some_db.Make a collection with the alias
db, and then make a document for it. Add a couple of keys like this:
1 | db.some_col.insertOne( {"foo key": "bar value", "int key": 42} ) |
- A JSON response should be returned if the command worked. It will have an
acknowledgedsetting oftrue.
1 2 3 4 | { "acknowledged" : true, "insertedId" : ObjectId("5def3dd8cad060b8ef9cc2fa") } |
- MongoDB should return the inserted document if you use the function
findOne()
1 | db.some_col.findOne() |
- Execute a document deletion with this command:
1 | db.some_col.deleteOne({}) |
- To leave the Mongo Shell, type
exit. Detach from the MongoDB container by inputtingexitonce more.
Persistent data for the Docker volumes
To enable persistent storage, your mongo-data directory should contain all databases, as well as the collections and the documents that go with them.
Stopping Docker containers
Access the directory where the
docker-compose.ymlis located.Use Compose to stop the Docker container from running with this command:
1 | docker-compose down |
- Alternatively, use
docker stopand then add the ID of the container. Instead of using the full ID of the container, you can input the name of the container or beginning three digits.
Conclusion
There as many advantages of using Docker to create and pull MongoDB images. The main benefit is that it enables you to run MongoDB and the Mongo Shell in a containerized environment. When you do this, you’re able to easily separate specific services or processes from others that run on the same system. You can run multiple containers and start and stop each one as desired. Containerized environments give you added flexibility in coding for extending project creativity.


Pilot the ObjectRocket Platform Free!
Try Fully-Managed CockroachDB, Elasticsearch, MongoDB, PostgreSQL (Beta) or Redis.
Get Started