Create React App with MongoDB - Part 2 Building the Backend
Part 2: Building the backend
So we have everything ready. Let’s create the backend.
Initiating
Open the terminal and create a new folder using the following command.
1 | mkdir backend |
Change the current directory to the newly created one.
1 | cd backend |
We need the package.json file in this folder. Use the following command.
1 2 3 4 5 6 7 8 9 10 11 12 13 14 15 | npm init -y Wrote to E:\sample\backend\package.json: { "name": "backend", "version": "1.0.0", "description": "", "main": "index.js", "scripts": { "test": "echo "Error: no test specified" && exit 1" }, "keywords": [], "author": "", "license": "ISC" } |
This will create a package.json file in the folder. The package.json file holds the various metadata of the project. So, no we can install some dependencies.
1 | npm install express mongoose cors |
Let’s understand what are these dependencies we installed.
- express: It is a web framework for Node.js, that is fast, unopinionated, and minimalist.
- mongoose: It is a document object model for MongoDB.
- cors: It is used to allow CORS with various options.
The last step here is installing nodemon.
1 | npm install -g nodemon |
Nodemon is used to monitor any changes in the source code. It automatically restarts the server when any change is found.
In the backend folder, create a new file and name it “index.js”. Insert the following code in it. This is the basic implementation of the Node.js/Express server.
1 2 3 4 5 6 7 8 | const express = require("express"); const app = express(); const cors = require("cors"); const PORT = 4000; app.use(cors()); app.listen(PORT, function() { console.log("Server is running on Port: " + PORT); }); |
We created an express server. We also added cors and body-parser middlewares. And this server will run on 4000 port number. Let’s start this server using nodemon.
1 2 3 4 5 6 | nodemon index [nodemon] 1.19.2 [nodemon] to restart at any time, enter `rs` [nodemon] watching dir(s): *.* [nodemon] starting `node index index.js` Server is running on Port: 4000 |
Installing MongoDB
Follow the following steps to download MongoDB on windows.
Go to https://www.mongodb.com/download-center/community?jmp=docs.
Select the version and your OS. Then, select the MSI file.
3) Click on the download option.
4) After the downloading is complete, run .msi file. Complete the installation steps.
5) Next, create a new folder in the C directory and name it “data”. Open this folder and again create a new folder. Name it “db”. This is the database directory.
Running MongoDB
Follow the following steps to run MongoDB.
- Go to “C:Program FilesMongoDBServer4.2bin\”.
Note: 4.2 is the version of MongoDB installed in my system. It can vary on your system.
- Open a terminal and type the following command.
1 | mongod; |
MongoDB will start on PORT 27017.
To start the mongo shell. Open another terminal (Do not close the terminal where mongod is running).
Again go to “C:Program FilesMongoDBServer4.2bin\” and type the following command.
1 | mongo; |
This command will run the mongo shell.
Inserting data
Let’s create a database and insert data in it.
- Type the following command to create a database.
1 | use details |
- Let’s insert a few documents in it.
1 2 3 4 5 6 7 8 9 10 11 | ", "age" :29},{"name": "Mike", "age" :23}]) { "acknowledged" : true, "insertedIds" : [ ObjectId("5da3267ed1ee0751c51aa0e4"), ObjectId("5da3267ed1ee0751c51aa0e5"), ObjectId("5da3267ed1ee0751c51aa0e6"), ObjectId("5da3267ed1ee0751c51aa0e7"), ObjectId("5da3267ed1ee0751c51aa0e8") ] } |
We created a collection named “details”, and inserted five documents in it. Let’s check.
1 2 3 4 5 6 7 | db.details.find() { "_id" : ObjectId("5da3267ed1ee0751c51aa0e4"), "name" : "John", "age" : 21 } { "_id" : ObjectId("5da3267ed1ee0751c51aa0e5"), "name" : "Max", "age" : 32 } { "_id" : ObjectId("5da3267ed1ee0751c51aa0e6"), "name" : "Lisa", "age" : 25 } { "_id" : ObjectId("5da3267ed1ee0751c51aa0e7"), "name" : "Sam", "age" : 29 } { "_id" : ObjectId("5da3267ed1ee0751c51aa0e8"), "name" : "Mike", "age" : 23 } > |
Connecting to MongoDB using Mongoose
Earlier, we installed mongoose. Let’s use mongoose to connect the server to MongoDB.
First, we need to import mongoose in our file.
1 | const mongoose = require("mongoose"); |
Then, connect mongoose to the database using the connect() function.
1 2 3 4 5 | mongoose.connect("mongodb://127.0.0.1:27017/details", { useNewUrlParser: true }); const connection = mongoose.connection; |
At last, we use the following function to tell us that the connection was successful.
1 2 3 | connection.once("open", function() { console.log("Connection with MongoDB was successful"); }); |
This is how the index.js file looks now.
1 2 3 4 5 6 7 8 9 10 11 12 13 14 15 16 17 18 19 20 | const express = require("express"); const app = express(); const cors = require("cors"); const PORT = 4000; const mongoose = require("mongoose"); app.use(cors()); mongoose.connect("mongodb://127.0.0.1:27017/details", { useNewUrlParser: true }); const connection = mongoose.connection; connection.once("open", function() { console.log("Connection with MongoDB was successful"); }); app.listen(PORT, function() { console.log("Server is running on Port: " + PORT); }); |
Creating a schema
Next step is to create a schema.
In the same folder where index.js file is, create a new file “model.js” add the following code in it.
1 2 3 4 5 6 7 8 9 10 11 12 13 14 | const mongoose = require("mongoose"); const Schema = mongoose.Schema; let detail = new Schema({ name: { type: String }, age: { type: Number } }); module.exports = mongoose.model("detail", detail); |
The model is ready and we need to import it in the index.js file. Add the following code in index.js file to do so.
1 | let detail = require("./model"); |
Implementing endpoints
The server is ready and connection with MongoDB is established. Now we will implement the endpoint. As we discussed in the previous part, we will fetch the data from MongoDB. To fetch data, we have to use GET. Let’s create a route handler for it.
But first, we need a router for it. Add the following line before the connection part.
1 | const router = express.Router(); |
And add this line above app.listen() function.
1 | app.use("/", router); |
Now the router part is complete. Let’s create the handler.
1 2 3 4 5 6 7 8 9 | router.route("/getData").get(function(req, res) { detail.find({}, function(err, result) { if (err) { res.send(err); } else { res.send(result); } }); }); |
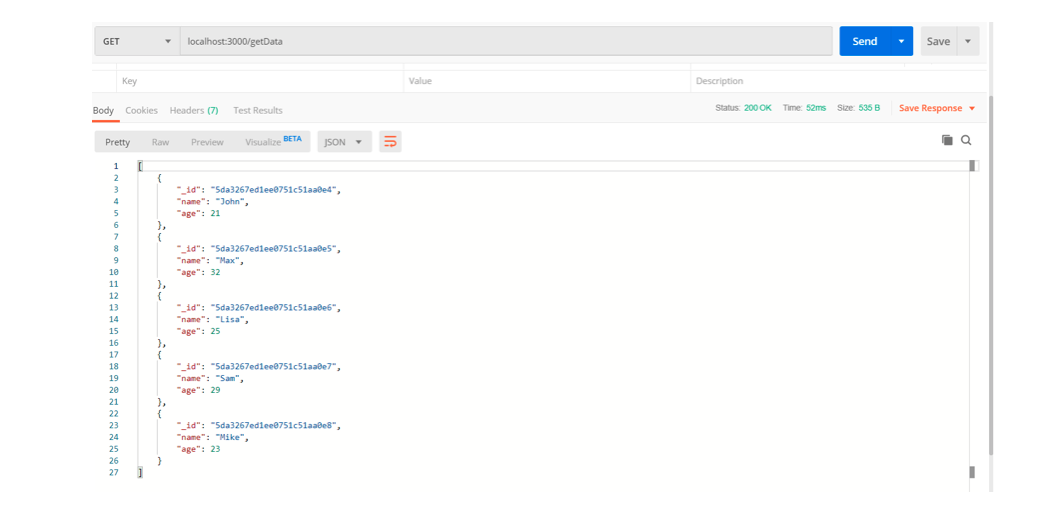
In this route handler, we used the find() method to retrieve all the documents from the details collection. The endpoint here is “/getData”. To check the endpoint, we will use the postman tool. You can download this tool from www.getpostman.com.
Conclusion
Yes! the endpoint is working properly. The backend for our application is ready.


Pilot the ObjectRocket Platform Free!
Try Fully-Managed CockroachDB, Elasticsearch, MongoDB, PostgreSQL (Beta) or Redis.
Get Started