Connect Kotlin to MongoDB
Introduction
If you’re developing apps with the Kotlin programming language, you may want your applications to interact with MongoDB. Fortunately, it’s easy to set up a Kotlin project and write the code needed to create a MongoDB connection. In this article, we’ll show you how to connect Kotlin to a MongoDB server.
Prerequisite
Before we dive into our code examples, let’s take a moment to go over the prerequisites for this tutorial:
- Make sure that MongoDB server is installed and properly configured on your system.
- Make sure that the Eclipse application is also properly installed and configured.
Install Kotlin in Eclipse
In this section, we’ll show you how to install Kotlin in the Eclipse application. We’ll be performing the following steps:
- First, we’ll open up the Eclipse application.
- Then, select Help from the menu bar, and then select Eclipse Marketplace from the sub-menu.
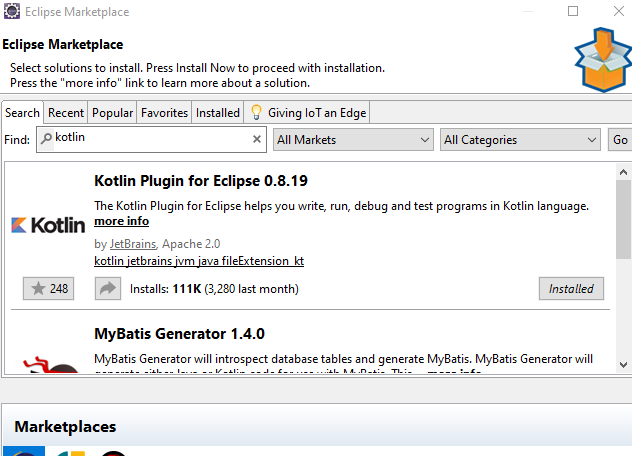
Next, we’ll type ‘Kotlin’ in the search bar and then press Enter.
After that, we’ll select ‘Kotlin Plugin for Eclipse 0.8.19’.
Finally, we’ll click the Install Now > button to install the plugin and proceed with the installation process.
Download MongoDB Java Driver
In order to connect Kotlin to MongoDB, we’ll need to download the MongoDB Java Driver in the form of a JAR file.
As of this writing, the latest version of the MongoDB Java Driver is 3.12.
Add JAR file to build path
Now that we’ve downloaded our JAR file, we need to add it to our build path. To do this, we’ll need to perform the following steps:
- Click on Project in the menu bar.
- Click on Properties.
- Then, click on Java Build Path.
- After that, click on the Libraries tab.
- On the right-hand panel, click the Add External JAR… button.
- Select the MongoDB Java Driver, which should have a name similar to this:
mongo-java-driver-3.12.0. - Finally, click the Apply and Close button.
Create a Kotlin Project
Next, we’ll be creating a Kotlin project that will connect Kotlin to MongoDB server.
To accomplish this task, we’ll need to do the following:
- Click on File in the menu bar.
- Select New.
- Then, select Kotlin Project.
- In the Project Name text box, provide a meaningful name for the project. For the purposes of our tutorial, we’ll name the project kotlinmongo.
Create a Kotlin Object File
Now that we have successfully created our Kotlin project, we can move forward and create a Kotlin object. We can add code to this object file to connect to an existing MongoDB server.
Let’s look at the steps required for this task:
- First, right-click on the Kotlin project that we created. In our example, the project is named kotlinmongo.
- Select New
- Select Kotlin Object
- Provide a name for the Kotlin object. In this case, we will name it KotlinMongoConnect.
- Finally, click on the Finish button, to create the file.
NOTE: In this example, we’re using a Kotlin Object file. This works for us since we are only going to use a single instance of this application.
Coding the Kotlin MongoDB connection
In the previous section, we created a Kotlin Object file; now, we are going to write the code that will connect Kotlin to MongoDB. Let’s look at how it’s done:
First, open up the KotlinMongoConnect.kt file and append the following code:
1 2 3 4 5 6 7 8 9 10 11 12 | @JvmStatic fun main(args: Array<String>){ var mongoClient: MongoClient? = null try { mongoClient = MongoClient("127.0.0.1", 27017) println("Kotlin is now connected to MongoDB!") } catch (e: MongoException) { e.printStackTrace() } finally { mongoClient!!.close() } } |
The code shown above uses the
@JvmStaticannotation, which tells the compiler to generate an additional method. For more information, you can consult Kotlin’s documentation here.We then use the
fun main(args: Array<String>)as the application’s entry point.After that, we create a MongoClient, providing the host and port to the constructor as arguments. The host argument is the IP address or the hostname, and the port argument is the number where the MongoDB service is running and listening for client requests. In this example, the host is “127.0.0.1” and the port number is 27017.
If no exception is thrown by the application, the code prints the output “Kotlin is now connected to MongoDB!”.
Finally, we close our connection with the MongoDB service using
mongoClient!!.close().
When we test our application, we should see something like this in the Eclipse console:
1 2 3 | Dec 28, 2019 9:59:21 AM com.mongodb.diagnostics.logging.JULLogger log INFO: Cluster created with settings {hosts=[127.0.0.1:27017], mode=SINGLE, requiredClusterType=UNKNOWN, serverSelectionTimeout='30000 ms', maxWaitQueueSize=500} Kotlin connected to MongoDB! |
Conclusion
If you’re looking to harness the power of MongoDB from your Kotlin code, it’s important to know how to get your apps connected to the database. In this article, we provided step-by-step instructions to guide you through the process of connecting Kotlin to MongoDB. With our code examples to guide you, you’ll be able to integrate MongoDB into your own Kotlin development efforts.
The Code
Shown below is all of the Kotlin code we used in this tutorial:
The KotlinMongoConnect.kt
1 2 3 4 5 6 7 8 9 10 11 12 13 14 15 16 17 | import com.mongodb.MongoClient import com.mongodb.MongoException object KotlinMongoConnect { @JvmStatic fun main(args: Array<String>){ var mongoClient: MongoClient? = null try { mongoClient = MongoClient("127.0.0.1", 27017) println("Kotlin connected to MongoDB!") } catch (e: MongoException) { e.printStackTrace() } finally { mongoClient!!.close() } } } |


Pilot the ObjectRocket Platform Free!
Try Fully-Managed CockroachDB, Elasticsearch, MongoDB, PostgreSQL (Beta) or Redis.
Get Started