Build A MongoDB GUI App Using Kivy And Python (Part 1)
Introduction
This article demonstrates how to build a GUI application for MongoDB, that can be deployed to multiple platforms, using the Kivy framework and Python programming language in less than 200 lines of code.
This is Part 1 of a two-part series. This first article will show how to setup your app’s environment, and how to import the MongoDB and Kivy libraries into your Python script, as well as create a Python class for the MongoDB application.
It should be noted, however, that there already exists a desktop GUI application for MongoDB called MongoDB Compass UI, but it’s limited to macOS, Linux, and Windows only, so creating a GUI app using the Kivy framework would allow you to deploy a mobile MongoDB GUI app.
Prerequisites
It’s recommended that you use Python 3 for the example code in this article. The script has not been tested on Python 2, and Python 2.7 is losing support and is now deprecated.
The MongoDB server should be running on your localhost on the same machine that will execute the Python script for the Kivy application. Use the
mongodormongodbcommand, in a terminal or command prompt window, to ensure that the server is running.Going into the mongo Shell with
mongowill also output the port that the server is running on:

The PIP3 package manager for Python 3 should be installed if you haven’t already installed the PyMongo and Kivy packages on the machine running your localhost server. Use the
pip3 -Vcommand to see which version is installed, and thepip3 listcommand to see all of the installed packages.Install the PyMongo distribution using the
pip3command if you haven’t done so already:
1 | pip3 install pymongo |
- Install the Kivy library as well:
1 | pip3 install |
Two ways to create an application with Kivy and Python
Kivy allows you to develop an application in Python, or using a Kv file script (.kv file extension) written in the Kivy language. For the sake of simplicity, this article will focus on just the “pure” Python for Kivy.
There are also three ways to load the Kivy string. You can use the Build.load() or Builder.load_string() methods, or you can have Kivy look for a Kv file automatically.
Use the Builder.load() method to load a Kivy string
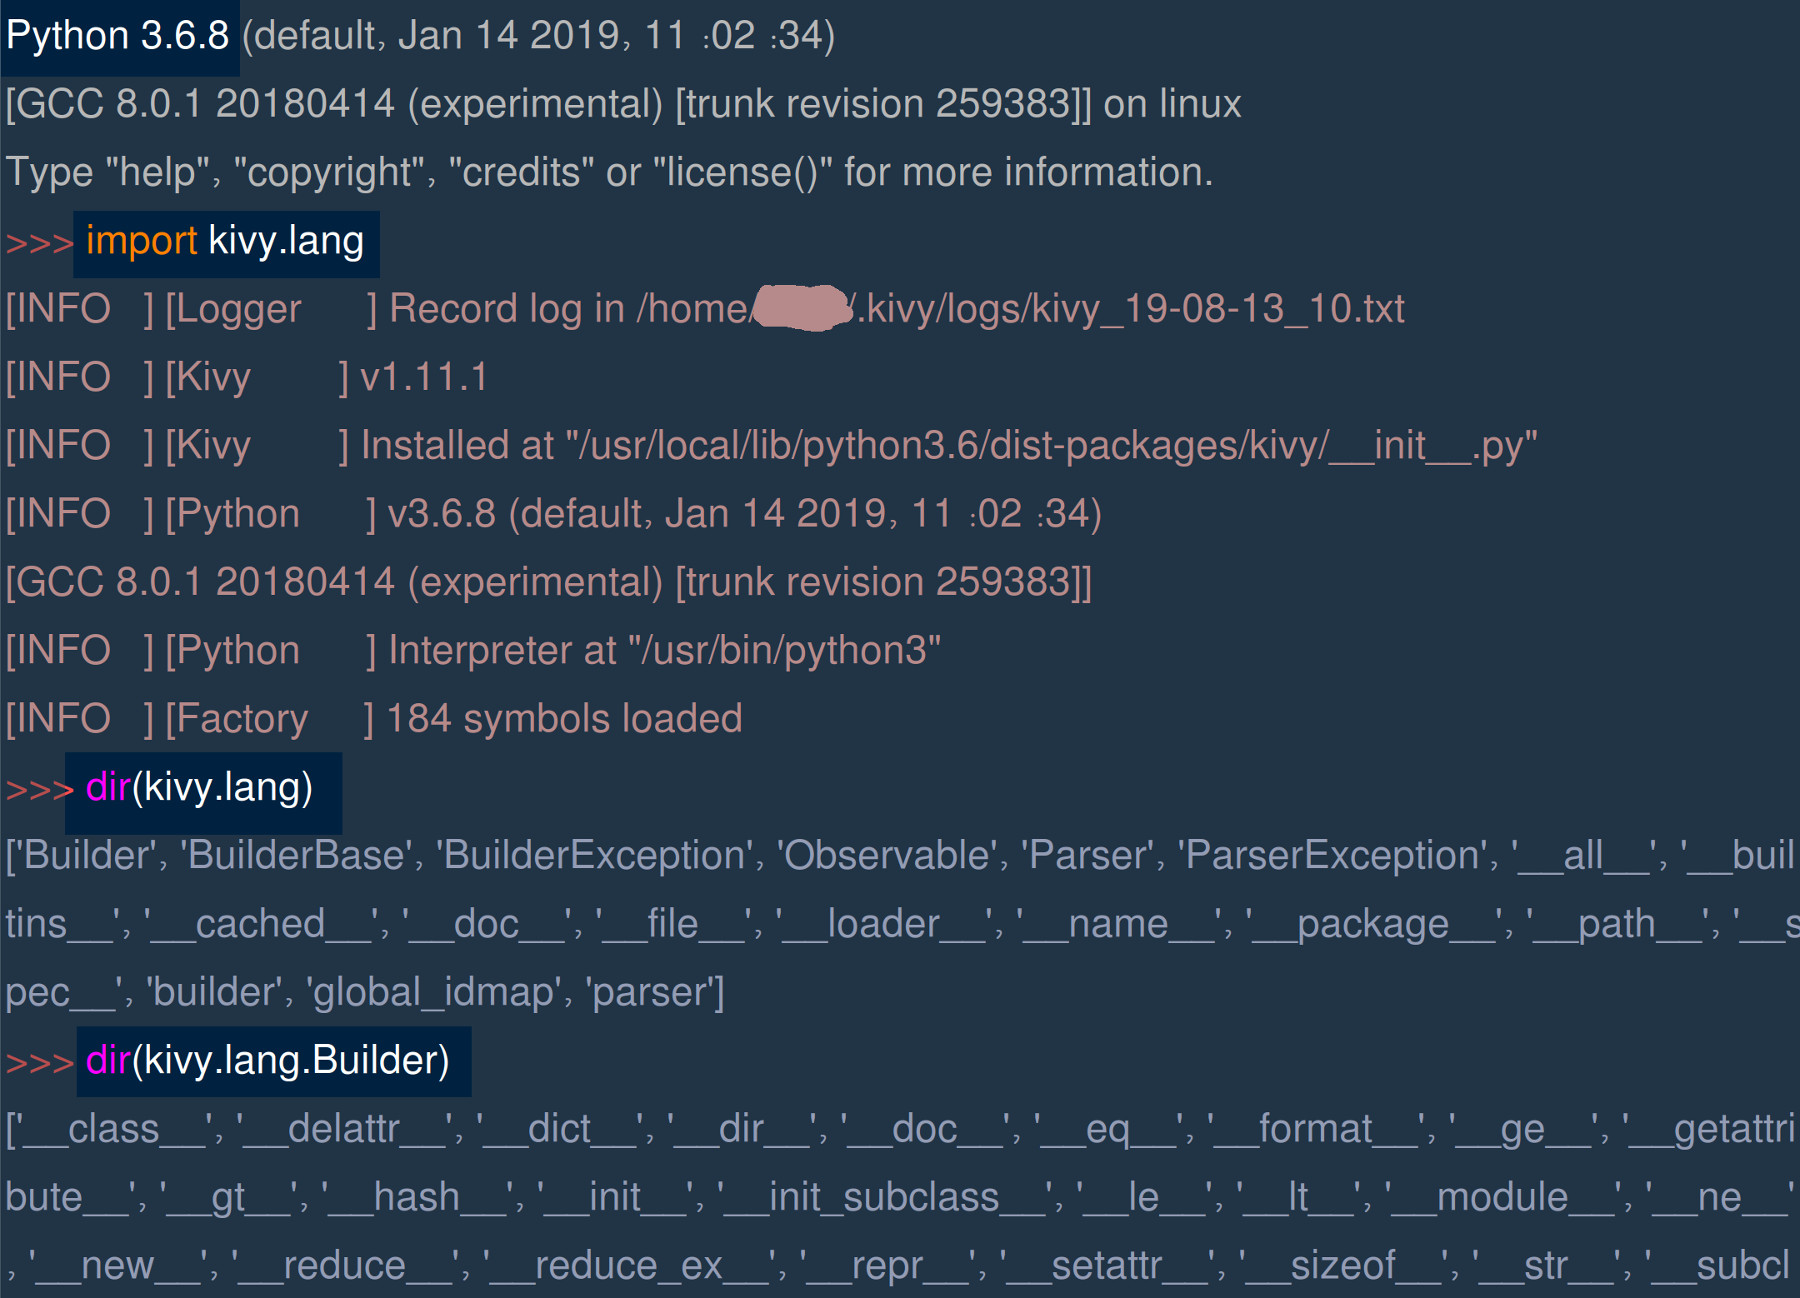
If you’d like to learn the Kivy and language, and import it into your application’s Python script, just use Kivy’s Builder() method found in the kivy.lang library:
1 2 3 4 5 6 7 8 9 | from kivy.lang import Builder Builder.load_string(''' <MainApp>: Label: text: 'ObjectRocket AppLabel' Button: text: 'CLICK ME' ''') |
Use the Builder.load() method to load the Kv file
You can also pass a string containing the file name and file path to the Kv file to the Builder library’s load_file() method:
1 2 | from kivi.lang import Builder Builder.load_file('directory/path/to/kvfile.kv') |
Have Kivy load the Kv file automatically using the app name
Kivy will get Kv file automatically if the filename is the same as your app’s class name, but in lowercase letters and without App at the end. For example, if the name of the app is MongoApp then the .kv file should be mongo.kv, and it should be located in the same directory.
Setup the Python script and the Kivy project directory
You can change the title for the application by
Create a directory for the MongoDB Kivy app using the mkdir command if you’re using a UNIX-based terminal:
1 | mkdir mongo_app |
Change into the directory (cd mongo_app) and use the touch command to create a Python script for the Kivy project:
1 | touch main.py |
NOTE: The commonly used naming convention for Python project directory and script names is all lowercase with hyphens (_) separating the words.
Import the Kivy and PyMongo libraries for the MongoDB Python application
Once you’ve created the Kivy directory and Python script you should open the script in your favorite text editor or IDE with Python syntax support and include the following code at the top to import the necessary Kivy app and uix libraries, and theMongoClient library as well:
1 2 3 4 5 6 7 8 | # import the necessary Kivy libraries from kivy.app import App from kivy.uix.button import Button from kivy.uix.label import Label from kivy.uix.boxlayout import BoxLayout # import the MongoClient class from pymongo import MongoClient, errors |
NOTE: Import the errors library from PyMongo so that we can catch any ServerSelectionTimeoutError exceptions while connecting to the MongoDB server.
Check if MongoDB is running with the PyMongo library for Python
Part of the application’s functionality is to check that the connection to MongoDB was successful before making any further API calls to get database and collection data. The following section shows how one can instantiate a PyMongo client instance and use it to check the MongoDB server status in order to display that information in the GUI window.
Declare the MongoDB domain and port variables for the client’s ‘host’
Pass a string to the DOMAIN global, and an integer to the PORT object, that can later be concatenated into a string that will be used to connect to MongoDB:
1 2 3 | # global variables for MongoDB host (default port is 27017) DOMAIN = 'localhost:' PORT = 27017 |
Declaring an instance of PyMongo’s MongoClient() method library
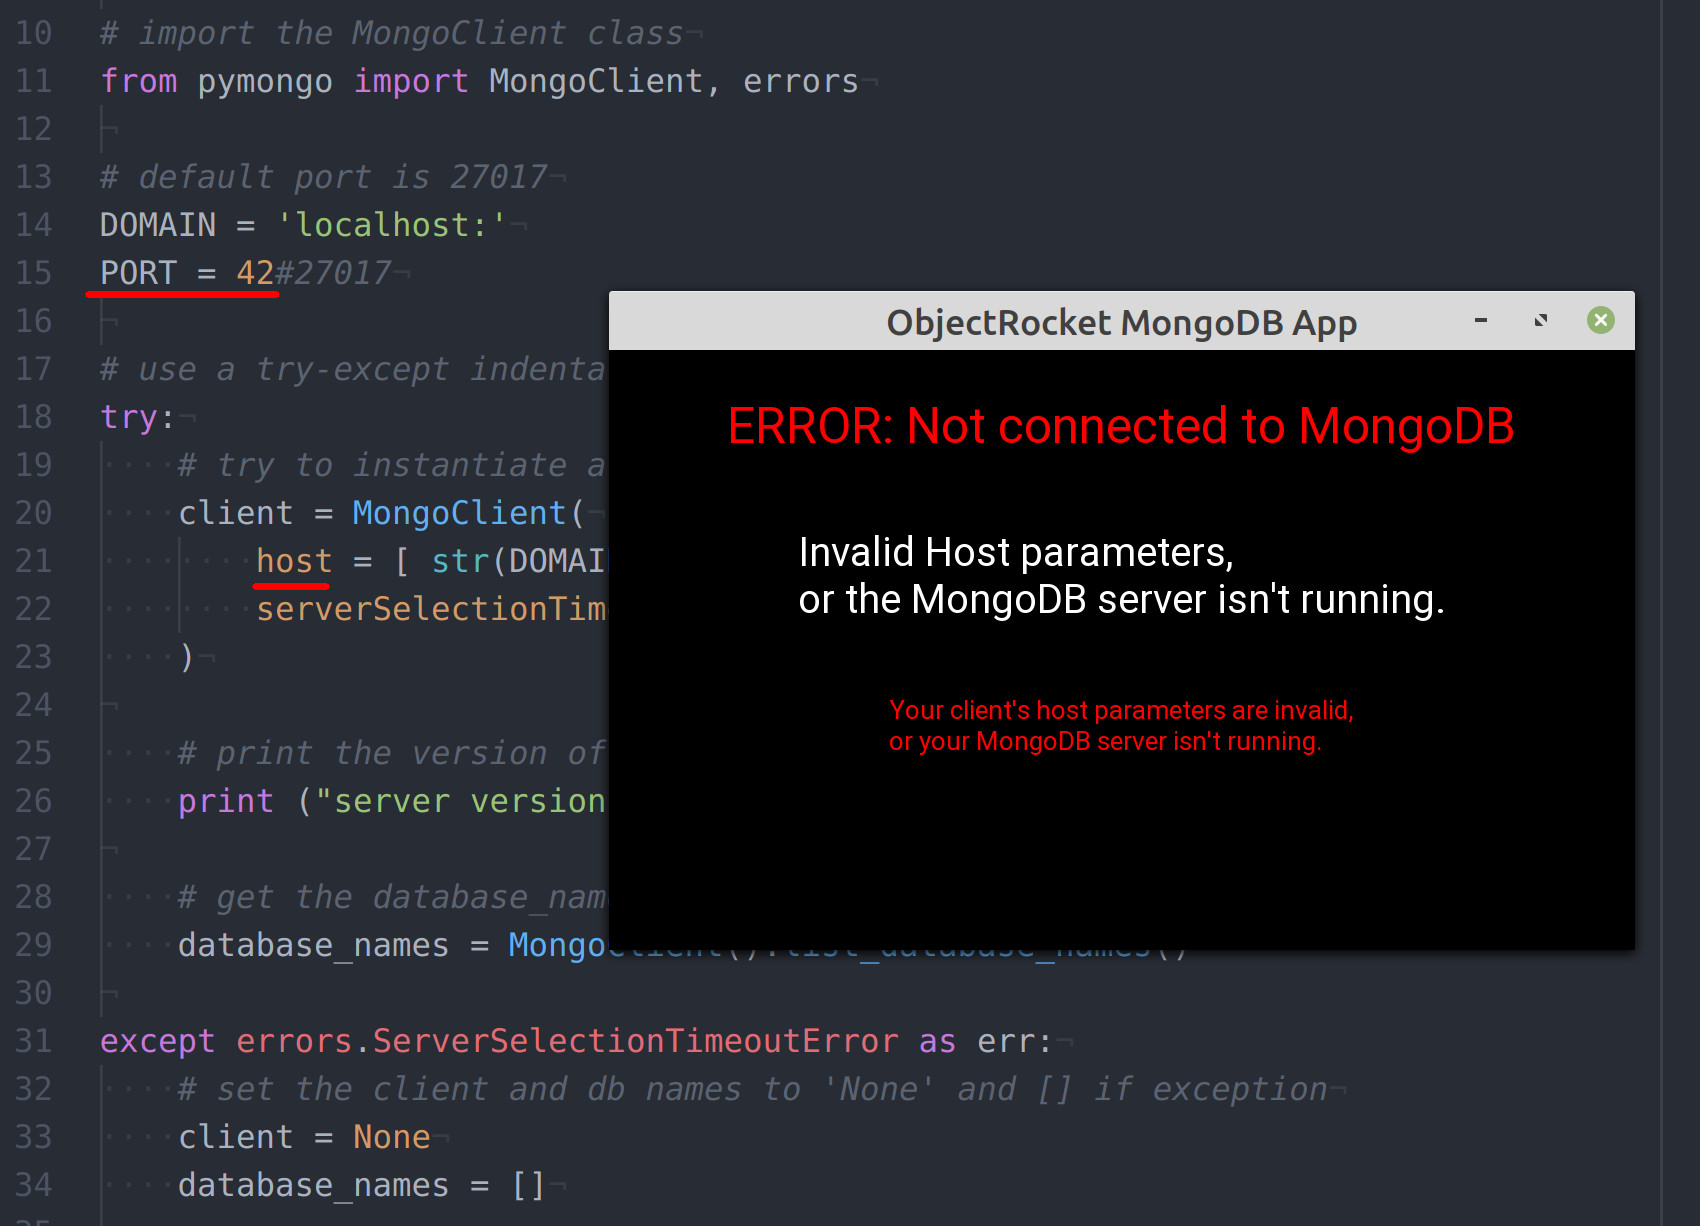
This code uses a try-except indentation block to declare an instance of the MongoClient() library. The server_info() method call should raise a ServerSelectionTimeoutError exception if the host parameters are incorrect, or if the server is not running:
1 2 3 4 5 6 7 8 9 10 | # use a try-except indentation to catch MongoClient() errors try: # try to instantiate a client instance client = MongoClient( host = [ str(DOMAIN) + str(PORT) ], serverSelectionTimeoutMS = 3000 # 3 second timeout ) # print the version of MongoDB server if connection successful print ("server version:", client.server_info()["version"]) |
Catch any MongoDB server connection exceptions returned by PyMongo
if PyMongo cannot connect to MongoDB, using the specified domain and port host parameters, then the above code will return a NoneType (None) object, instead of the MongoClient object as intended:
1 2 3 4 5 6 | except errors.ServerSelectionTimeoutError as err: # set the client and db names to 'None' and [] if exception client = None # catch pymongo.errors.ServerSelectionTimeoutError print ("pymongo ERROR:", err) |
We can use the None value of the client, later on in the Kivy application, to inform the user that the connection failed.
Declare a Kivy App Python class for the MongoDB GUI application
Declare a new class with Python’s class keyword for the Kivy application by passing the entire App library to the class as an argument.
1 2 3 4 5 | # create a new class for the Kivy MongoDB app class MongoApp(App): # define the build() function for the app def build(self): |
NOTE: Make sure that the name in the class declaration matches that of the one used for the App.run() method call at the end of the script.
Assign new values to the Kivy App’s class attributes
In Python, both classes and functions have a “self” keyword, but for classes it’s designed to represent an instance, or a stand-in of the class itself. The following example code uses self to access the Kivy App class’s attributes:
1 2 3 4 5 | # change the app's attributes self.title = 'ObjectRocket MongoDB App' # concatenate the host's domain and port variables self.mongo_domain = str(DOMAIN) + str(PORT) |
NOTE: Declare a new attribute for the Kivy-MongoDB App class called mongo_domain that you can use to access the MongoDB server’s host string used to instantiate the client instance.
The App class has a title attribute that allows you to change the application’s title name using a string assignment.
Select the Kivy App layout by assigning a new string value to
Select the Kivy App layout by assigning a new string value to the BoxLayout() method’s orientation parameter.
1 2 | # set the layout for the Kivy application self.layout = BoxLayout(orientation='vertical') |
This example application uses the "vertical" layout for the sake of simplicity. It will “stack” the widgets vertically, on top of one another, as they are added using the add_widget() method call.
Create a Kivy label widget for the MongoDB client status
Instantiate some Label() objects for the MongoDB domain host and then add the widget to the layout using the App class’s add_widget() method:
1 2 3 4 5 6 7 | # change font title labels db_label = Label(font_size=50) domain_label = Label(font_size=40) # add the labels to the layout self.layout.add_widget(db_label) self.layout.add_widget(domain_label) |
Evaluate the MongoDB client instance and change the Kivy widgets’ text
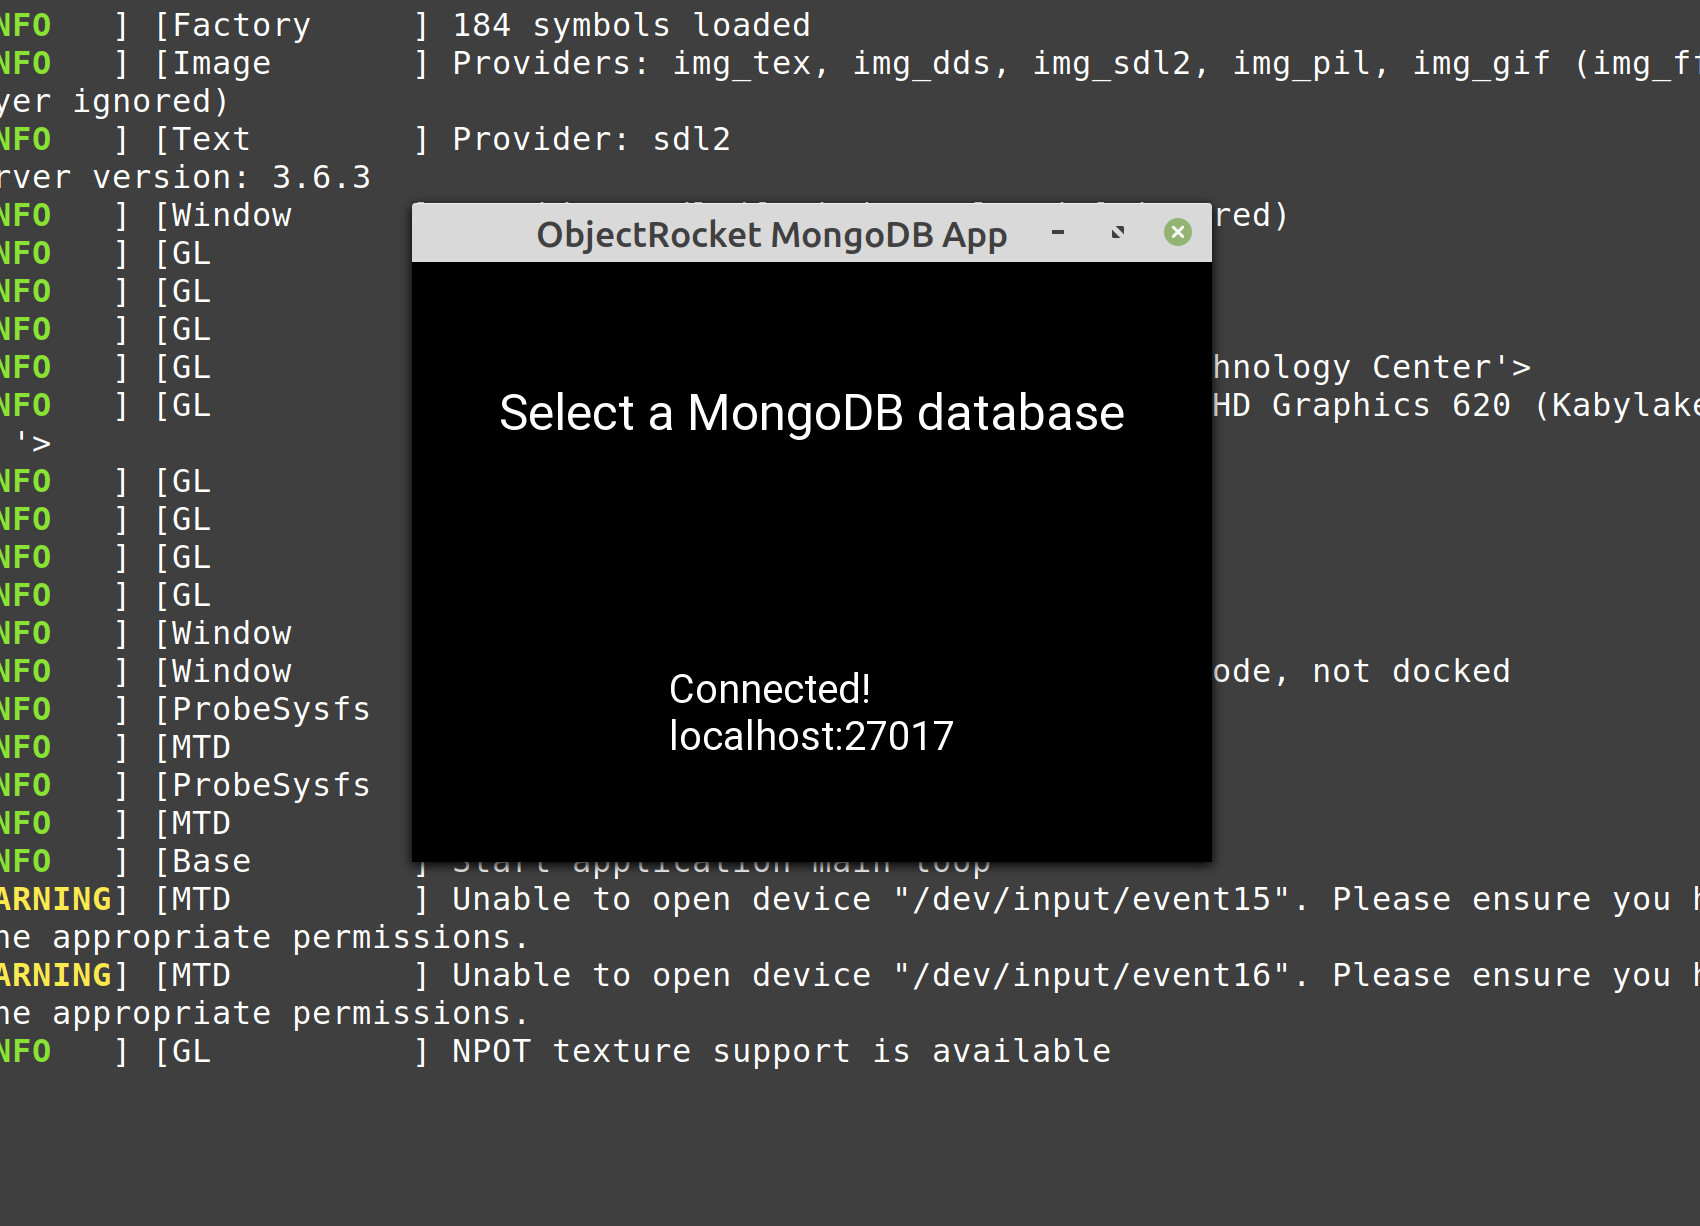
If the client instance is not None change the label’s text attribute to display the MongoDB servers’ domain information:
1 2 3 4 5 6 7 8 9 | # eval connection to MongoDB with global client instance if client != None: domain_label.text = "Connected!\n" + str(self.mongo_domain) db_label.text = "Select a MongoDB database" else: # inform the user if the connection to MongoDB failed domain_label.text = "Your client's host parameters are invalid," domain_label.text += "\nor your MongoDB server isn't running." db_label.text = "ERROR: Not connected to MongoDB" |
Return the layout object at the end of the build() function
Make sure to return the App class’s layout object containing all of the widgets at the end of the Kivy build() method, and call the app using the run() method:
1 2 3 4 5 | # return the layout at end of App class return self.layout # run the MongoDB Kivy app class MongoApp().run() |
Conclusion
Save the code, and run the Python script using the python3 command in a terminal or command prompt window inside the project’s directory:
1 | python3 main.py |
This code is obviously not the complete code for the Kivy application. The next part of this series will demonstrate how to make API calls to the MongoDB server, using the PyMongo package driver, inside of the Kivy app’s class.
Just the Code
1 2 3 4 5 6 7 8 9 10 11 12 13 14 15 16 17 18 19 20 21 22 23 24 25 26 27 28 29 30 31 32 33 34 35 36 37 38 39 40 41 42 43 44 45 46 47 48 49 50 51 52 53 54 55 56 57 58 59 60 61 62 63 64 65 66 67 68 69 70 71 72 | #!/usr/bin/env python3 #-*- coding: utf-8 -*- # import the necessary Kivy libraries from kivy.app import App from kivy.uix.button import Button from kivy.uix.label import Label from kivy.uix.boxlayout import BoxLayout # import the MongoClient class from pymongo import MongoClient, errors # global variables for MongoDB host (default port is 27017) DOMAIN = 'localhost:' PORT = 27017 # use a try-except indentation to catch MongoClient() errors try: # try to instantiate a client instance client = MongoClient( host = [ str(DOMAIN) + str(PORT) ], serverSelectionTimeoutMS = 3000 # 3 second timeout ) # print the version of MongoDB server if connection successful print ("server version:", client.server_info()["version"]) except errors.ServerSelectionTimeoutError as err: # set the client and db names to 'None' and [] if exception client = None # catch pymongo.errors.ServerSelectionTimeoutError print ("pymongo ERROR:", err) # create a new class for the Kivy MongoDB app class MongoApp(App): # define the build() function for the app def build(self): # change the app's attributes self.title = 'ObjectRocket MongoDB App' # concatenate the host's domain and port variables self.mongo_domain = str(DOMAIN) + str(PORT) # set the layout for the Kivy application self.layout = BoxLayout(orientation='vertical') # change font title labels db_label = Label(font_size=50) domain_label = Label(font_size=40) # add the labels to the layout self.layout.add_widget(db_label) self.layout.add_widget(domain_label) # eval connection to MongoDB with global client instance if client != None: domain_label.text = "Connected!\n" + str(self.mongo_domain) db_label.text = "Select a MongoDB database" else: # inform the user if the connection to MongoDB failed domain_label.text = "Your client's host parameters are invalid," domain_label.text += "\nor your MongoDB server isn't running." db_label.text = "ERROR: Not connected to MongoDB" # return the layout at end of App class return self.layout # run the MongoDB Kivy app class MongoApp().run() |


Pilot the ObjectRocket Platform Free!
Try Fully-Managed CockroachDB, Elasticsearch, MongoDB, PostgreSQL (Beta) or Redis.
Get Started