How To Install And Use The MongoEngine Wrapper For PyMongo
Introduction
When you’re working with Python and MongoDB, you want your code to be as clean and elegant as possible. Using MongoEngine can help you write code that’s easy to read and maintain. The MongoEngine Python library is a light-weight wrapper for PyMongo, which is the Python MongoDB driver. This library allows users to update and set up JSON mapping schemas for MongoDB documents using Python dictionaries; it also has access to all of the methods and attributes of the PyMongo client library for MongoDB. In this article, we’ll show you how to install and use the MongoEngine wrapper for PyMongo.
Prerequisites
Before we dive into the example code, let’s take a moment to go over the prerequisites for this task. There are a few key system requirements that must be met:
- MongoDB must be installed and running. Use
pstogrepfor instances of MongoDB running on the server:
1 | ps -e | grep mongo |
You’ll need to have a basic understanding of how to use Python and how to run a Python script. It’s also helpful to be somewhat familiar with the PyMongo client driver for MongoDB.
The examples shown in this article use Python 3. Writing your own scripts with Python 3 is recommended since Python 2.7 is deprecated.
The
pymongolibrary doesn’t need to be imported into the script to use MongoEngine, but it does need to be installed on the machine or server where your script is running. You can use thepip3command to install the PyMongo library:
1 | pip3 install pymongo |
>NOTE: MongoEngine requires that pymongo v3.5 or above be installed.
Install the MongoEngine wrapper for PyMongo
Now that we’ve set up all the system requirements, we can move forward with installing MongoEngine. You can use Python’s PIP installer to install the MongoEngine library. Use the -U flag to upgrade the package, if possible:
1 | pip3 install -U mongoengine |
Use the pip command instead if you’re installing MongoEngine for Python 2:
1 | pip3 install -U mongoengine |
Check the version of PyMongo and MongoEngine
You can use the following code to get the installed version of the PyMongo low-level client library:
1 2 | import pymongo pymongo.version |
Similarly, you can access the __version__ attribute of the mongoengine class to check MongoEngine’s version:
1 2 | import mongoengine mongoengine.__version__ |
Be sure to import Python’s datetime library if you plan to create a document class using MongoEngine’s DateTimeField:
1 | import datetime |
Connect to a MongoDB server using MongoEngine
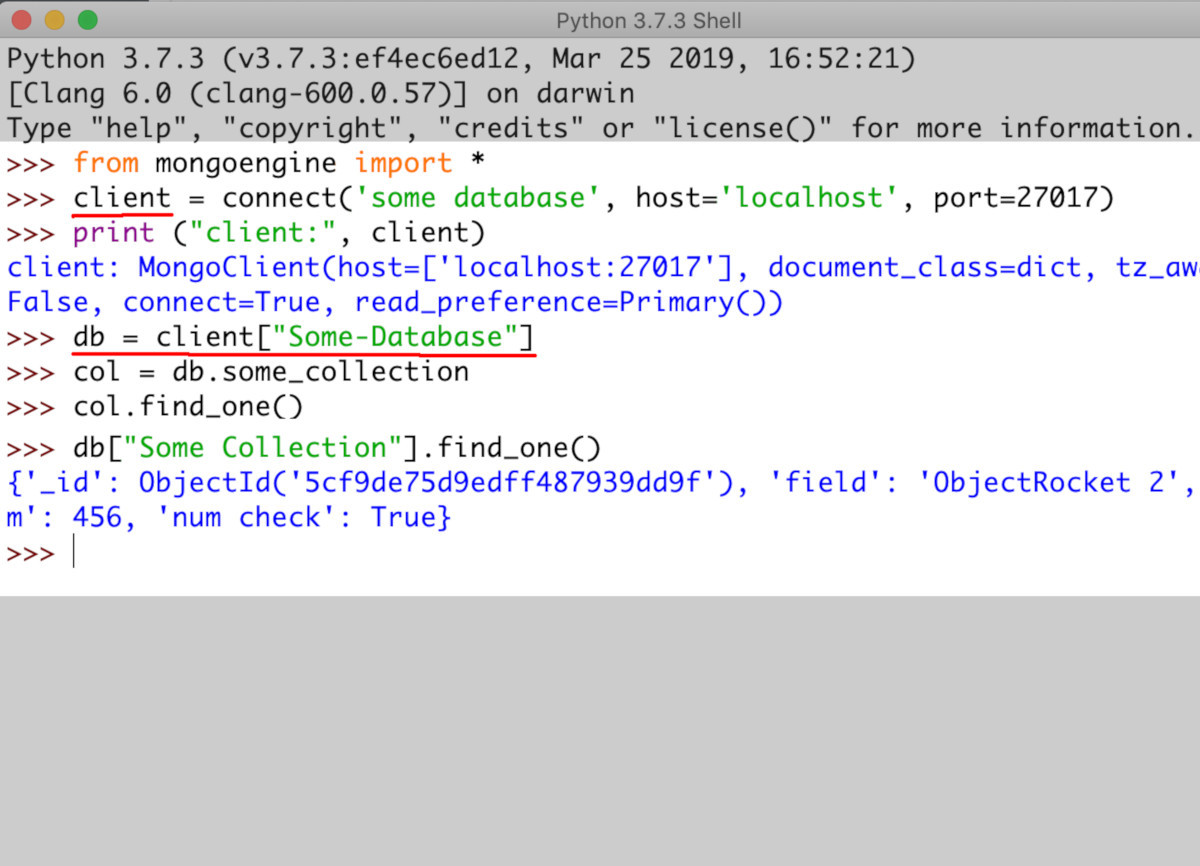
After we include all our necessary import statements, we can use MongoEngine’s connect() method to connect to the MongoClient class just like we would with the PyMongo library:
1 2 3 4 5 6 7 8 | # import all of the MongoEngine classes from mongoengine import * # create a new PyMongo client client = connect('Some-Database', host='localhost', port=27017) # the connection is like a PyMongo client instance print ("client:", client) |
>NOTE: By default, MongoEngine uses the project name as the name of the database. Be sure that the name you pass to the the connect() method doesn’t have any spaces or other characters that are invalid for MongoDB database names. If the name contains an invalid character, you’ll get a pymongo.errors.InvalidName exception when you try to index documents using MongoEngine.
For the connect() method, the first parameter is the name of the database on the MongoDB server, and the other host and port parameters are optional. If nothing is passed to the optional parameters, MongoEngine will connect to http://localhost:27017 by default.
MongoEngine creates a MongoClient client instance like PyMongo
This method call returns a pymongo.mongo_client.MongoClient class instance, which is simply the MongoClient class from the PyMongo library. Let’s try using this class instance to access databases, collections, and documents just like we would with PyMongo:
1 2 3 4 5 6 | # create a MongoDB database instance db = client["Some-Database"] # create a MongoDB collection instance and find a doc col = db["Some Collection"] col.find_one() |
Create a MongoClient instance using an alias
You can use the connect() method to create multiple instances of database clients and organize them by aliases. This is accomplished by passing an alias option to connect():
1 2 3 4 5 6 | # import the mongoengine Python library import mongoengine # create 2 separate connections to MongoDB db1 = mongoengine.connect('Some-Database', alias='db1') db2 = mongoengine.connect('another_database', alias='db2') |
Be sure to register the alias using mongoengine.register_connection(), as shown below:
1 2 3 | # register the databases mongoengine.register_connection('Some-Database') mongoengine.register_connection('another_database') |
Define a MongoEngine model for a MongoDB document
In our next example, we’ll see how to define a MongoEngine model for a document in MongoDB. A MongoEngine model is a bit like a Django table model, except that a MongoEngine model defines a collection. The class that is used to create a MongoDB collection inherits its attributes and properties from the MongoEngine library’s Document class.
Let’s look at an example class that creates a document with both a string field and a MongoDB array:
1 2 3 4 5 6 | # inherits the MongoEngine 'Document' class class CollectionName( Document ): text = StringField(required=True, max_length=128) keywords = ListField(StringField(max_length=50)) date = DateTimeField(default=datetime.datetime.now) meta = {'allow_inheritance': True} |
Please note that the collection’s name, which is generated by MongoDB during document insertion, is created from the CollectionName class name. However, it is given an underscore and is converted to all lowercase, so that the collection’s name ultimately ends up being collection_name.
Inserting MongoDB documents using MongoEngine in Python
In MongoEngine, subclasses are used to create new MongoDB document fields. To do this, simply pass the class name of the collection when you construct a new subclass for the field. Let’s take a look at an example that creates a UUID field for the collection’s documents:
1 2 3 4 | # inherits the CollectionName's class class NewDoc(CollectionName): # make sure to have `import uuid` at top uuid = StringField(required=True) |
Instantiate a class instance and call the save() method to insert the document into a MongoDB collection
Next, let’s create a new instance of the CollectionName class, which we’ll use to create a new document instance. Be sure to pass all the appropriate data to the class’s parameters:
1 2 3 4 5 6 7 | # insert a MongoDB document using MongoEngine doc1 = NewDoc( text = 'ObjectRocket', keywords = [], date = datetime.datetime.now(), uuid = str( uuid.uuid4() ) # create UUID for new doc ) |
At this point, the document isn’t yet inserted into the MongoDB collection. We just need to call the class instance’s save() method to insert the document into the collection_name class:
1 2 | # call the 'save()` method to insert document doc1.save() |
With this code in place, a new document will be inserted every time the script is run.
You can create a PyMongo instance of the database and use the list_collection_names() method to confirm that the collection has been created, or you could just open the MongoDB Compass UI to verify that the collection was created and a document was inserted:

Making MongoDB queries using MongoEngine filters
Each MongoEngine collection class has an object attribute, and that attribute has several methods and attributes of its own. We can use the filter() method for querying MongoDB documents:
1 | docs = CollectionName.objects.filter(some_field="search for this") |
The filter() method returns a list of the CollectionName class’s attributes—- each one represents a document that matches the query criteria. If no document matches are found, the method returns just an empty list ([]).
Iterate the list of MongoDB document instances returned by the MongoClient filter() method
You can use either for or enumerate() to iterate over a MongoEngine class instance, and the attributes of each document can be accessed during the iteration:
1 2 3 4 5 6 7 | # query documents in the MongoEngine collection class docs = CollectionName.objects.filter(text="ObjectRocket") # iterate the queried documents for num, doc in enumerate(docs): print ("UUID:", doc.uuid) print (num, "documents found.") |
An individual document instance can also be accessed directly from the list of returned documents:
1 2 3 4 | # make sure the filter() method returned at least one doc if len(docs) > 0: # print the UUID of the first doc in the list print ("UUID:", docs[0].uuid) |
Updating MongoDB document fields using the MongoEngine instance attribute
Python’s setattr() function can be used to change the values of the class instance object. This comes in handy for writing custom functions to update MongoDB documents using MongoEngine. Let’s look at an example:
1 | setattr(docs[0], "keywords", ['test 1', 'test 2']) |
It’s also possible to just access the attribute directly and make changes that way:
1 | docs[0].keywords = ['hello', 'world'] |
When you make changes, be sure to call the save() method so that the document gets updated on the MongoDB server:
1 | docs[0].save() |
Conclusion
Although PyMongo offers a quick and efficient way to interact with MongoDB in a Python script, there are times when an additional layer of abstraction would make it a bit easier to write clean, easy-to-maintain code. That’s where MongoEngine comes into play, acting as a wrapper on top of PyMongo and allowing you to define schemas for your document data. With the instructions provided in this tutorial, you’ll be ready to install and use MongoEngine in your own Python scripts.
Just the Code
Throughout this article, we’ve looked at the code section by section. The complete Python script is shown below:
1 2 3 4 5 6 7 8 9 10 11 12 13 14 15 16 17 18 19 20 21 22 23 24 25 26 27 28 29 30 31 32 33 34 35 36 37 38 39 40 41 42 43 44 45 46 47 48 49 50 51 52 53 54 55 56 57 58 59 | # import all of the MongoEngine classes from mongoengine import * # import the Datetime and UUID libraries for Python import datetime, uuid # create a new PyMongo client client = connect('Some-Database', host='localhost', port=27017) # the connection is like a PyMongo client instance print ("client:", client) # inherits the MongoEngine 'Document' class class CollectionName( Document ): text = StringField(required=True, max_length=128) keywords = ListField(StringField(max_length=50)) date = DateTimeField(default=datetime.datetime.now) meta = {'allow_inheritance': True} # inherits the CollectionName's class class NewDoc(CollectionName): # make sure to have `import uuid` at top uuid = StringField(required=True) # insert a MongoDB document using MongoEngine doc1 = NewDoc( text = 'ObjectRocket', keywords = ['object', 'rocket'], date = datetime.datetime.now(), uuid = str( uuid.uuid4() ) # create UUID for new doc ) # insert another MongoDB document using MongoEngine doc2 = NewDoc( text = 'ObjectRocket FTW!!', keywords = ['object', 'rocket', 'services'], date = datetime.datetime.now(), uuid = str( uuid.uuid4() ) # create UUID for new doc ) # save the docs to write changes to MongoDB server doc1.save() doc2.save() # use the filter() method to query MongoEngine docs docs = CollectionName.objects.filter(text="ObjectRocket") # make sure the filter() method returned at least one doc if len(docs) > 0: # print the UUID of the first doc in the list print ("UUID:", docs[0].uuid) # iterate the list of doc instances for num, doc in enumerate(docs): print ("date:", doc.date) print (num, "documents found.") # change attributes of a doc setattr(docs[0], "keywords", ['test 1', 'test 2']) |

Pilot the ObjectRocket Platform Free!
Try Fully-Managed CockroachDB, Elasticsearch, MongoDB, PostgreSQL (Beta) or Redis.
Get Started